Python Tutorial
Setup
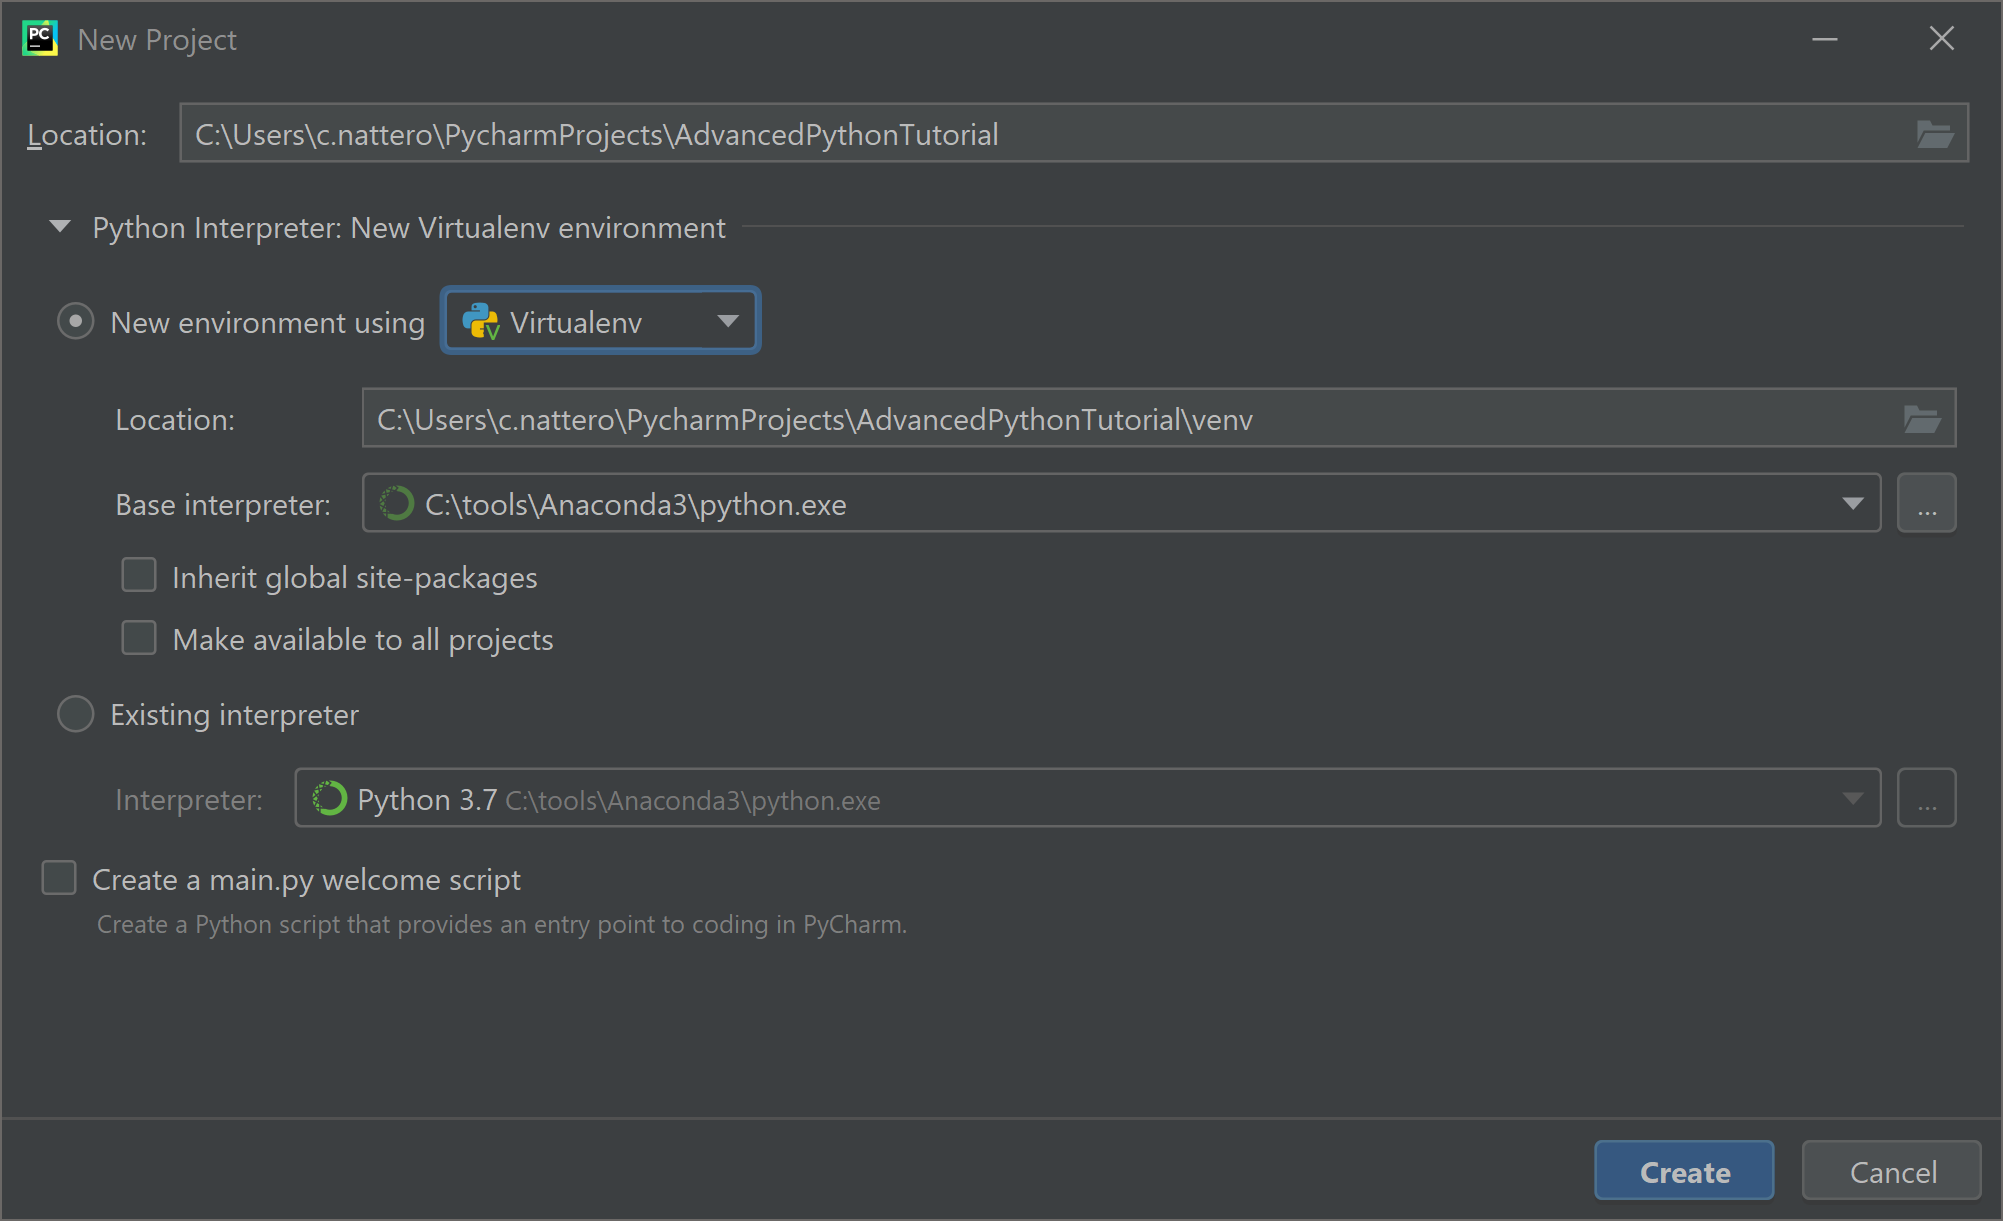
Open PyCharm and start a new project.

Call it “Advanced Python Tutorial” (or however you wish, just remember to be coherent). You may wish to create a new virtual environment (here we derive it from Python 3.8). Uncheck the option for creating a “main.py” welcome script (or, at least, remember to delete it later on).
Let’s install the library we need. In the terminal write:
pip install wasdi
and press enter
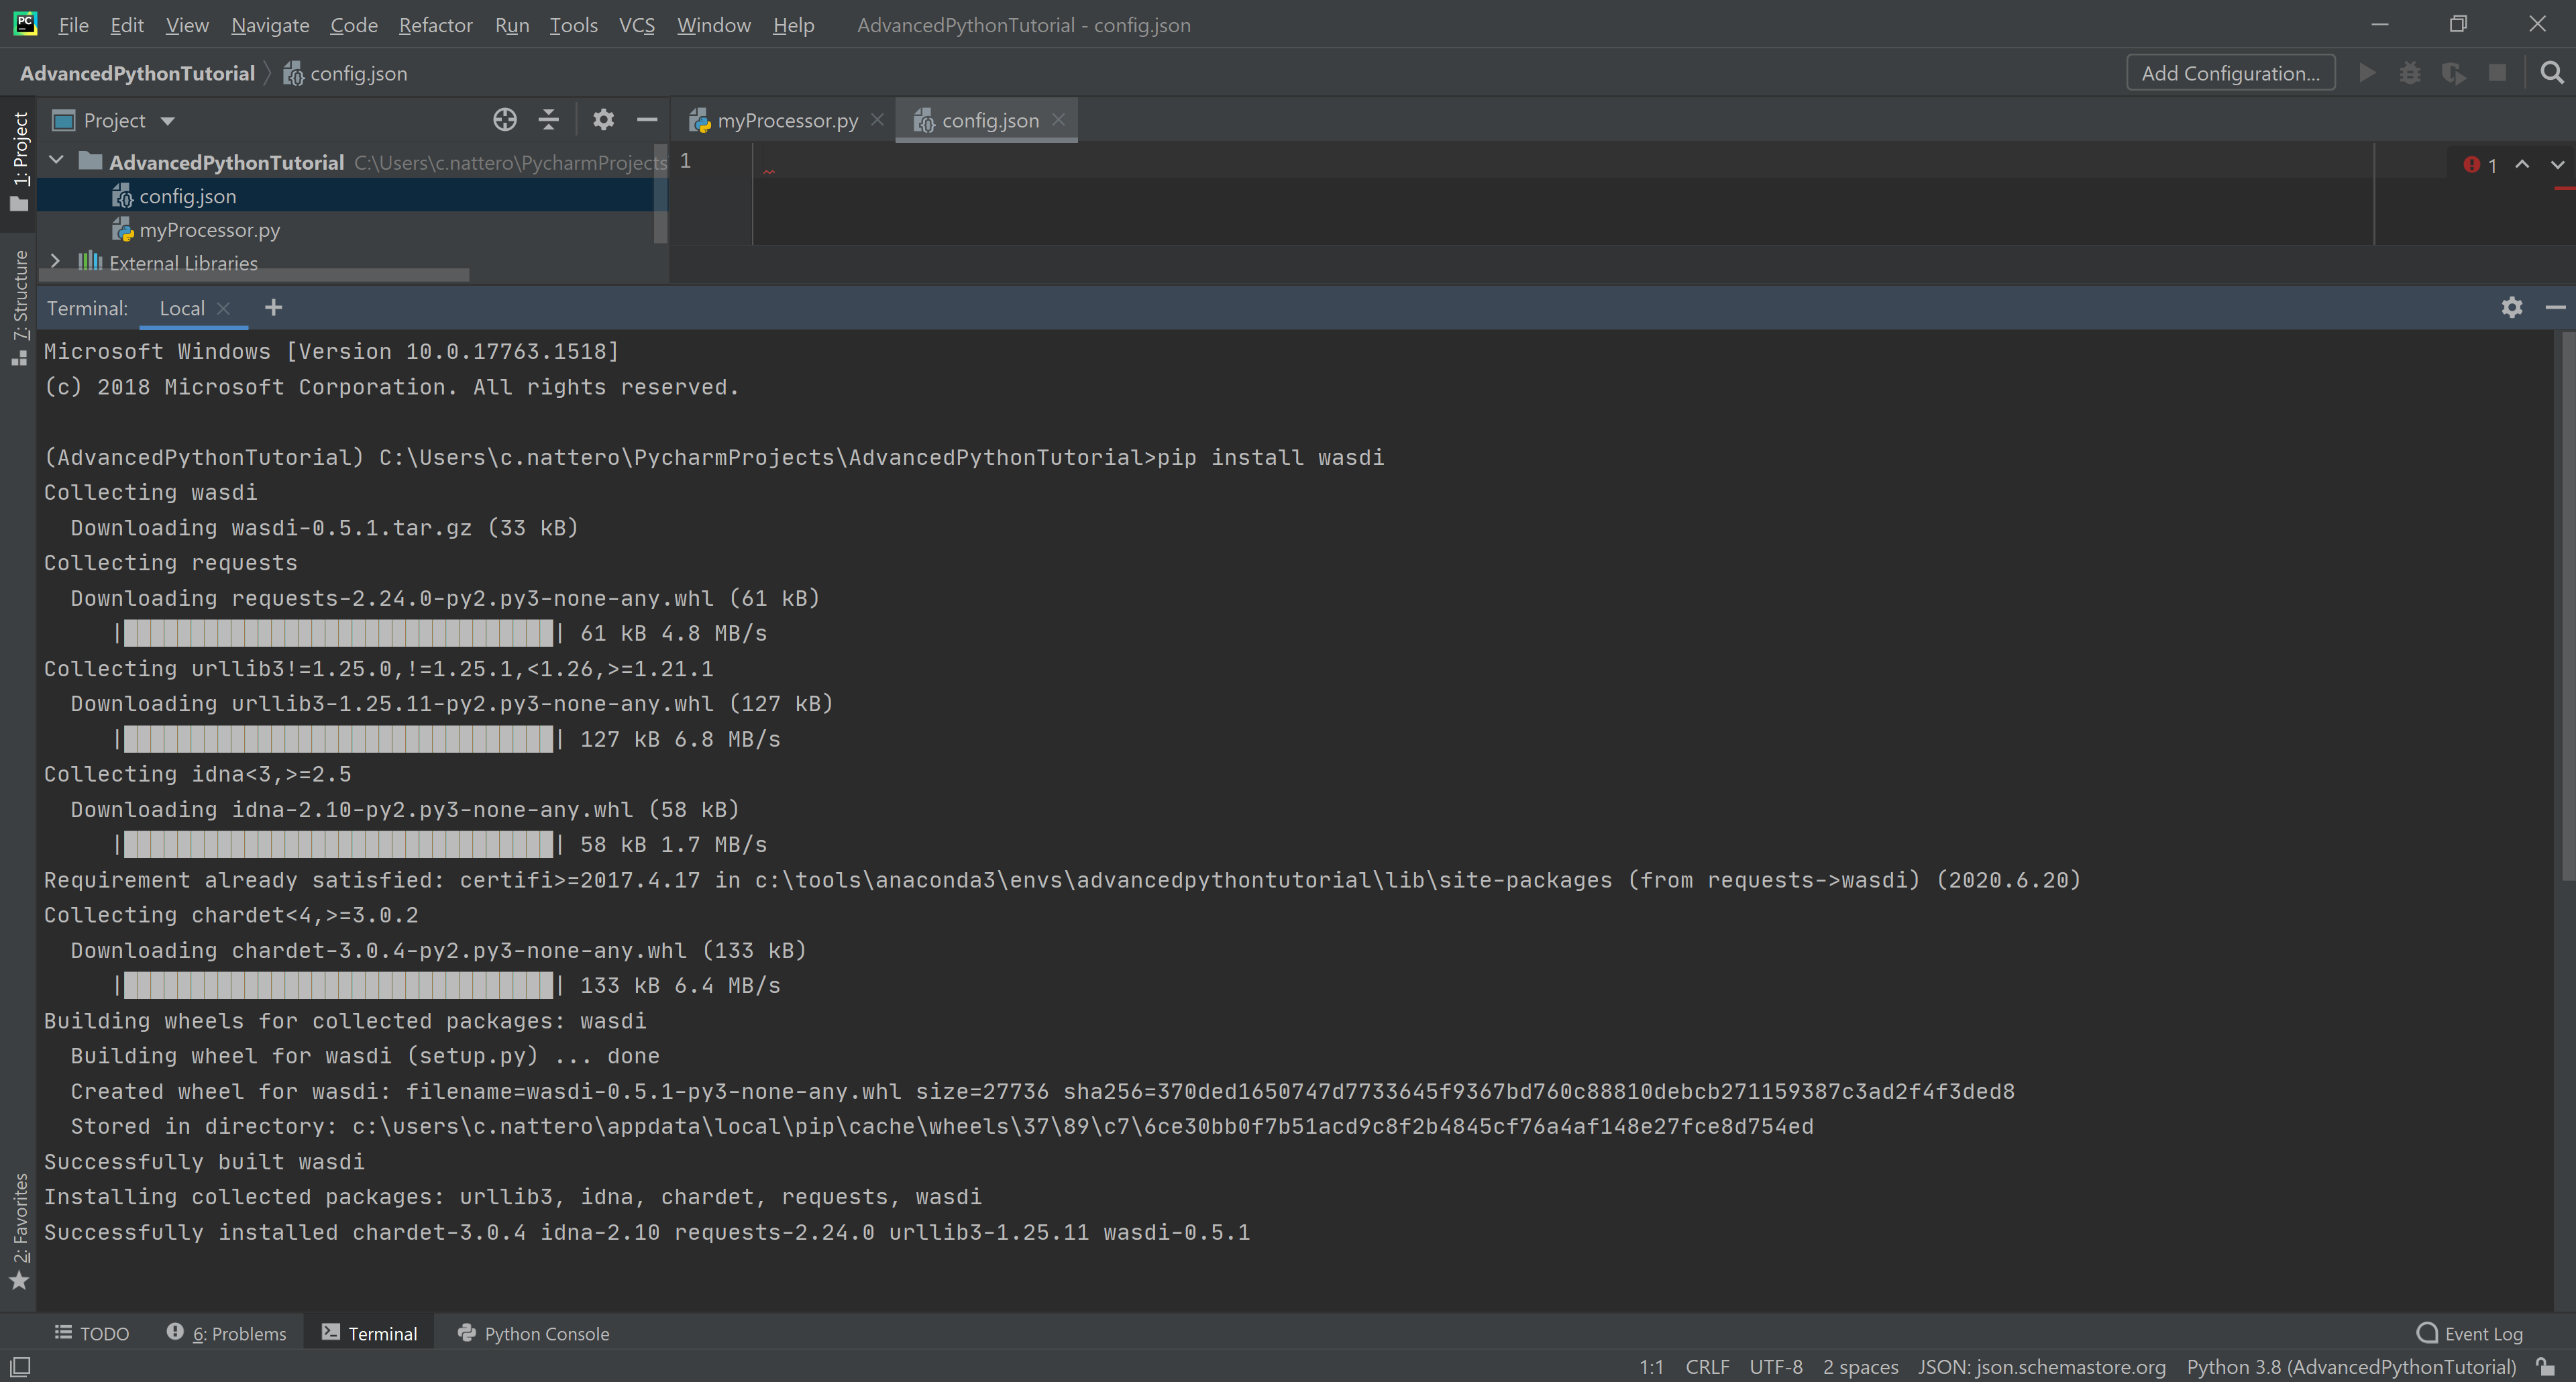
hint: if you previously installed wasdi, you may wish to update it by adding the –upgrade flag, i.e.:
pip install --upgrade wasdi
Create first files
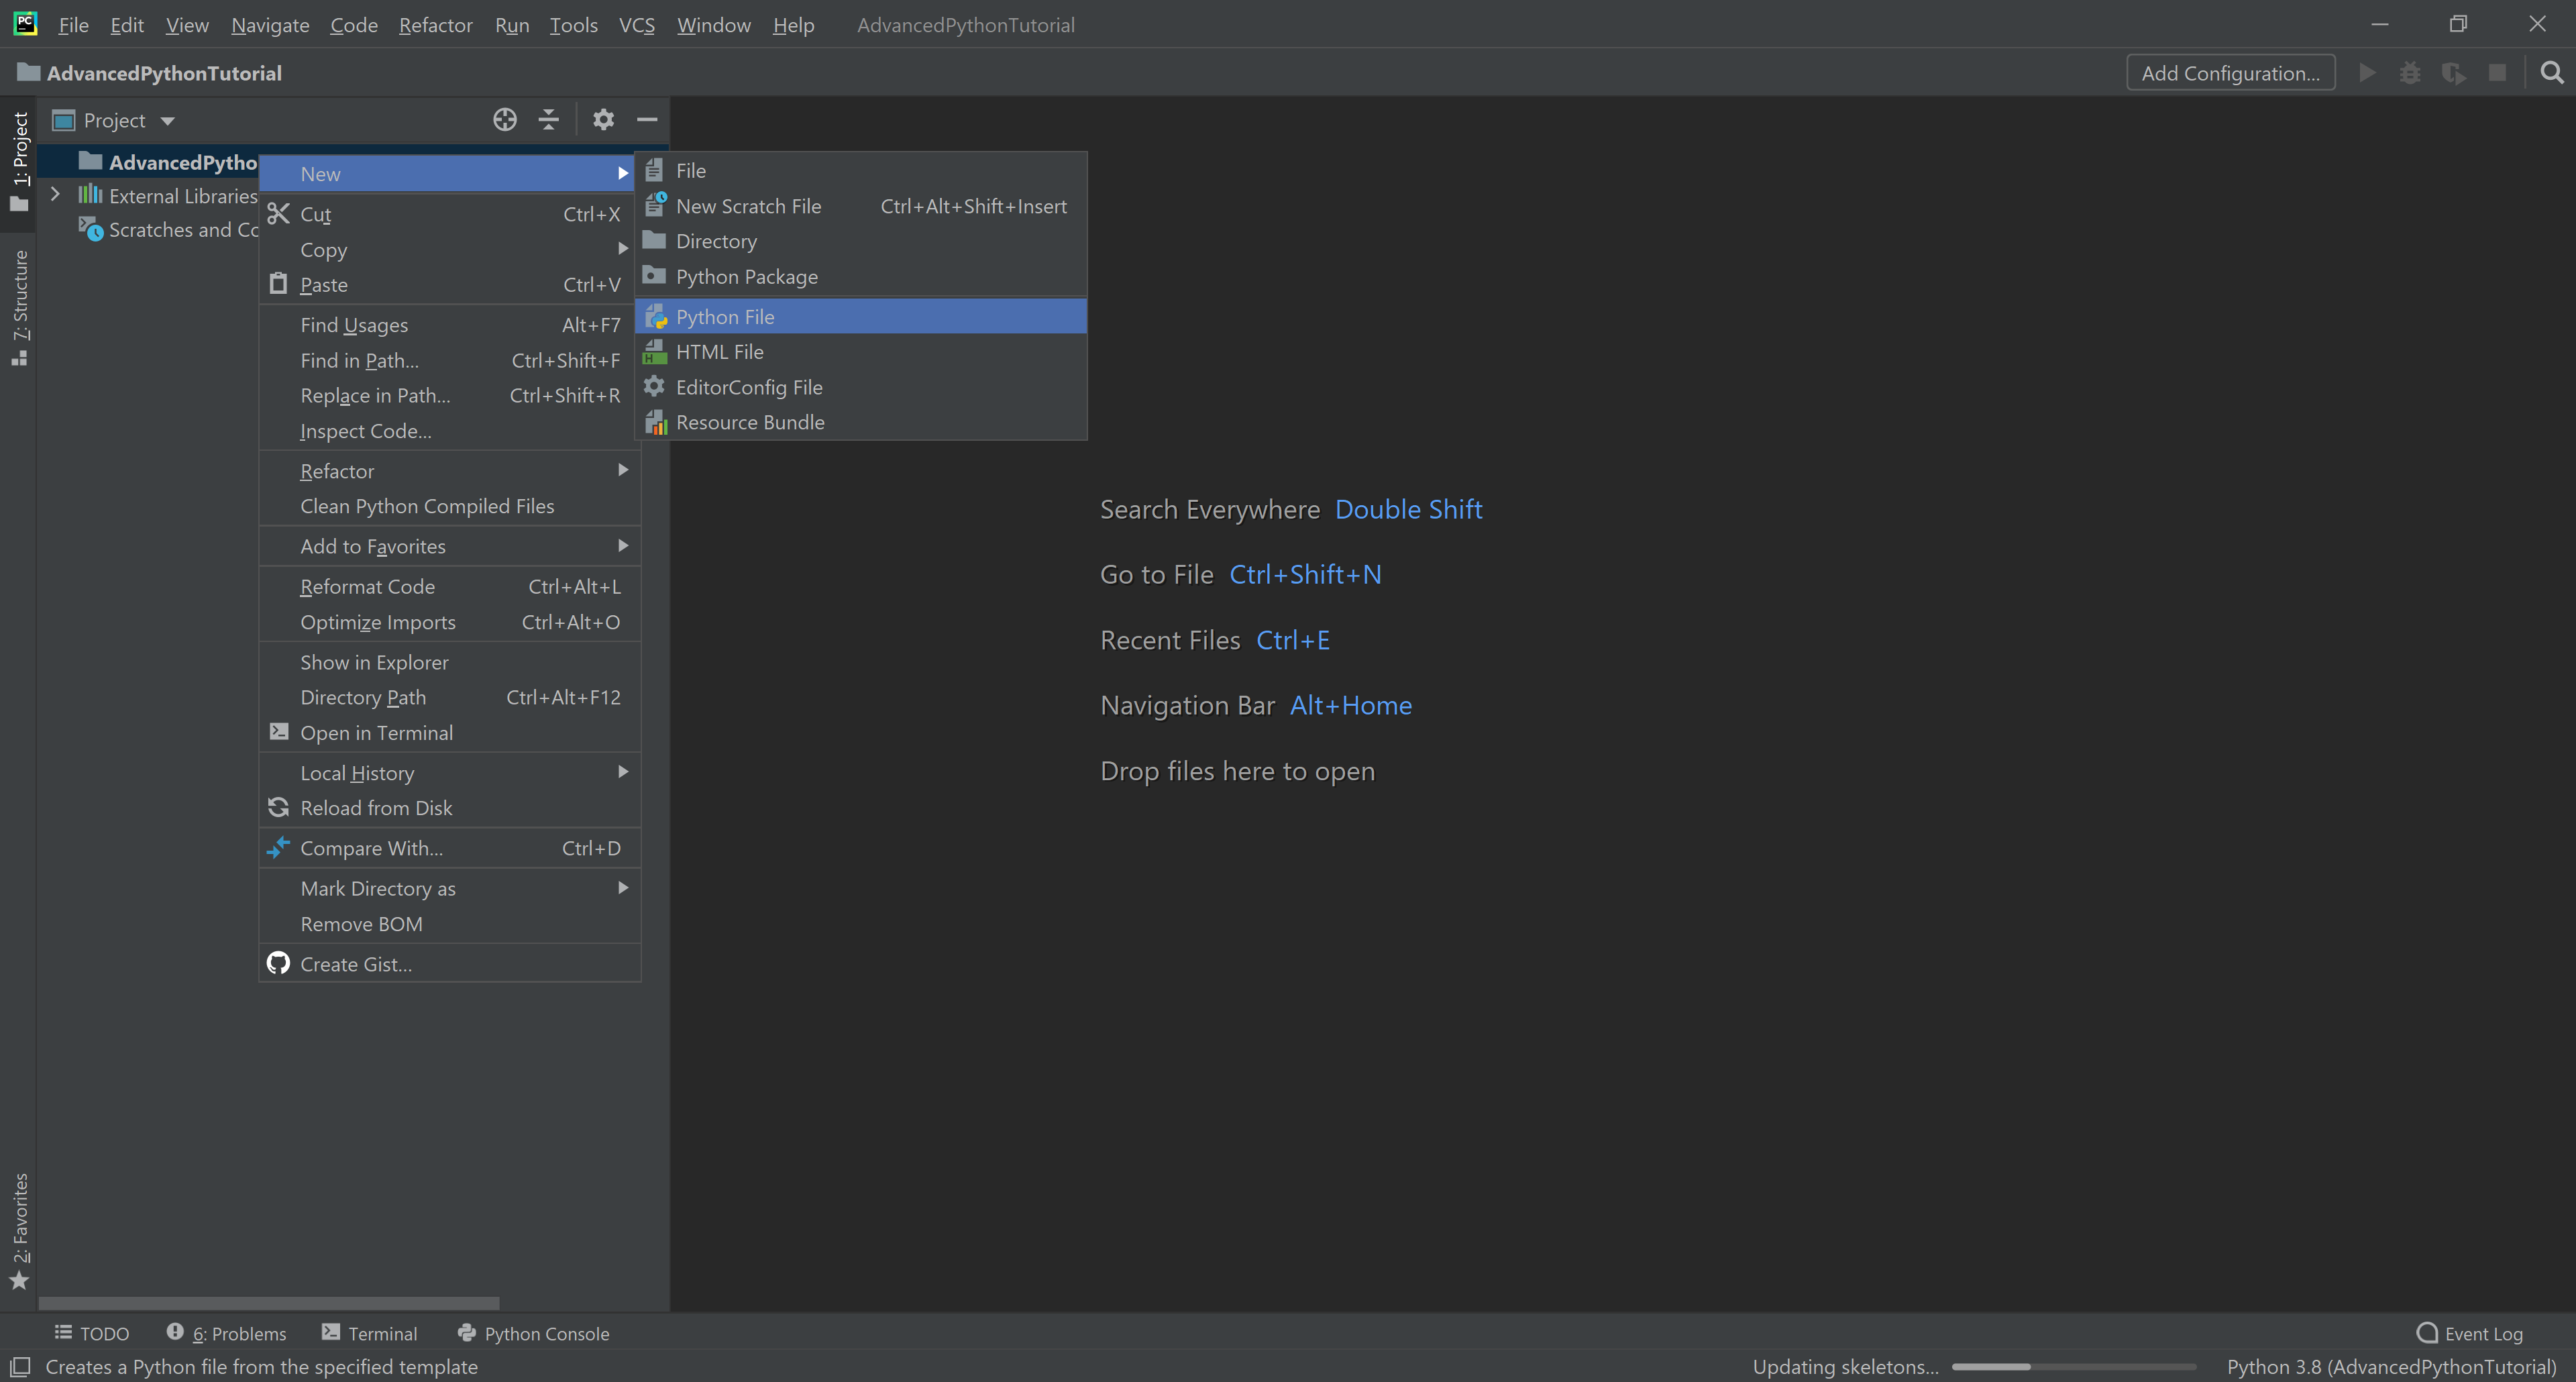
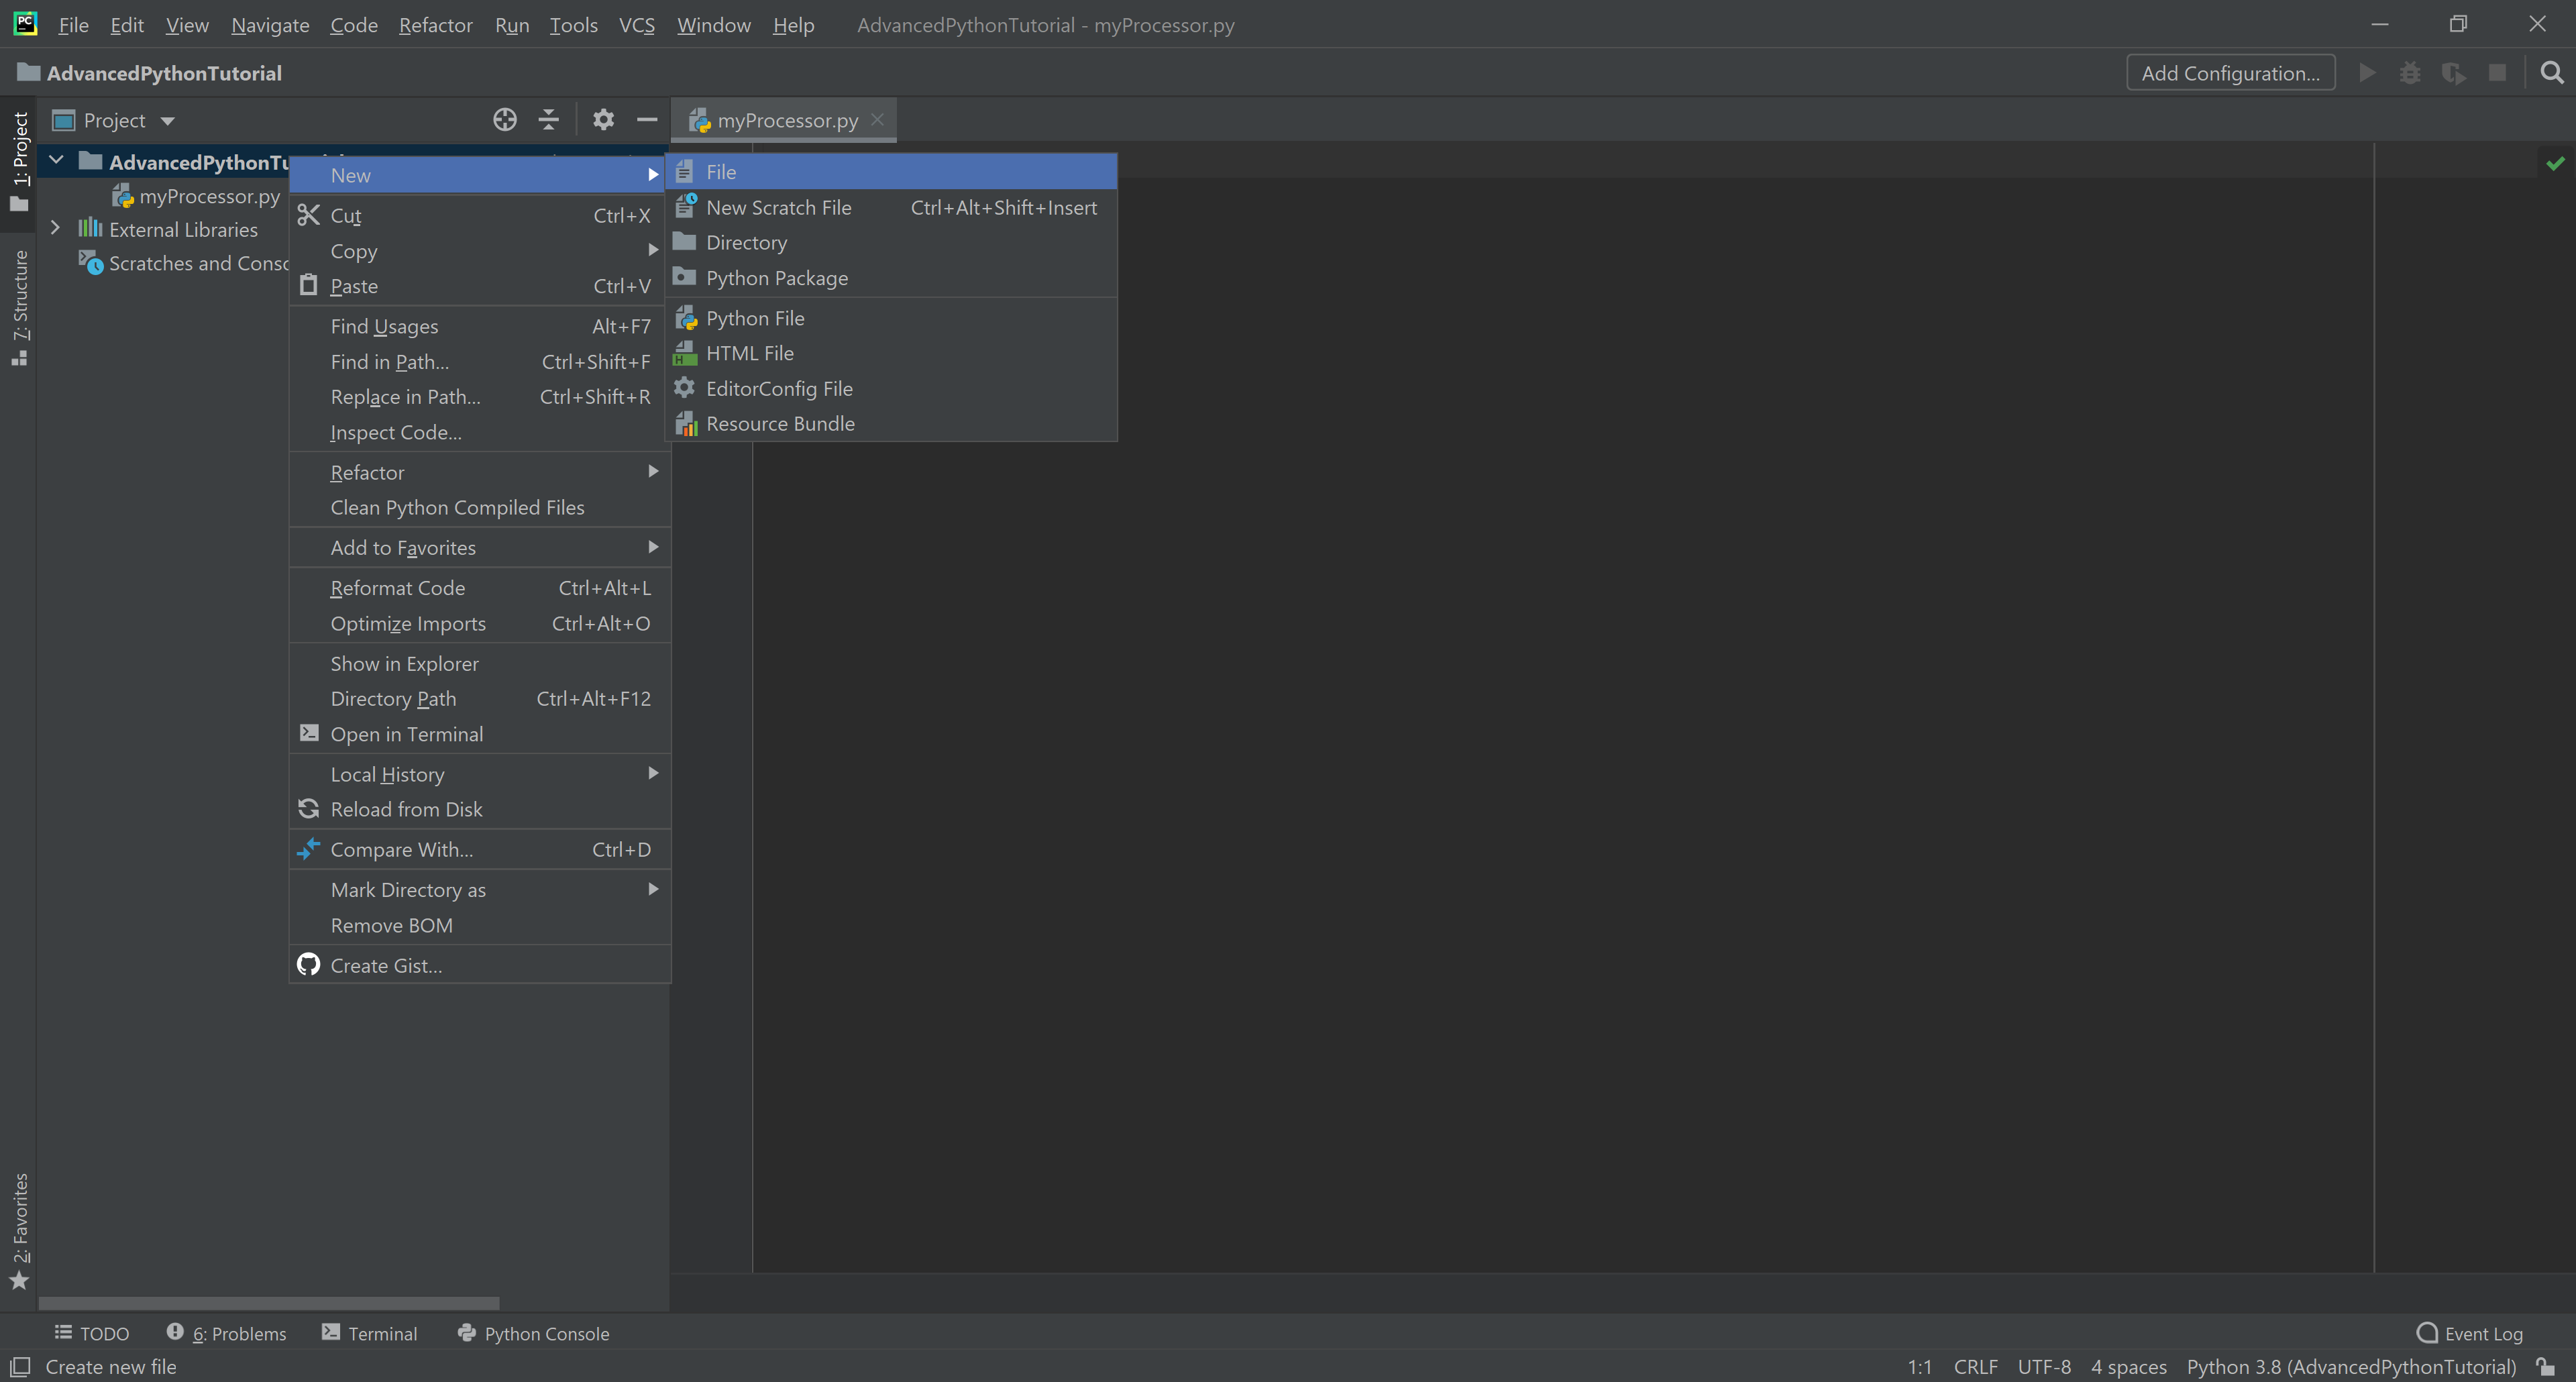
Now we need to create these two fundamental files (right click on the AdvancedPythonTutorial project icon, new -> …):
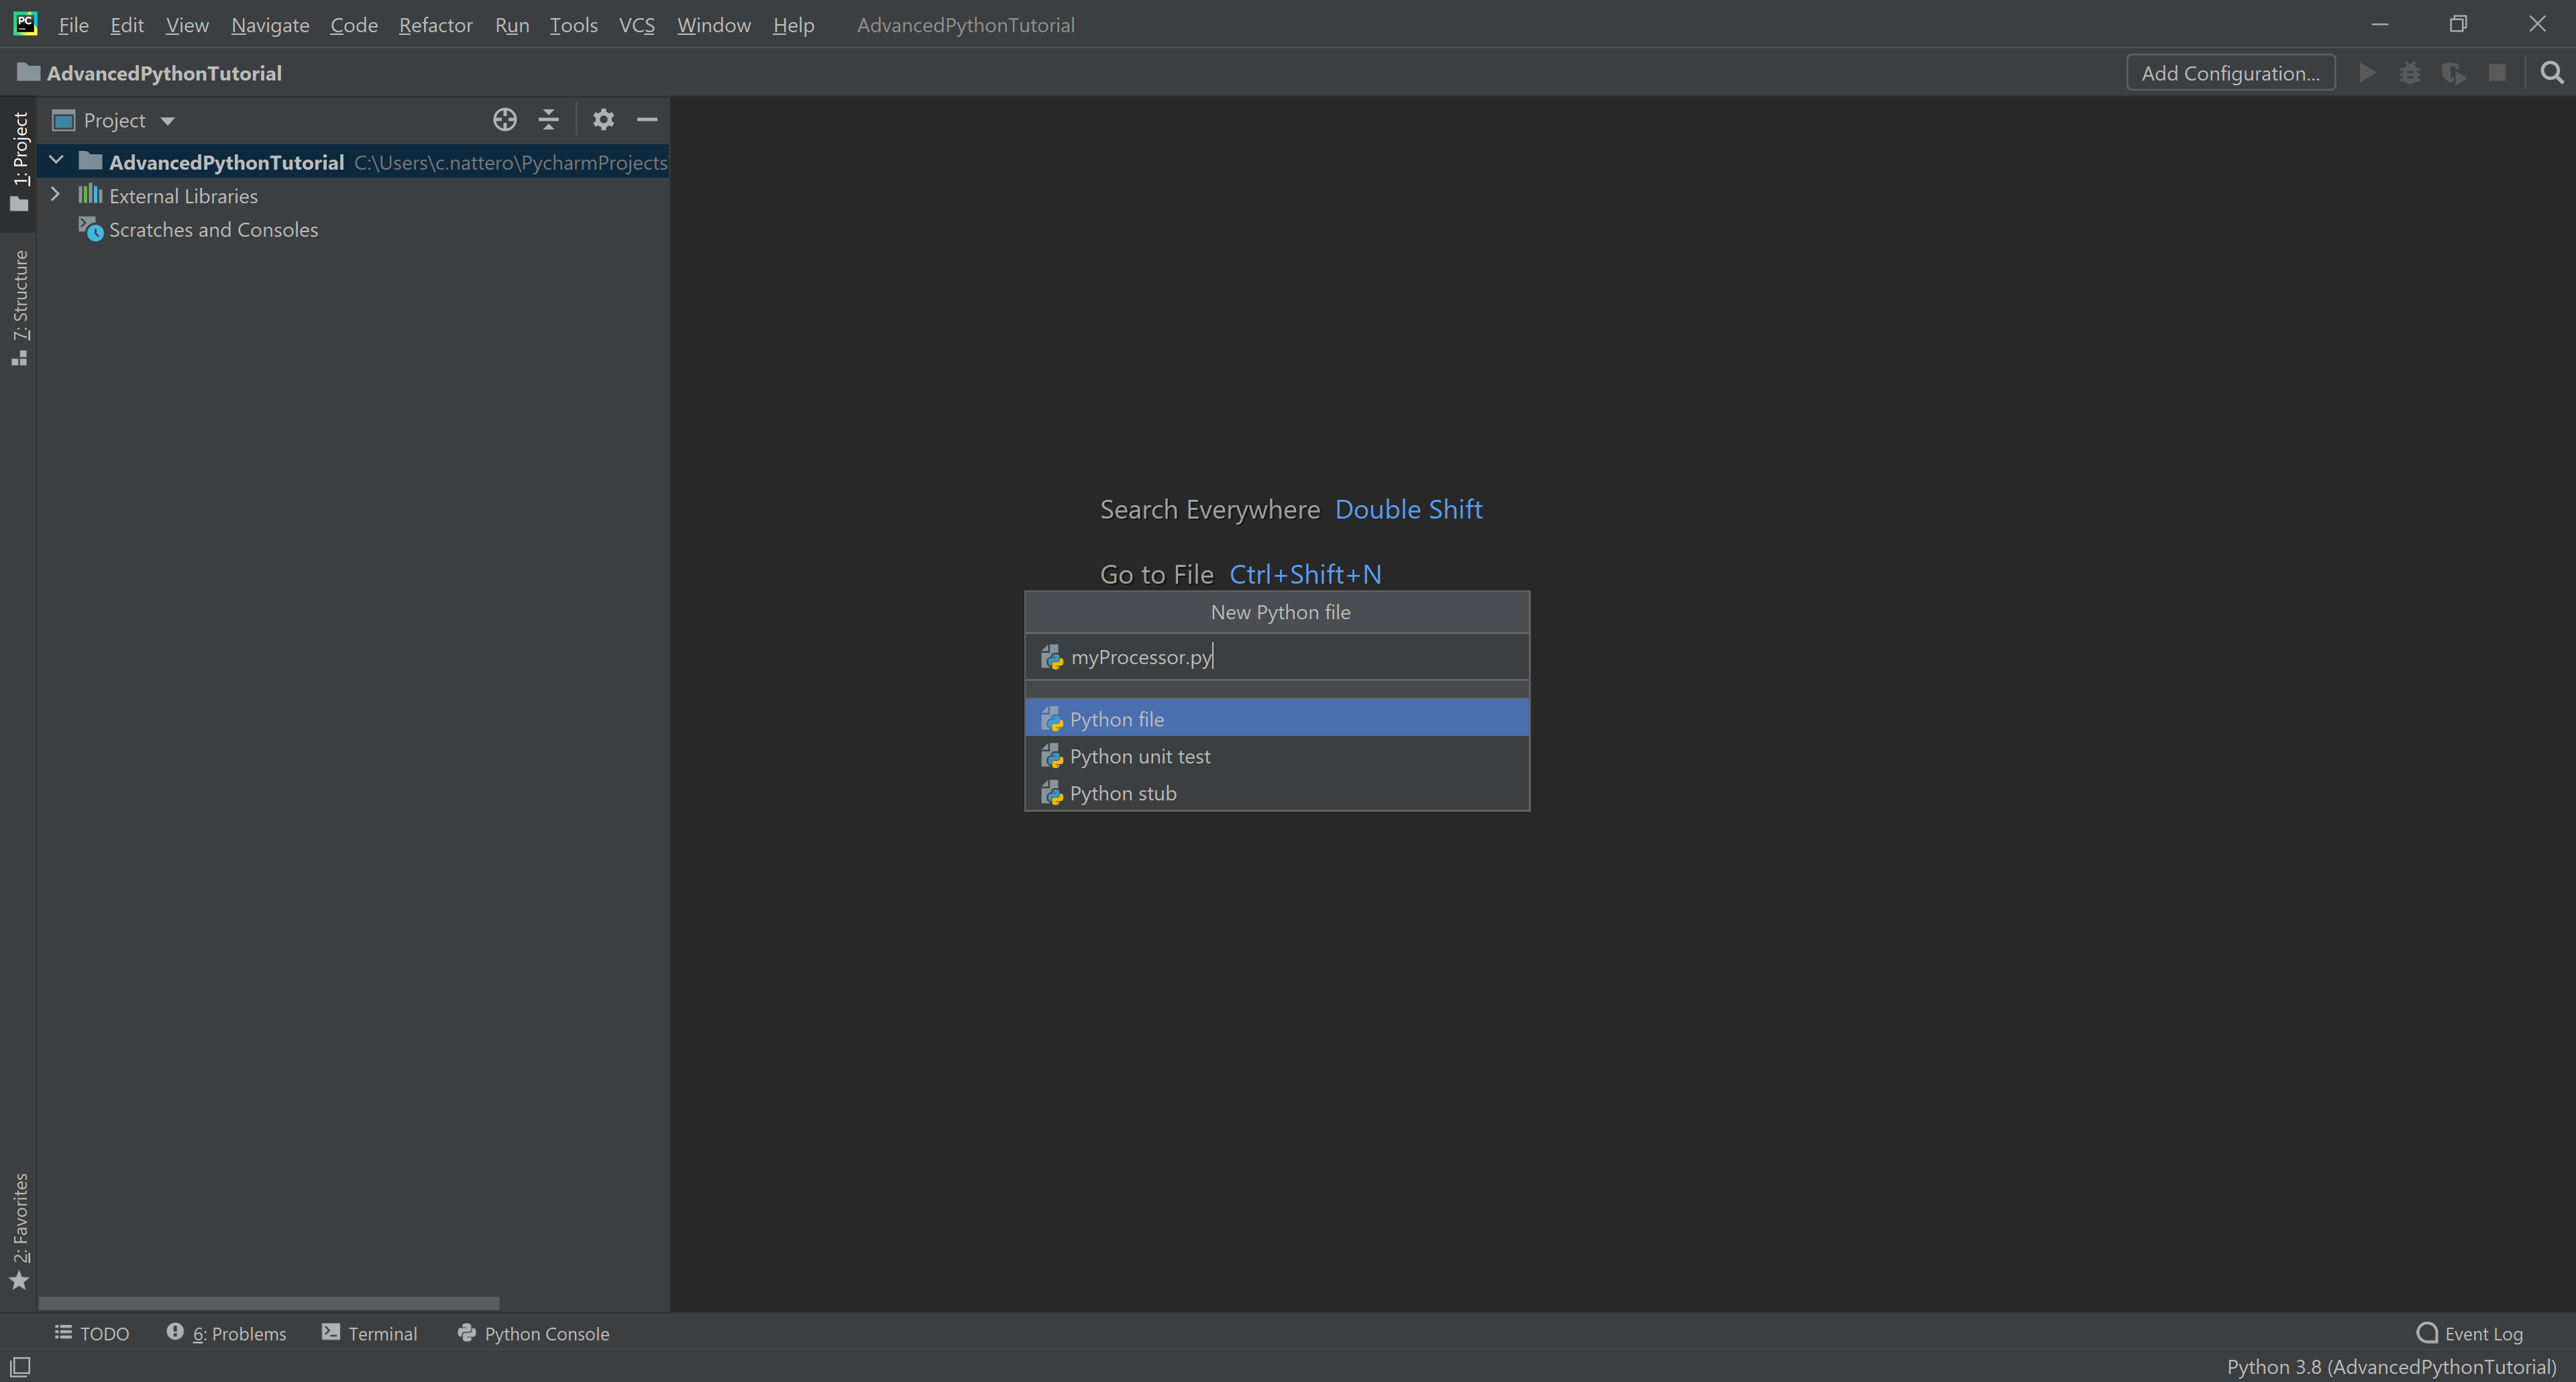
myProcessor.py: create a python file, then call it myProcessor.py
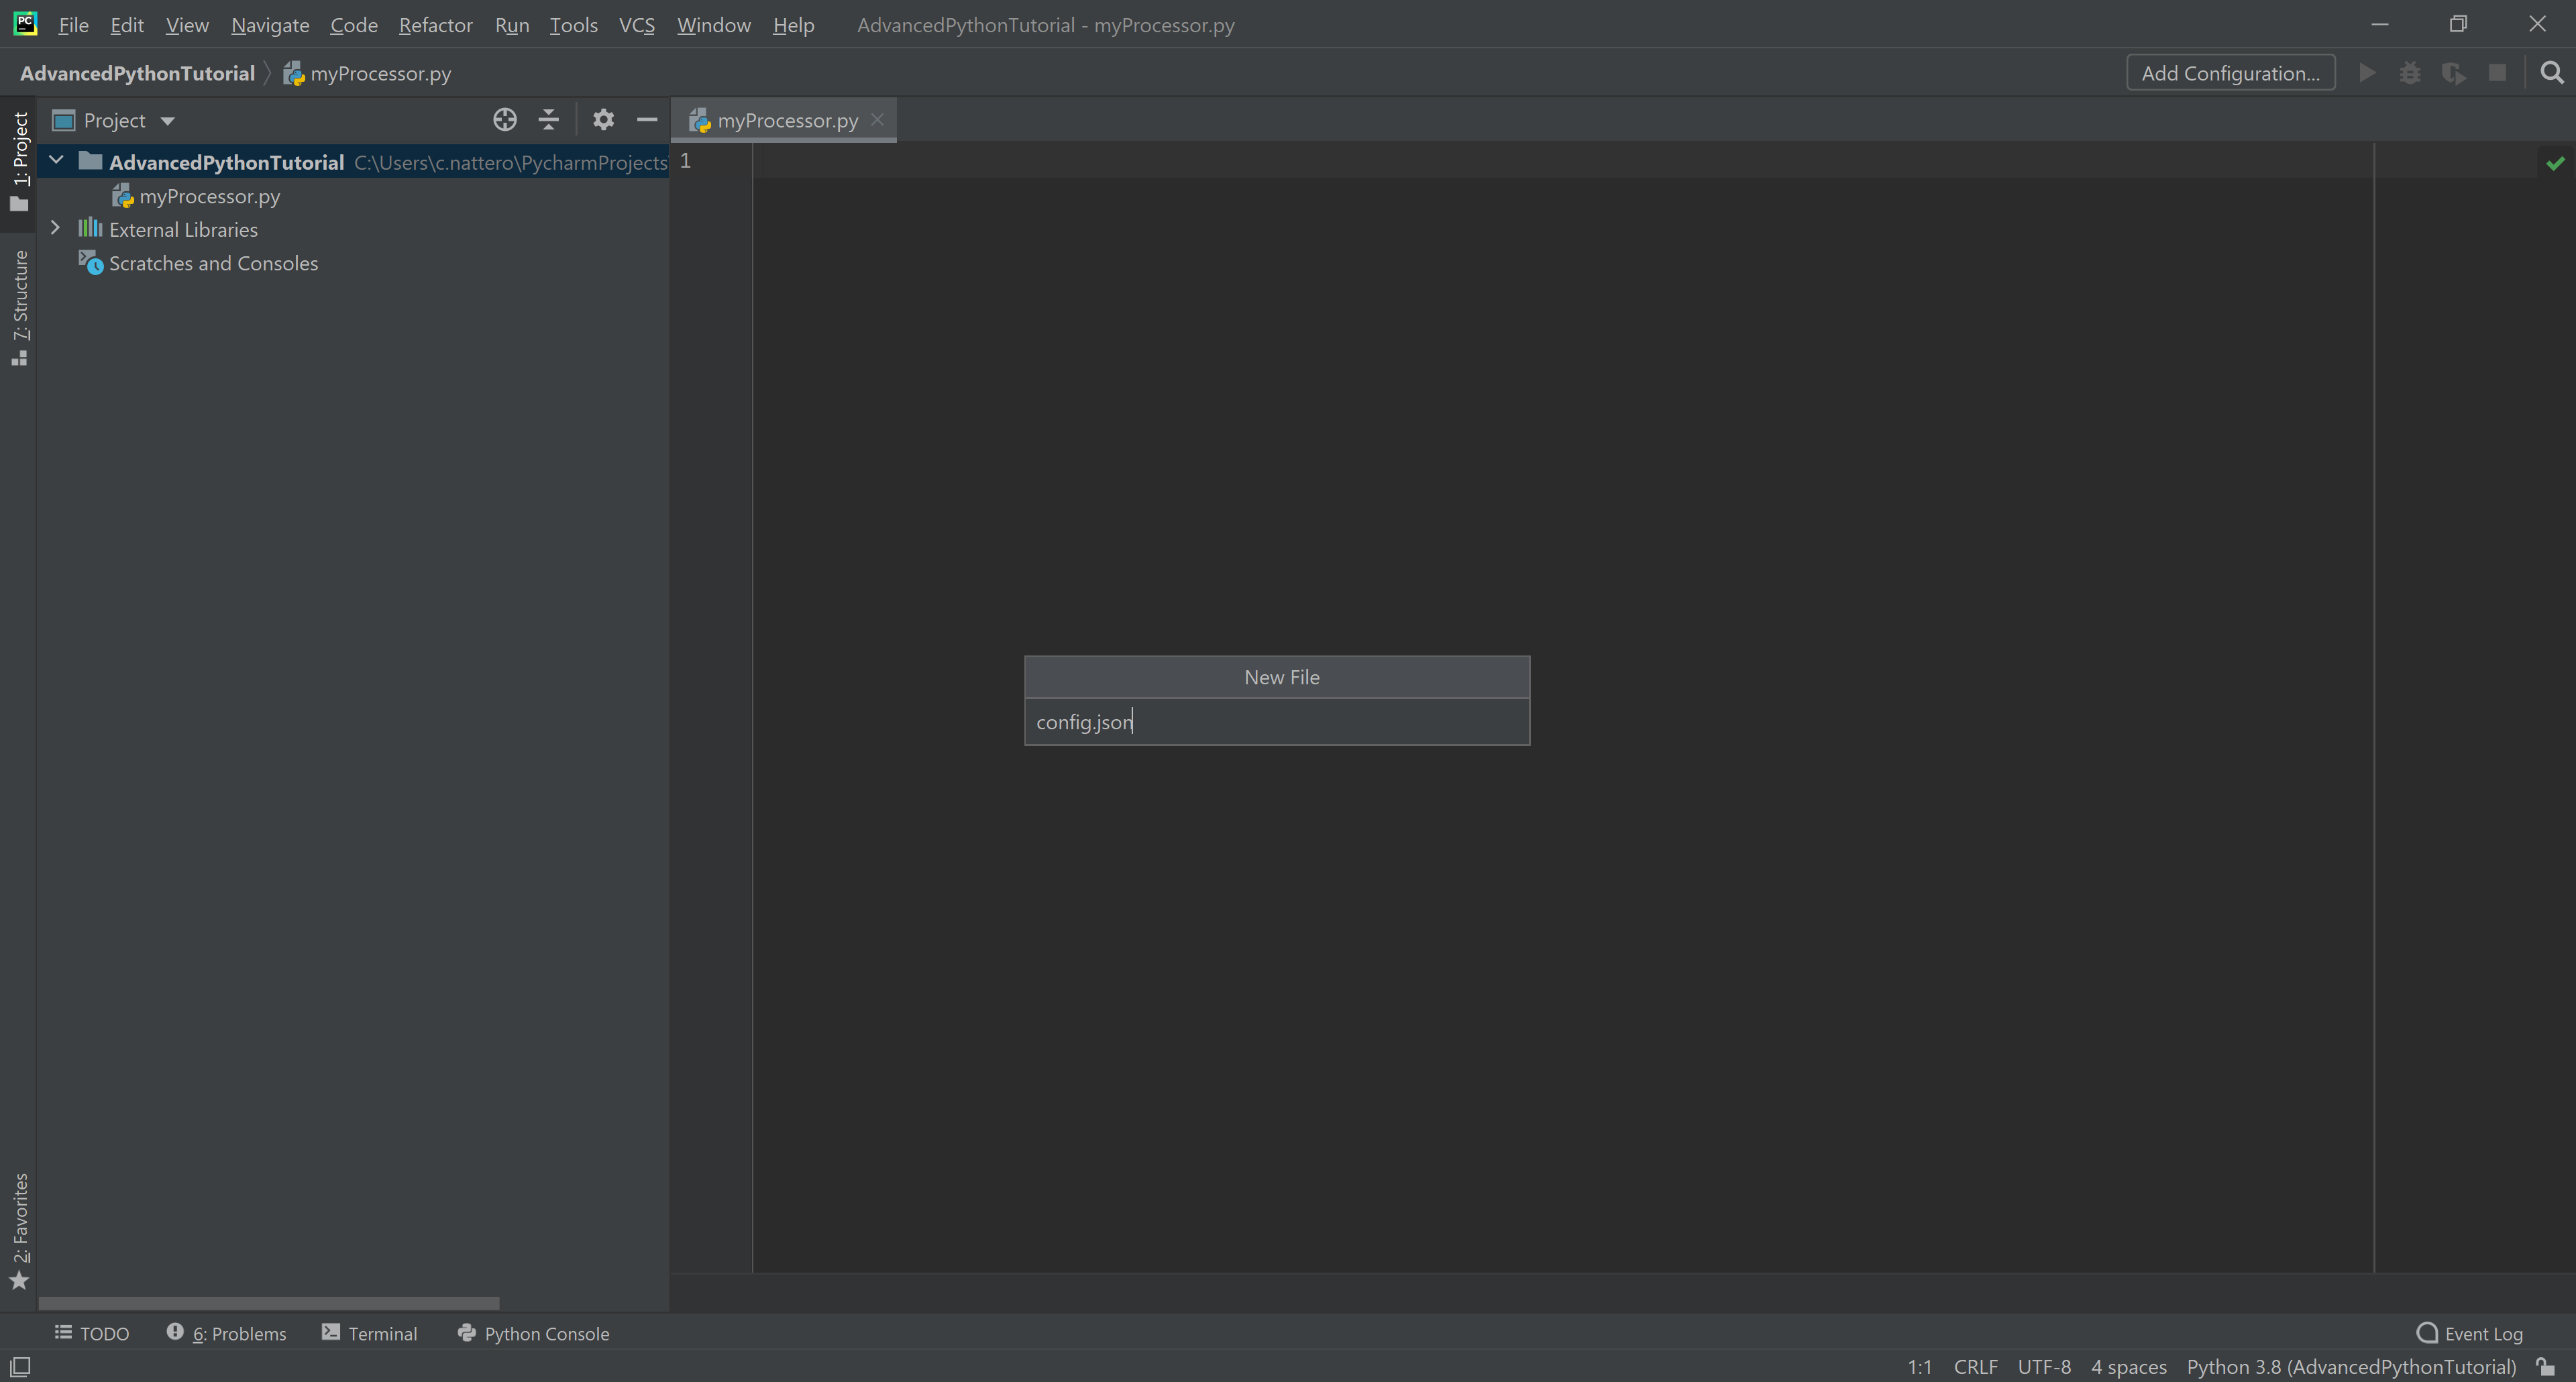
config.json: create a file, then call it config.json (PyCharm will recognize automatically it’s a JSON file)
Create python file
Create myProcessor.py
Create a file
Create config.json
Next, point your browser to wasdi.net, log in, make sure you see the workspaces page (otherwise click on the workspaces menu) and create a new workspace. Call it somehow, e.g., “AdvancedTutorialTest” (or however you want, just remember it and be coherent later on). Leave the browser open on that page, we’ll need it later on.
Create a workspace called AdvancedTutorialTest
First lines
Let’s begin by editing the config.json file. It’s a JSON file, containing the user credentials and some fundamental parameters to get you started:
{
  "USER": "your user name here",
  "PASSWORD": "your password here",
  "WORKSPACE": "AdvancedTutorialTest"
}
NOTE: please, keep this file for yourself. You should never give this file to anyone else, and you do not need to upload to WASDI, as we’ll see later on. You just need this file in your project for working with the WASDI python library.
Now, open myProcessor.py, create a main and a method called run. The latter is required for WASDI to work (more on that later on).
Note: these are two requirements necessary to use WASDI:
have a python file called myProcessor.py
have a function called run() (no params) within myProcessor.py
After that, you can include as many python files as you need, no matter if they are organized in directories. You just need to have a myProcessor.py with a method run() as entry point.
The main method will initiate the WASDI library and call the run method:
import wasdi
def run():
pass
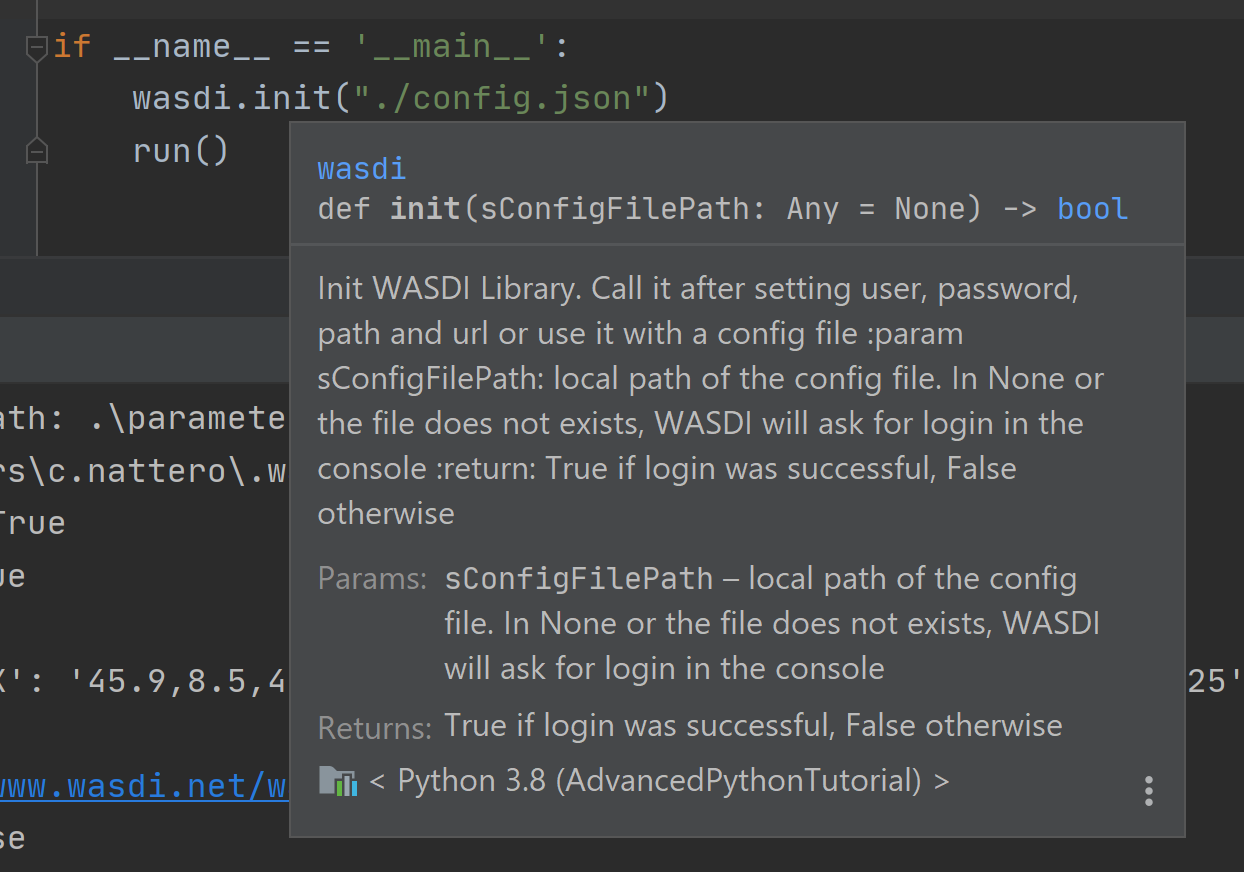
if __name__ == '__main__':
wasdi.init("./config.json")
run()
As you can see, we call wasdi.init and pass the relative path of the config file to it.
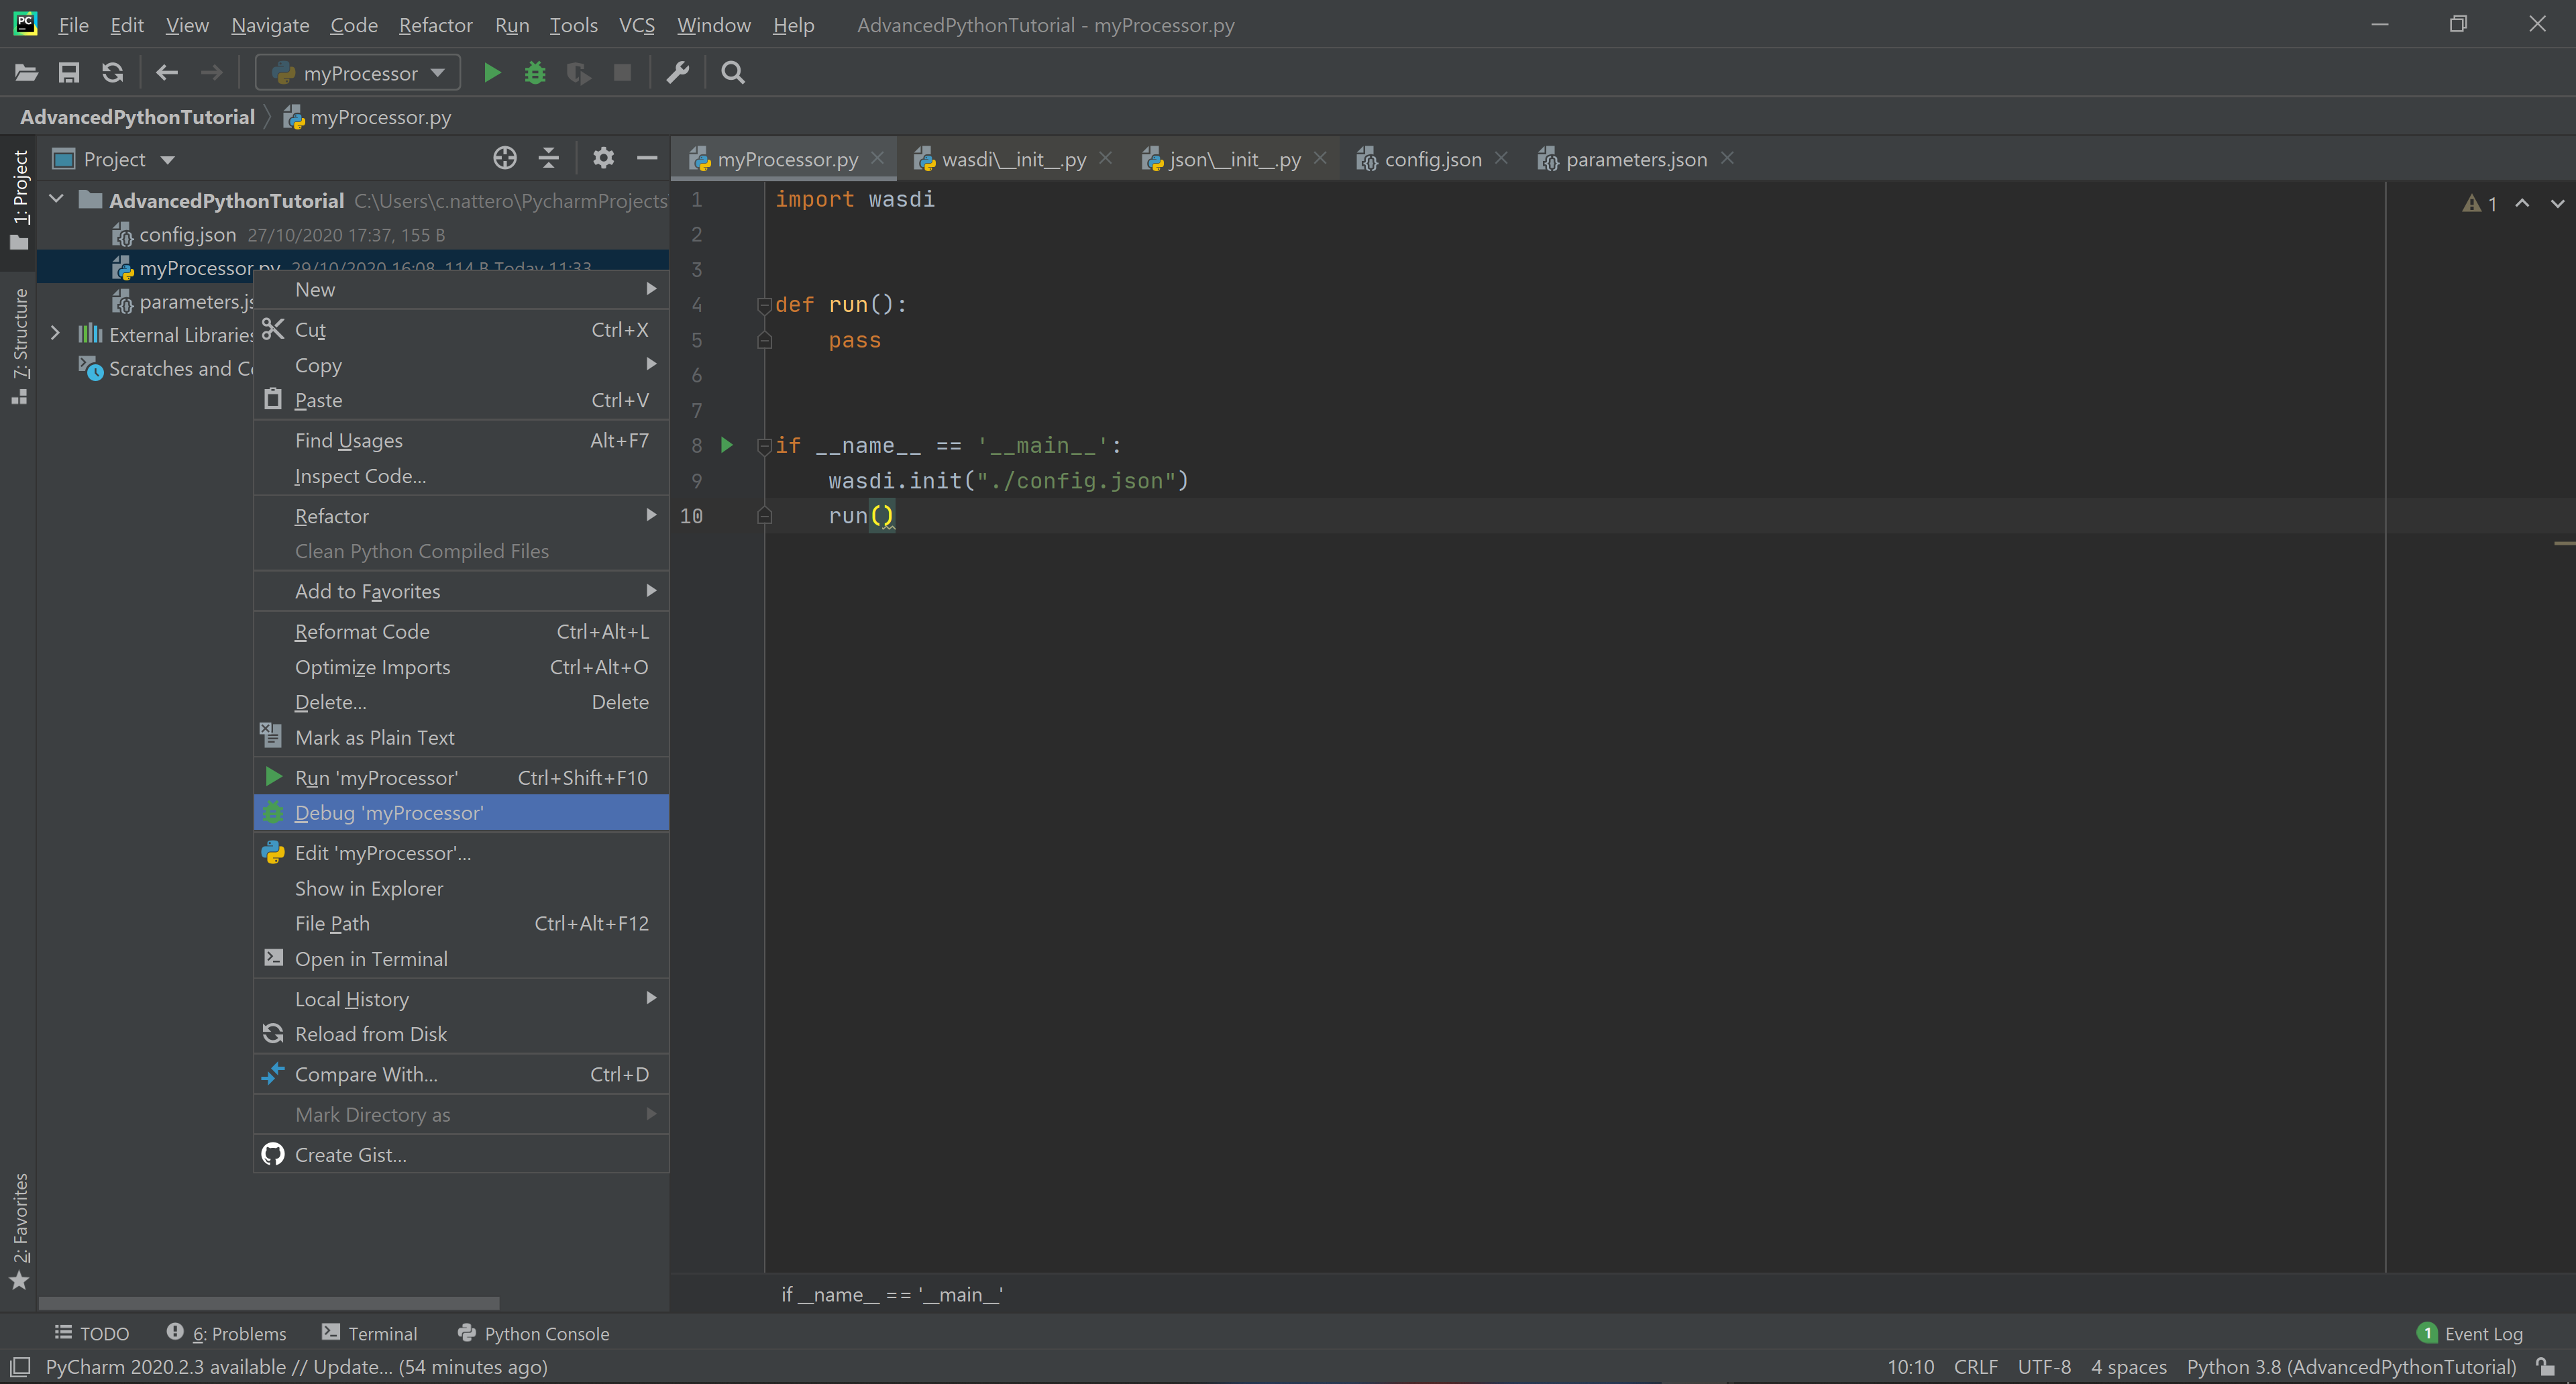
Let’s debug to see the effects of this. Note: if a file main.py was created automatically for you, remember to define another debug configuration. The easiest way to do so is by right clicking on your code and select Debug ‘myProcessor.py’.

If the setup is correct so far, we should see the output from the wasdi library that shows the initialization has gone well. Let’s see it more in details:
[INFO] _loadParams: wasdi could not load param file. That is fine, you can still load it later, don't worry
We’ll see to this later, for now we trust it and do not worry ;-)
[INFO] waspy.init: returned session is: 0d3f3ef1-f4c3-4202-9015-6ca17fc21cc7
Great, we authenticated and got a session (yours is going to be different)
[INFO] waspy.init: WASPY successfully initiated :-)
Good news
[INFO] waspy.printStatus: user: username@email.address
[INFO] waspy.printStatus: password: ***********
[INFO] waspy.printStatus: session id: 0d3f3ef1-f4c3-4202-9015-6ca17fc21cc7
Looks like our credentials worked. Yours username and session id will be different, and the password will not be shown. Pay attention, if you forget to insert the password, WASDI will ask you for it.
[INFO] waspy.printStatus: active workspace: 4f541d2c-4b29-445b-9869-9c8d185932ce
[INFO] waspy.printStatus: workspace owner: username@email.address
This code corresponds to the workspace we opened, i.e., AdvancedTutorialTest (it’s going to be different for you), next is the email address you used to register on WASDI
[INFO] waspy.printStatus: parameters file path: None
We did not provide a parameter file, we’ll see this later
[INFO] waspy.printStatus: base path: C:\Users\username\.wasdi\
This is the base path inside which WASDI will mirror the online file structure, creating one folder per workspace
[INFO] waspy.printStatus: download active: True
[INFO] waspy.printStatus: upload active: True
Downloads and uploads will happen automatically when necessary
[INFO] waspy.printStatus: verbose: True
Verbosity
[INFO] waspy.printStatus: param dict: {}
No params so far
[INFO] waspy.printStatus: proc id:
[INFO] waspy.printStatus: base url: http://www.wasdi.net/wasdiwebserver/rest
[INFO] waspy.printStatus: is on server: False
[INFO] waspy.printStatus: workspace base url: http://www.wasdi.net/wasdiwebserver/rest
More config info, which are fine
[INFO] waspy.printStatus: session is valid :-)

This is good

Process finished with exit code 0
And the debug finishes
WASDI Hello World
Now let’s try to call a WASDI API. There’s a hello world API just for these tests. Let’s change the run method code as follows:
def run():
  sHello = wasdi.hello()
  print(sHello)
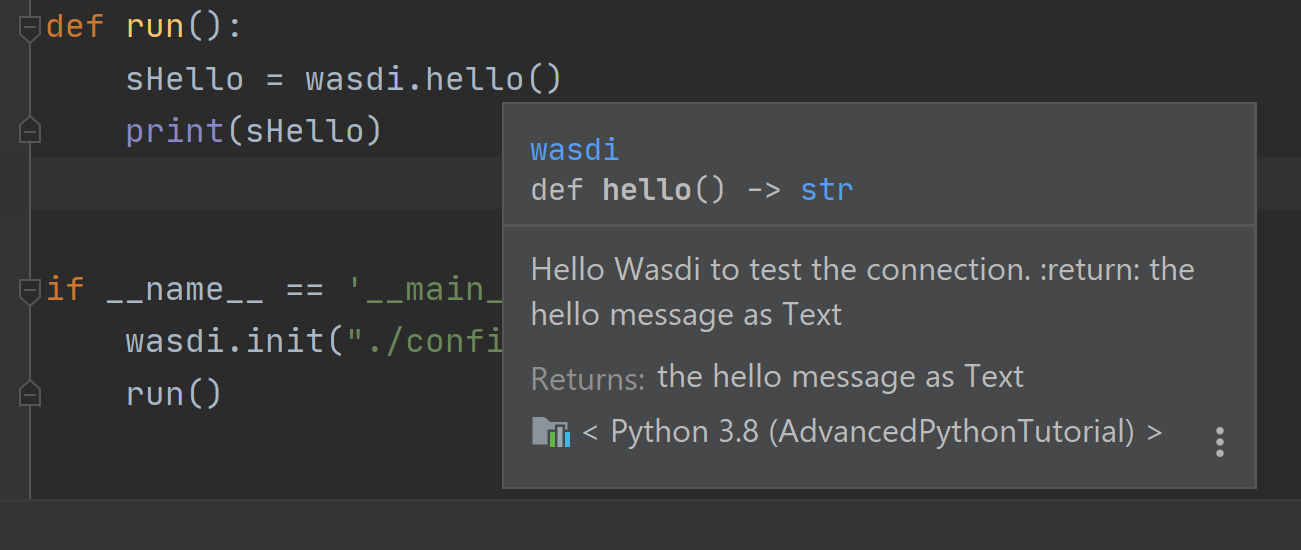
Basically, the method wasdi.hello wraps a call to WASDI hello world API and returns the response, which we print on the next line, getting the following result:
{"boolValue":null,"doubleValue":null,"intValue":null,"stringValue":"Hello Wasdi!!"}
So that’s our first WASDI processor: we demonstrated we can authenticate and call an API using code.
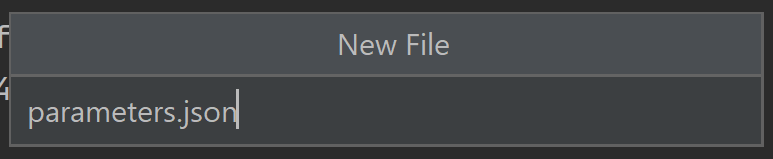
Introducing parameters
Now we’ll see how WASDI lets you handle the parameters for your processor. Let’s create a new file called parameters.json (Right click on the project, New -> File, name it parameters.json)
That’s another JSON file where the developer can set and/or simulate inputs for his processor. The idea is that WASDI processors can manipulate satellite images fed in input to create added-value products to be output. Parameters are those variables needed by the developer to retrieve input data and/or generate output data.
In the tutorial we are going to see some typical examples: the area of interest, the type of satellite data, a date or interval of dates. These parameters are defined in the file params.json During the development and the debug of the processor, the developer must write her/his input in this file. It’s like a dictionary: this way, the programmer decides what are the parameters and their syntax, and by assigning them a value she/he can test them.
Let’s try this example:
{
  "NAME": "advanced python tutorial"
}
We also need to edit the config.json file to specify that we want to use parameters.json as the parameters file, and that’s done by adding the following line:
"PARAMETERSFILEPATH": "./parameters.json"
(please check that the JSON is valid, check especially your commas).
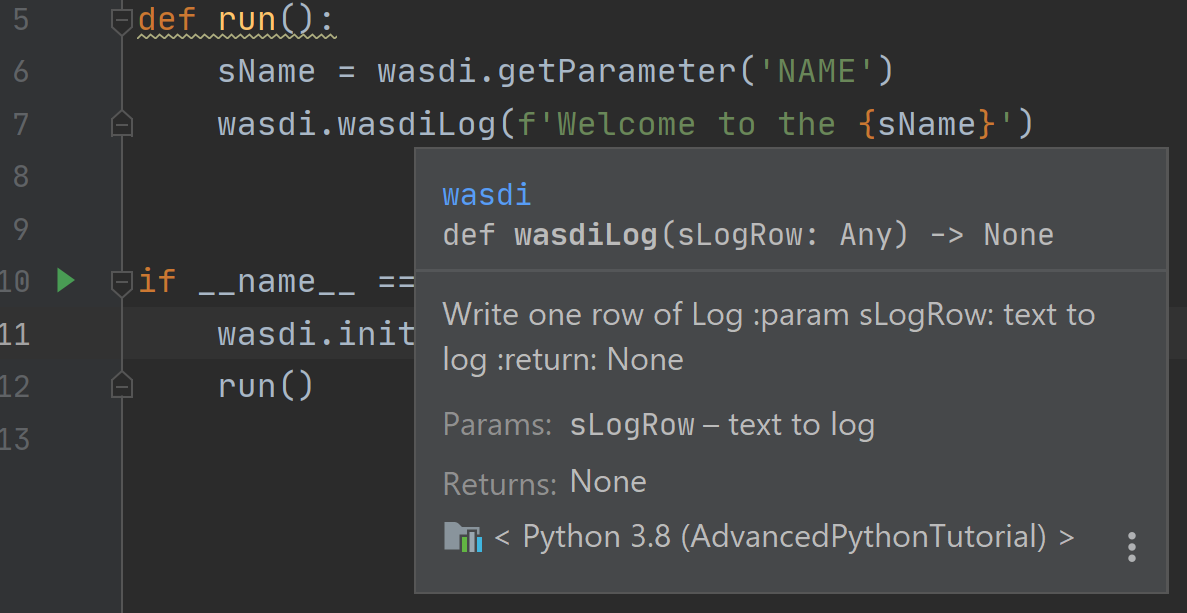
Now edit the run method and change it as follows:
def run():
  sName = wasdi.getParameter('NAME')
  wasdi.wasdiLog(f'Welcome to the {sName}')
During the initialization, parameters are read from the specified file.
wasdi.getParameter is the method for reading a single parameter, and a default value can be specified.
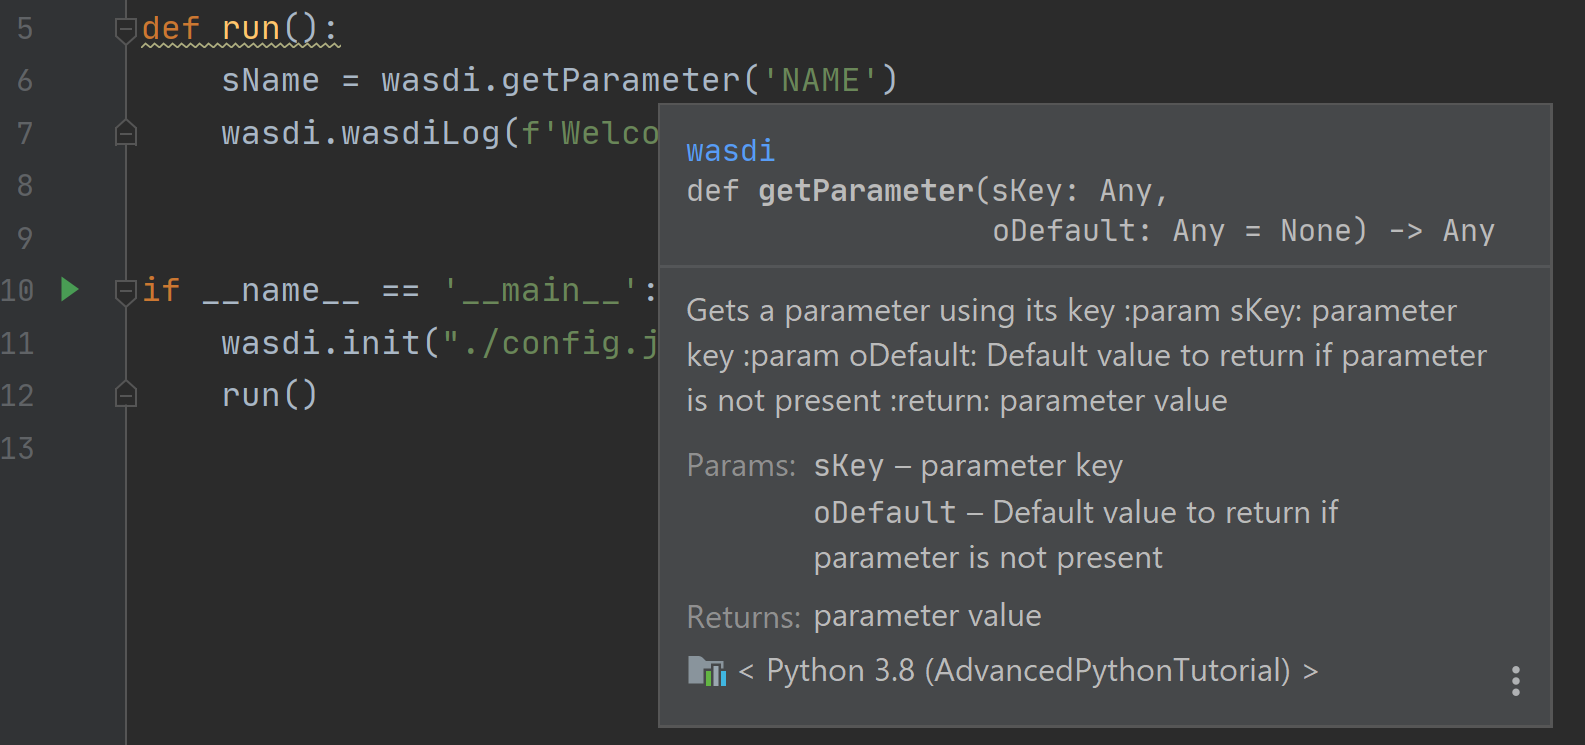
wasdi.wasdiLog is the utility for logging a line. It’s a print, locally, but when executed on the cloud, it prints a long line on the user interface.
Let’s debug it and we’re going to see, after the initialization output, the following line:
Welcome to the advanced python tutorial
Parameters can be of any type supported by the JSON format. When the processor will be deployed, the final user, or third party systems will be able to run it passing these parameters.
A more meaningful example
Let’s try another example. We want to write a processor that searches for Sentinel-2 images and uses them to create a RGB GeoTIFF file.
You can download the final code from here:
Step 1: read and validate parameters
Let’s change our parameters in parameters.json as follows:
{
"BBOX": "45.9,8.5,45.7,8.7",
"MAXCLOUD": "30",
"DATE": "2020-10-25",
"SEARCHDAYS": "20"
}
Now the file is in its final form, and you can download the file from here: parameters.json
These parameters represent, respectively:
the area of interest in the format “NORTH,WEST, SOUTH, EAST”
the maximum cloud coverage (percentage)
a date in which we want to search images
a maximum number of days to search back in time.
Now, edit the code of myProcessor.py
First of all, add the following imports:
from datetime import datetime
from datetime import timedelta
Next, modify the run method as follows:
def run():
# STEP 1: Read "real" parameters
sBBox = wasdi.getParameter("BBOX")
sDate = wasdi.getParameter("DATE")
sMaxCloud = wasdi.getParameter("MAXCLOUD", "20")
sSearchDays = wasdi.getParameter("SEARCHDAYS", "10")
sProvider = wasdi.getParameter("PROVIDER", "AUTO")
# L1
sImageType = wasdi.getParameter("IMAGETYPE", "S2MSI1C")
# L2
# sImageType = wasdi.getParameter("IMAGETYPE", "S2MSI2A")
# Check the Bounding Box: is needed
if sBBox is None:
    wasdi.wasdiLog("BBOX Parameter not set. Exit")
    wasdi.updateStatus("ERROR", 0)
    return
# Split the bbox: it is in the format: NORTH, WEST, SOUTH, EAST
asBBox = sBBox.split(",")
if len(asBBox) != 4:
    wasdi.wasdiLog("BBOX Not valid. Please use LATN,LONW,LATS,LONE")
    wasdi.wasdiLog("BBOX received:" + sBBox)
    wasdi.wasdiLog("exit")
    wasdi.updateStatus("ERROR", 0)
    return
# Ok is good, print it and convert in float
wasdi.wasdiLog("Bounding Box: " + sBBox)
fLatN = float(asBBox[0])
fLonW = float(asBBox[1])
fLatS = float(asBBox[2])
fLonE = float(asBBox[3])
iDaysToSearch = 10
try:
    iDaysToSearch = int(sSearchDays)
except Exception as oEx:
    wasdi.wasdiLog(f'Number of days to search not valid due to {repr(oEx)}, assuming 10 [' + str(sSearchDays) + "]")
# Check the date: assume now
oEndDay = datetime.today()
try:
    # Try to convert the one in the params
    oEndDay = datetime.strptime(sDate, '%Y-%m-%d')
except Exception as oEx:
    # No good: force to yesterday
    wasdi.wasdiLog(f'Date not valid due to {repr(oEx)}, assuming today')
oTimeDelta = timedelta(days=iDaysToSearch)
oStartDay = oEndDay - oTimeDelta
sEndDate = oEndDay.strftime("%Y-%m-%d")
sStartDate = oStartDay.strftime("%Y-%m-%d")
# Print the date
wasdi.wasdiLog("Search from " + sStartDate + " to " + sEndDate)
# Check the cloud coverage
sCloudCoverage = None
if sMaxCloud is not None:
    sCloudCoverage = "[0 TO " + sMaxCloud + "]"
    wasdi.wasdiLog("Cloud Coverage " + sCloudCoverage)
else:
    wasdi.wasdiLog("Cloud Coverage not set")
The code reads, validates and manipulates the parameters.
updateStatus is another primitive: it allows to update the process status and the progress (percent) of its execution.
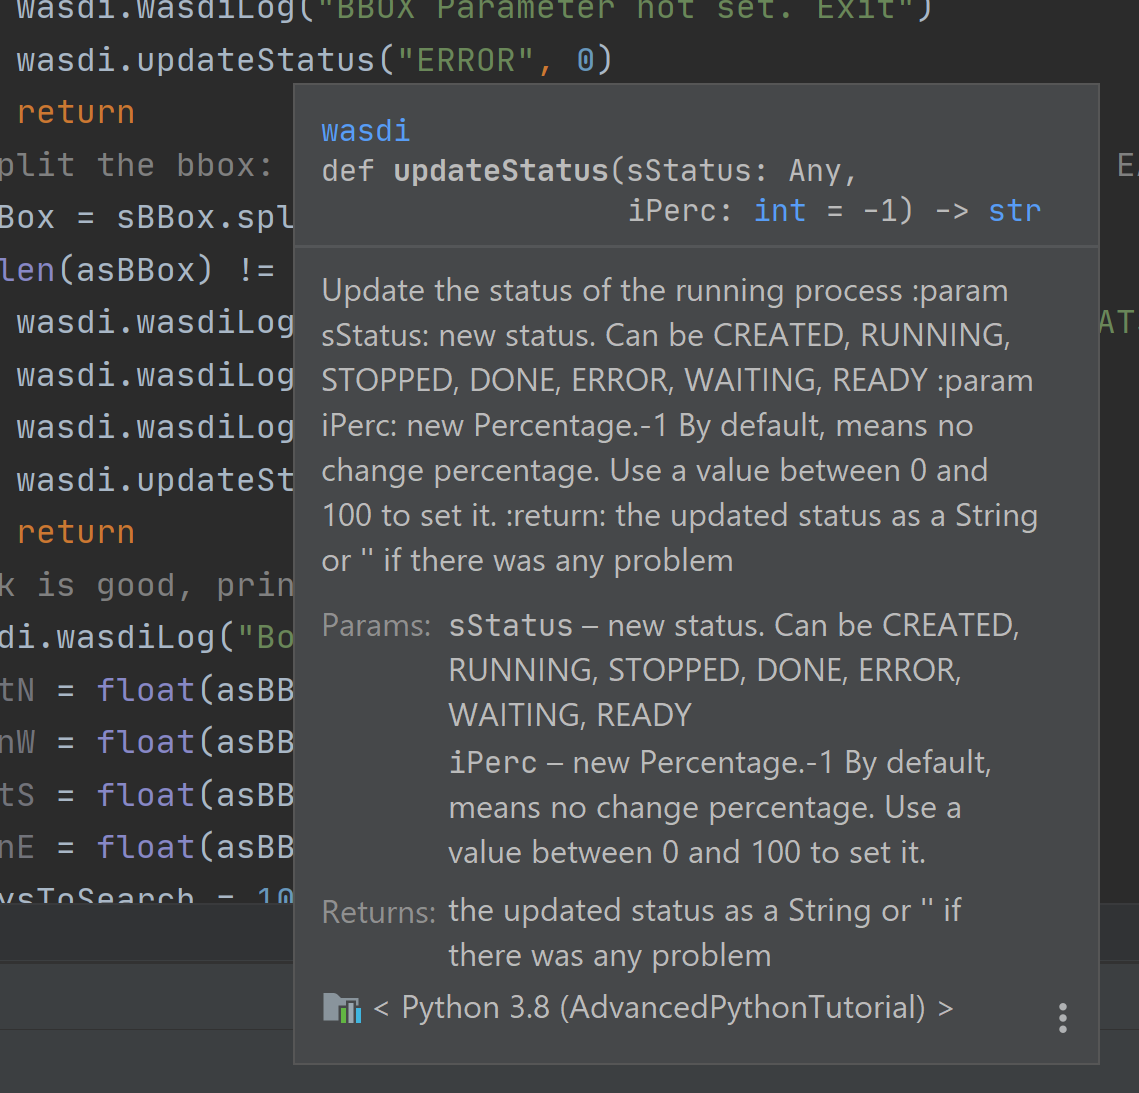
Each WASDI process has a status among the following:
CREATED: a newly created process, waiting to be executed
RUNNING: a process that is being executed
WAITING: a process that was running and is now waiting for another resource, and has been put on hold for this reason
READY: a process that obtained the resource for which it was WAITING and is now waiting for the WASDI scheduler to continue executing it
DONE: process that completed successfully
ERROR: the execution encountered some error that prevented the process from completing correctly
STOPPED: process stopped by the user or by another processor.
Let’s run it and, if everything is properly set, we will see the usual output, but now we are going to see these two lines too (one is different, the other is new):
[INFO] waspy.printStatus: parameters file path: .\parameters.json
[INFO] waspy.printStatus: param dict: {'BBOX': '45.9,8.5,45.7,8.7', 'MAXCLOUD': '30', 'DATE': '2020-10-25', 'SEARCHDAYS': '10'}
Also, we are going to see our logs:
Bounding Box: 45.9,8.5,45.7,8.7
Search from 2020-10-15 to 2020-10-25
Cloud Coverage [0 TO 30]
Step 2: search the catalogs for EO data
Add the following lines to the run method to search for EO images
# STEP 2: Search EO Images
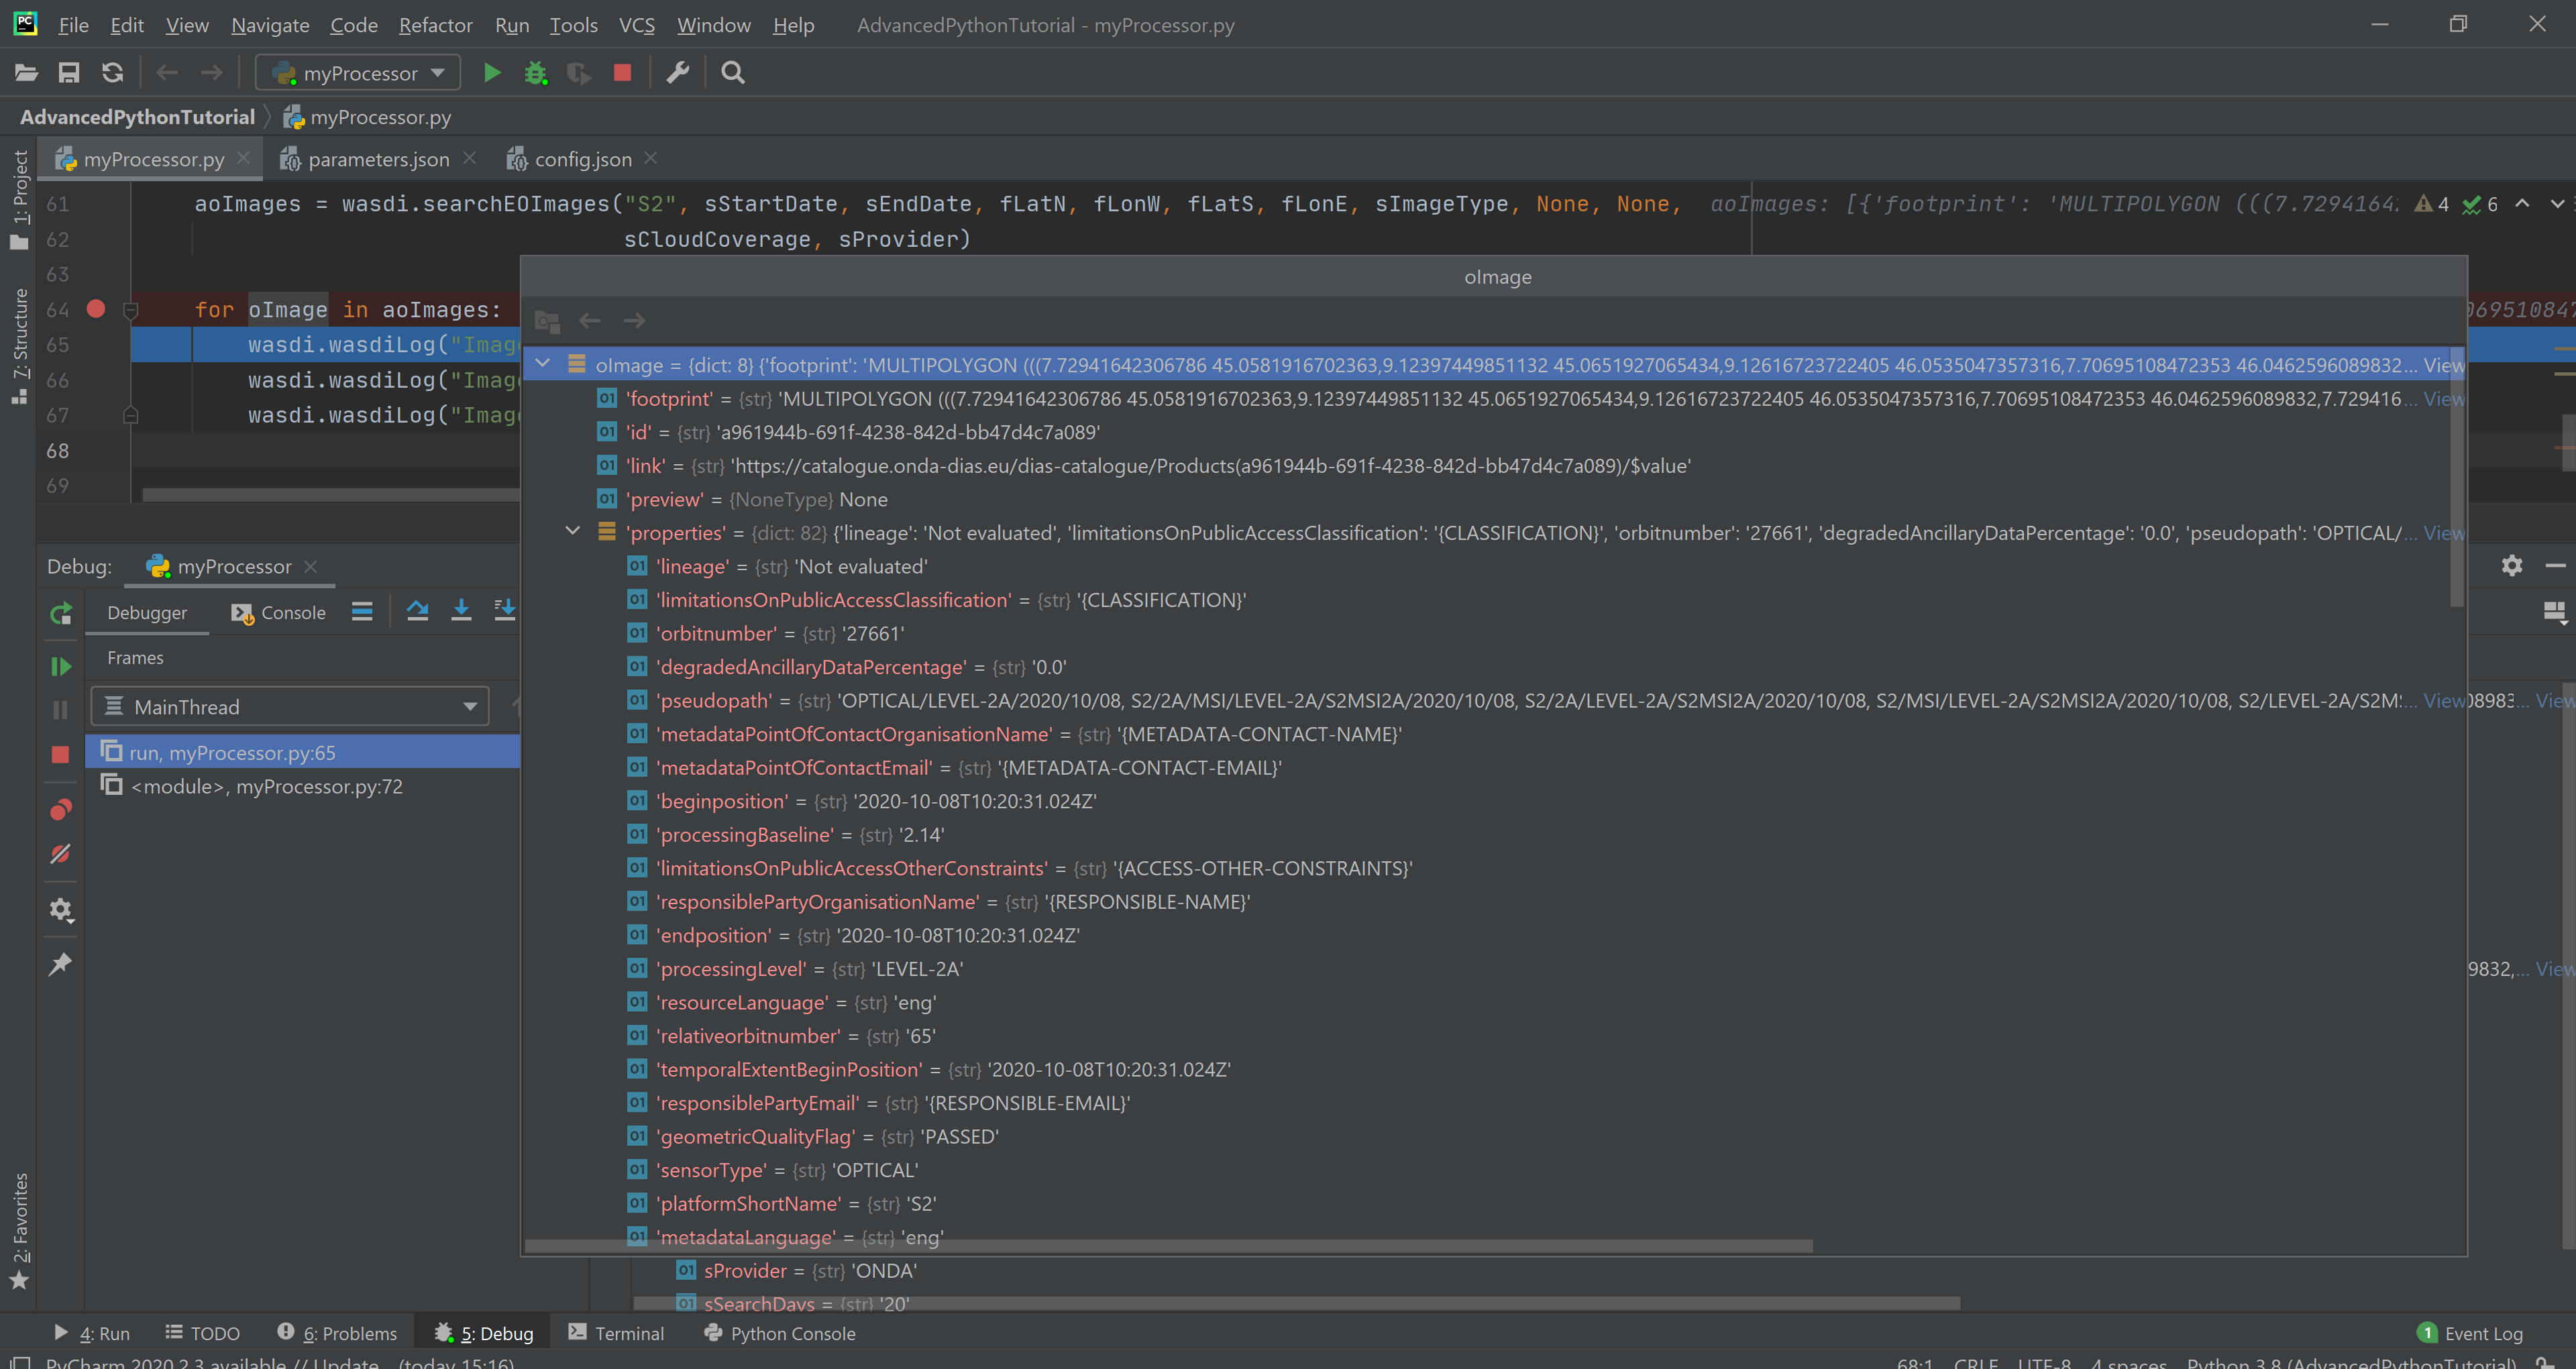
aoImages = wasdi.searchEOImages("S2", sStartDate, sEndDate, fLatN, fLonW, fLatS, fLonE, sImageType, None, None, sCloudCoverage, sProvider)
for oImage in aoImages:
wasdi.wasdiLog("Image Name WITHOUT Extension:" + oImage['title'])
wasdi.wasdiLog("Image Name WITH Extension:" + oImage['fileName'])
The method searcheEOimages allows filtering for area of interest (bounding box), mission, product type, orbit number, sensor operational mode and cloud coverage (when applicable to the data type). A more advanced usage allows to specify the provider to use, but that’s beyond the scope of this tutorial.

The method returns a list of objects, one per image. Each of these object is in turn a dictionary, describing the image: it contains every propriety returned by the search, such as, for example:
footprint
beginPosition
endPosition
cloudShadowPercentage
relativeOrbitNumber
orbitDirection
There are many more, and we can see them debugging the code. Please note that the number and type of these parameters depends on the data provider.
Step 3: import EO images in the workspace
Now we want to import selected images in the workspace.
# STEP 3: Import EO Images in the workspace
# Get the list of products in the workspace
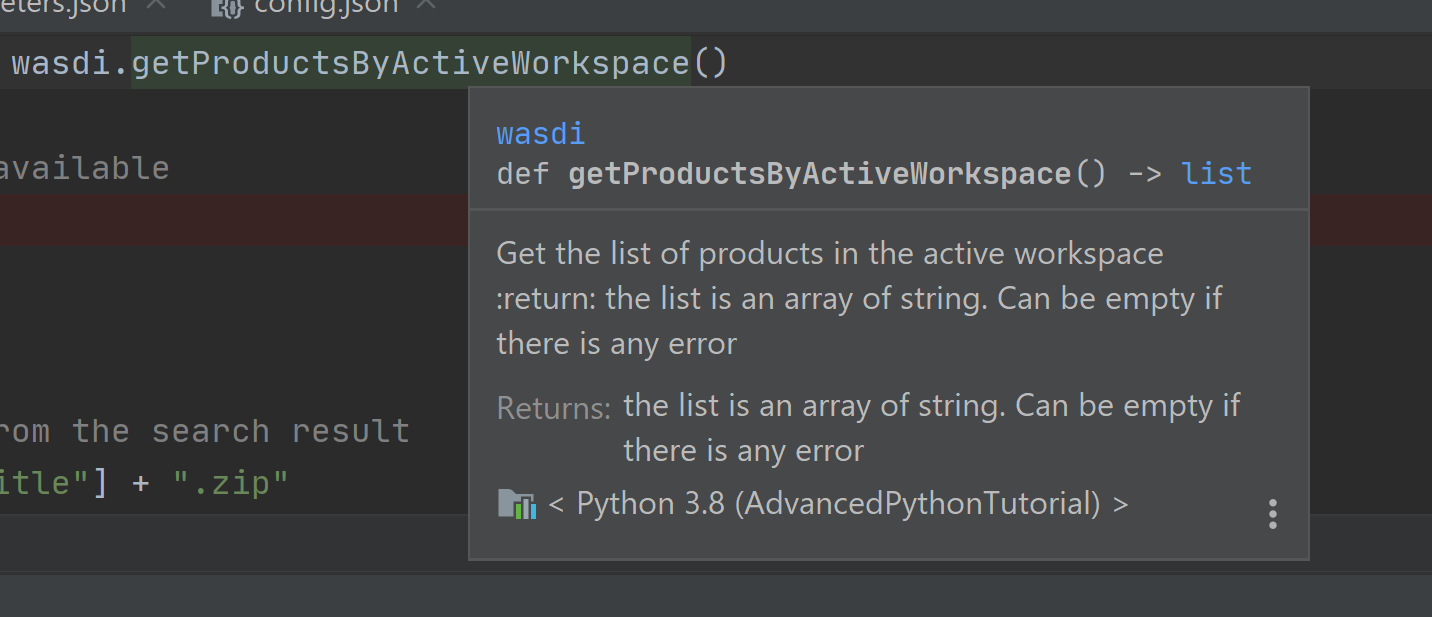
asAlreadyExistingImages = wasdi.getProductsByActiveWorkspace()
# List of images not yet available
aoImagesToImport = []
# For each found image
for oImage in aoImages:
# Get the file Name from the search result
sFileName = oImage["fileName"]
# If the file name is not yet in the workspace
if sFileName not in asAlreadyExistingImages:
# Add it to the list of images to import
aoImagesToImport.append(oImage)
# If there are images to import
if len(aoImagesToImport) > 0:
# Trigger the import of the images
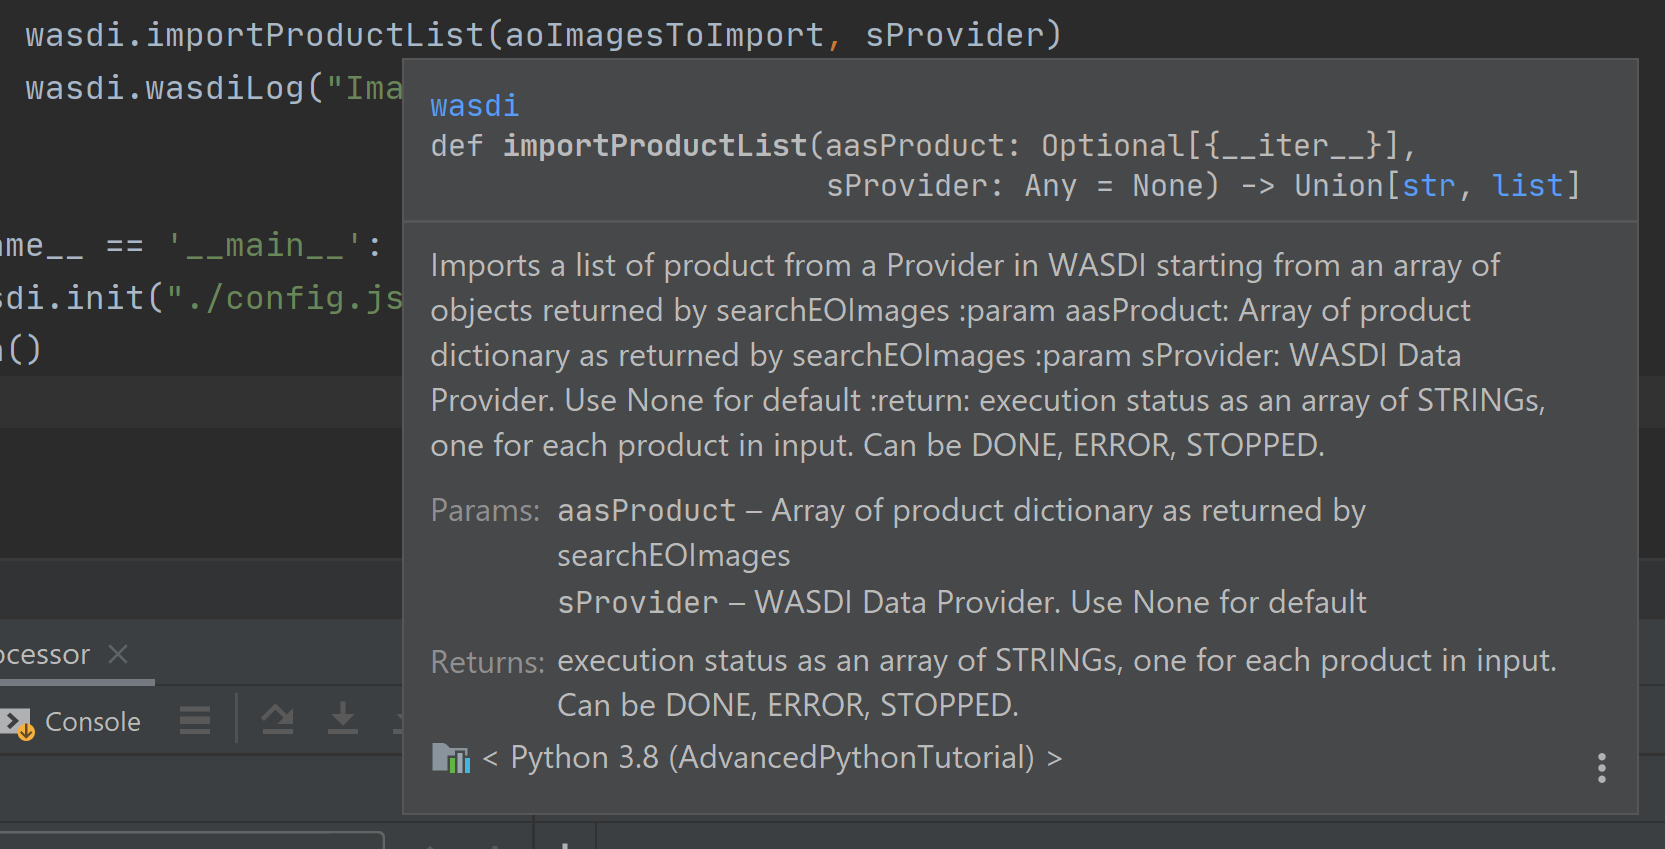
wasdi.importProductList(aoImagesToImport, sProvider)
wasdi.wasdiLog("Images Imported")
Here we check, for each image, if it is not yet in the workspace. It’s not strictly necessary, as it is handled by WASDI, but in this way we optimize the process: if an image is not already present, then we add it to the list of images to be imported, and finally we retrieve them from the provider.
The method wasdi.getProductsByActiveWorkspace returns a string array with the names of files in the workspace.
To compare the search results with the files in the workspace we need to obtain the file name. This can depend on the provider and on the image type but, for instance, with every Sentinel image it’s easily reproduced with:
sFileName = oImage["title"] + ".zip"
Next, wasdi.importProductList allows to import a batch of images from the specified provider.
WASDI will take control of the process and handle the task by queuing the requests in the background. The entire operation runs in the cloud. It will take a while, and during that time you will not be able to control the debugger. However, if you get back to your browser (did you remember to leave it open on the workspace editor?) you will be able to check the status of the operation.

If you click on the list icon in the bottom right corner of the screen, you can also view details for each operation in progress:

Step 4: create an 8-bit RGB GeoTIFF out of a Sentinel-2 image
Now we want to open one of those Sentinel-2 images, extract bands for Red, Green and Blue (RGB) and use them to construct an RGB GeoTIFF. We are going to use numpy and GDAL. GDAL is a set of tool for working with geo referenced images. You may need to install it in your environment. In that case, execute
pip install GDAL
in your terminal.
Make sure you have the latest version of Microsoft Visual C++ Build Tools installed, you can download the installer from this link https://visualstudio.microsoft.com/it/thank-you-downloading-visual-studio/?sku=BuildTools&rel=16.
If you get some error, try to install GDAL following these steps:
Download the wheel from (https://github.com/cgohlke/geospatial-wheels/releases) the website has many libraries that are very useful.
1.1 Pay attention to the last part of the wheel to choose the correct one suitable for your PC, for example check if it is 64 or 32 bit.(For more information check: https://realpython.com/python-wheels/#what-is-a-python-wheel).
Open the Windows Terminal (CMD) and type “pip install (the path the wheel located in)”.
Add the following imports:
import numpy
import zipfile
import os
from osgeo import gdal
Now we need a way to extract the three bands from the Sentinel-2 image.
run()
Here in the following you can find the lines to add to the run method. Beware, there are two calls to two methods, extractBands and stretchBandValues, which will not work: we are going to implement them in a moment, keep reading. Here’s the snippet:
# STEP 4: From the S2 image create a 8-bit RGB GeoTiff
# Get again the list of images in the workspace:
asAvailableImages = wasdi.getProductsByActiveWorkspace()
# Check if we have at least one image
if len(asAvailableImages) <= 0:
# Nothing found
wasdi.wasdiLog("No images available, nothing to do.")
wasdi.updateStatus("DONE", 100)
return
# Initialize the image to process as None
sImageToProcess = None
# Take the first S2 image
for sImg in asAvailableImages:
if sImg.startswith("S2"):
sImageToProcess = sImg
break
if sImageToProcess is None:
wasdi.wasdiLog("Cannot find our S2 image in the workspace")
wasdi.updateStatus("DONE", 100)
return
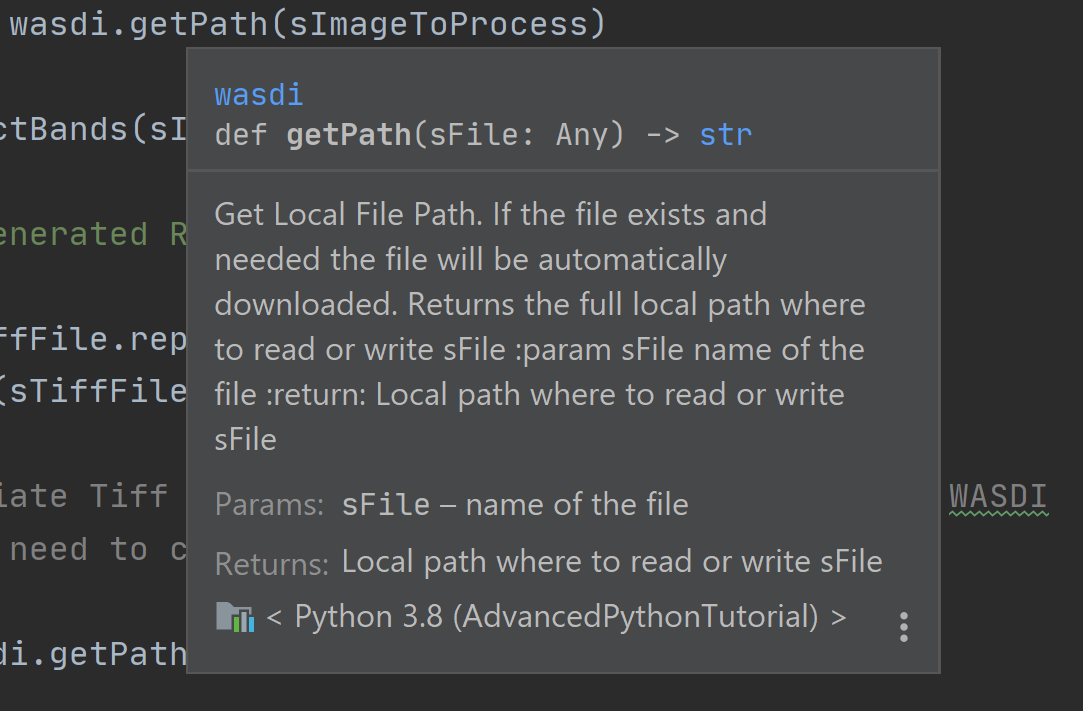
# Get the local path of the image: this is one of the key-feature of WASDI
# The system checks if the image is available locally and, if it is not, it will download it
sLocalImagePath = wasdi.getPath(sImageToProcess)
sTiffFile = extractBands(sImageToProcess, sImageType)
wasdi.wasdiLog("Generated RGB Tiff: " + sTiffFile)
sOutputFile = sTiffFile.replace(".tif", "_rgb.tif")
stretchBandValues(sTiffFile, sOutputFile)
# Delete intermediate Tiff File: NOTE this has not been added to WASDI
# so there is the need to clean only the physical file
try:
os.remove(wasdi.getPath(sTiffFile))
except:
wasdi.wasdiLog("Error removing " + sTiffFile)
# Add the real output to the WASDI Workspace
# NOTE: here starts the opposite path: when running locally, WASDI will upload the file to the cloud
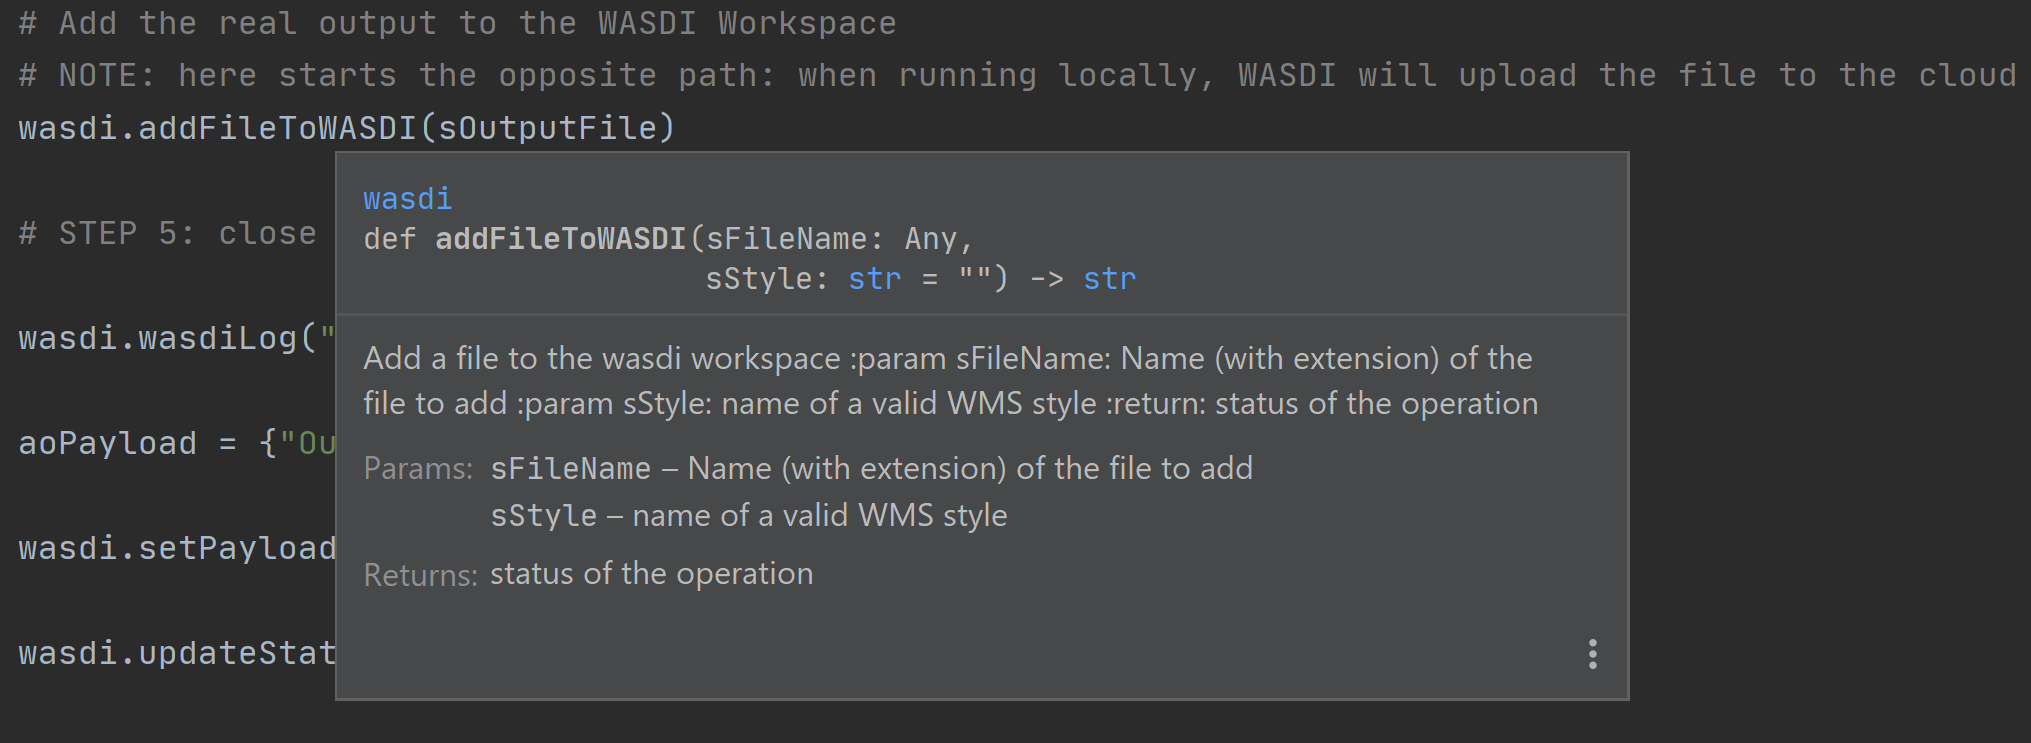
wasdi.addFileToWASDI(sOutputFile)
You noticed the call to wasdi.getPath: those are very important lines, since it’s one of the basis on which we built the library. Up to now, every file path we used was relative (we actually used just the file name). The key concept here is that a file is not needed locally until it is open (think of it as a kind of lazy access). WASDI’s getPath method is used to translate a file name to an absolute path. When the developer tries to access the file, WASDI understands if it exists in the platform or not and returns, depending on the case, either the local absolute path in which to create a file that does not yet exist, or the local absolute path from which it is possible to read the searched file. In this second case, the system automatically understands that the developer is currently working locally and downloads the required file automatically. As soon as the file is available, the control returns to the IDE, and the debug can proceed.
Note: in general, downloading file is not what we want and, once the processor will be deployed on the cloud, it is not going to happen any more: we will thus be able to process also large batches of EO data. However, as long as we are developing, we need to download some images, just to check that everything works as we expect it to work. The WASDI python library is smart enough to understande whether the code is running on our PC or in the cloud, and change behavior transparently and automatically.
The call to addFileToWasdi is worth a mention too. The method adds the file entry to the WASDI system so that it can be accessed and further used by WASDI. Again, this call has a double way of working: on the cloud, it simply adds the product to the WASDI data collection; when executed locally, the library realizes automatically that the file is missing on the platform and uploads.
Note: we do not like uploads either. However we decided to implement this functionality because being able to test our processor from end to end to is fundamental. So, uploads will take place only during development, whereas they will not be necessary when the processor will run on the cloud.
Next, we need to create the following two methods that we wish to call:
extractBands
stretchBandValues
extractBands
This method gets a collection of bands, and extracts them as a virtual GeoTIFF from the Sentinel-2 image, and finally creates a GeoTIFF with the extracted bands.
def extractBands(sFile, sImageType):
  try:
      sOutputVrtFile = sFile.replace(".zip", ".vrt")
      sOutputTiffFile = sFile.replace(".zip", ".tif")
      # Get the Path
      sLocalFilePath = wasdi.getPath(sFile)
      sOutputVrtPath = wasdi.getPath(sOutputVrtFile)
      sOutputTiffPath = wasdi.getPath(sOutputTiffFile)
      # Band Names for S2 L2
      asBandsJp2 = ['B04_10m.jp2', 'B03_10m.jp2', 'B02_10m.jp2']
      if sImageType != "S2MSI2A":
          # Band Names for S2 L1
          asBandsJp2 = ['B04.jp2', 'B03.jp2', 'B02.jp2']
      with zipfile.ZipFile(sLocalFilePath, 'r') as sZipFiles:
          asZipNameList = sZipFiles.namelist()
          asBandsS2 = [name for name in asZipNameList for band in asBandsJp2 if band in name]
          asBandsZip = ['/vsizip/' + sLocalFilePath + '/' + band for band in asBandsS2]
          asOrderedZipBands = []
          for sBand in ['B04', 'B03', 'B02']:
              for sZipBand in asBandsZip:
                  if sBand in sZipBand:
                      asOrderedZipBands.append(sZipBand)
                      break
          gdal.BuildVRT(sOutputVrtPath, asOrderedZipBands, separate=True)
          # , options="-tr " + sResolution + " " + sResolution
          gdal.Translate(sOutputTiffPath, sOutputVrtPath)
          os.remove(sOutputVrtPath)
          return sOutputTiffFile
  except Exception as oEx:
      wasdi.wasdiLog(f'extractBands EXCEPTION: {repr(oEx)}')
  return ""
Sentinel-2 images contain Blue in band 2, Green in band 3, and Red in band 4. Here we extract them from the original file, save them into a virtual GeoTIFF (a .vrt file), and then we create a GeoTIFF. Finally, we can delete the virtual file, and return the name of the GeoTIFF RGB file we just created
stretchBandValues
Here, using numpy, we manipulate the bands. Add the following method to myProcessor.py:
def stretchBandValues(sOutputTiffPath, sStretchedOutputFile):
  oDataset = gdal.Open(wasdi.getPath(sOutputTiffPath))
  if not oDataset:
      wasdi.wasdiLog("Impossible to get Dataset from " + sOutputTiffPath)
      return ""
  [iCols, iRows] = oDataset.GetRasterBand(1).ReadAsArray().shape
  oDriver = gdal.GetDriverByName("GTiff")
  oOutDataFile = oDriver.Create(wasdi.getPath(sStretchedOutputFile), iRows, iCols,
                                oDataset.RasterCount, gdal.GDT_Byte, ['COMPRESS=LZW', 'BIGTIFF=YES'])
  # sets same geotransform as input
  oOutDataFile.SetGeoTransform(oDataset.GetGeoTransform())
  # sets same projection as input
  oOutDataFile.SetProjection(oDataset.GetProjection())
  for iBand in range(oDataset.RasterCount):
      iBand += 1
      oBand = oDataset.GetRasterBand(iBand)
      if oBand is None:
          wasdi.wasdiLog("BAND " + str(iBand) + " is None, jump")
          continue
      adBandArray = numpy.array(oBand.ReadAsArray())
      adBandArray[adBandArray > 5000] = 5000
      adBandArray = adBandArray.astype(float)
      adBandArray *= 0.051
      adBandArray = adBandArray.astype(int)
      oOutDataFile.GetRasterBand(iBand).WriteArray(adBandArray)
      oOutDataFile.GetRasterBand(iBand).SetNoDataValue(0)
      oBand = None
  # saves to disk!!
  oOutDataFile.FlushCache()
  wasdi.wasdiLog("Saved " + sStretchedOutputFile)
This method opens the tif file we just created, reads the bands as numpy arrays, and cuts each band empirically at a value of 5000, then scales their values down into [0, 255]. The file is saved to disk and its name is returned.
Step 5: close the WASDI processor
We’re almost done! Add the remaining part to myProcessor.py:
# STEP 5: close the processor
wasdi.wasdiLog("Created output file " + sOutputFile)
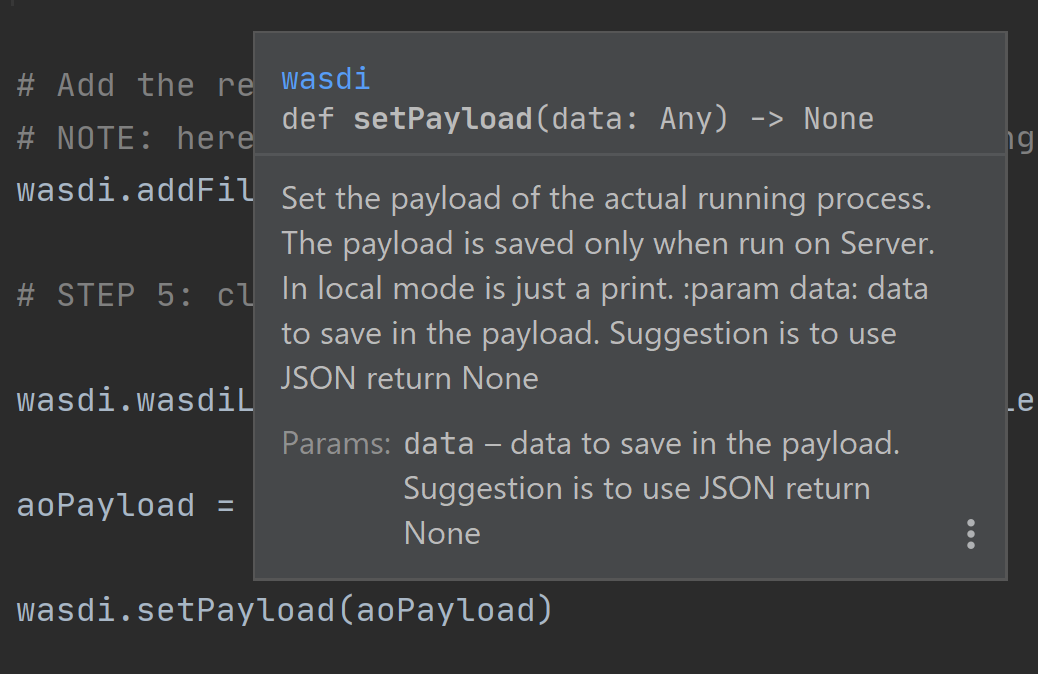
aoPayload = {"OutputFile": sOutputFile}
wasdi.setPayload(aoPayload)
wasdi.updateStatus("DONE", 100)
Here we set a payload for the processor. The payload consists of the output parameters, i.e., a dictionary that can be retrieved later in form of a JSON object.
To retrieve that payload you can use wasdi.getProcessorPayloadAsJson and pass the processID as argument. You can obtain the process ID from the UI or programmatically: it’s given in output when launching another processor. Finally, we set the status to DONE before closing the processing.
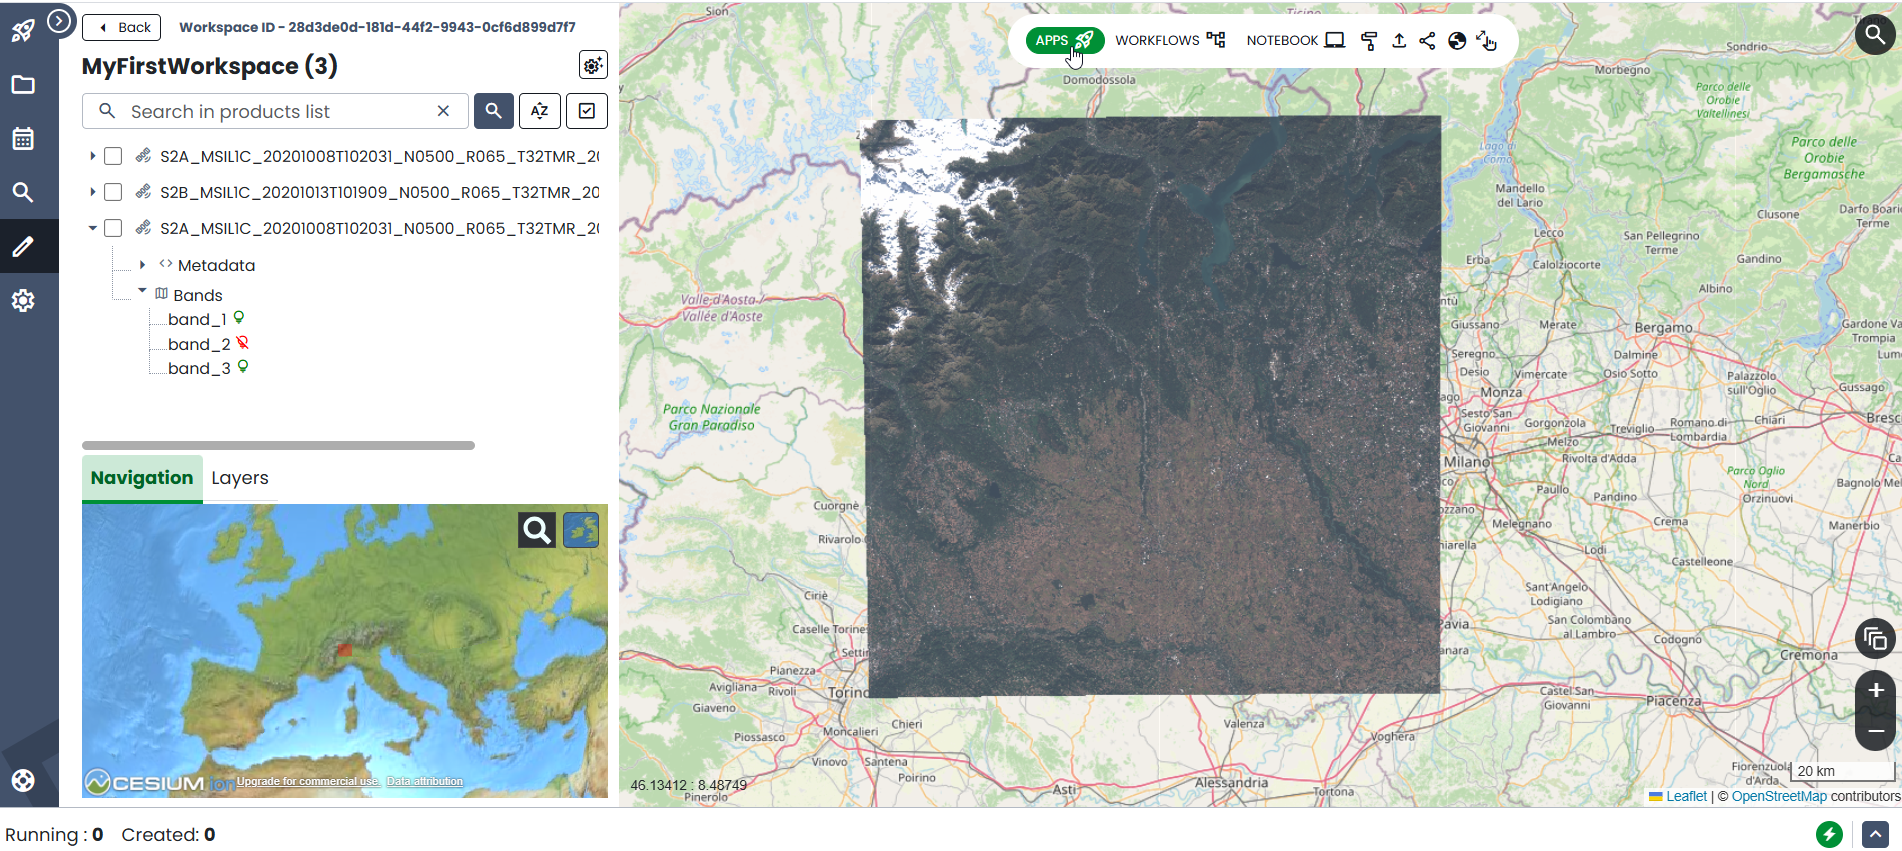
Once the processor is done, we can go to the web UI and open the final result:

To wrap up, you can download the complete code from here: myProcessor.py
Creating a help file
You can create a manual for those who are going to use your processor by adding a file called readme.md to your project. As you can see, it is a markdown file that, once the processor will be deployed, will be rendered to the users.
In the help, it’s a good idea to describe what the processor does and how to use its parameters. This is an example you can copy and paste in your file:
# WASDI Advanced Python Tutorial
This processor searches for Sentinel-2 images and extract an RGB GeoTIFF from it.
## Parameters
Parameters are in this form:
{
"BBOX": "45.9,8.5,45.7,8.7",
"MAXCLOUD": "50",
"DATE": "2020-10-25",
"SEARCHDAYS": "20",
"PROVIDER": "AUTO"
}
where:
- BBOX is the bounding box represented as a string with the format: "LATN,LONW,LATS,LONE"
- MAXCLOUD is an integer representing the maximum cloud coverage (percent)
- DATE is a date for the search
- SEARCHDAYS is the maximum number of days to search in the past, so the search will be performed on the BBOX and in the period [DATE - SEARCHDAYS, DATE], and for images with at most MAXCLOUD% cloud coverage
- PROVIDER is the data provider: use "AUTO"
Check your file locally, you’re going to use it in a moment. If you wish, you can download it from here: readme.md
Deploy the processor on WASDI
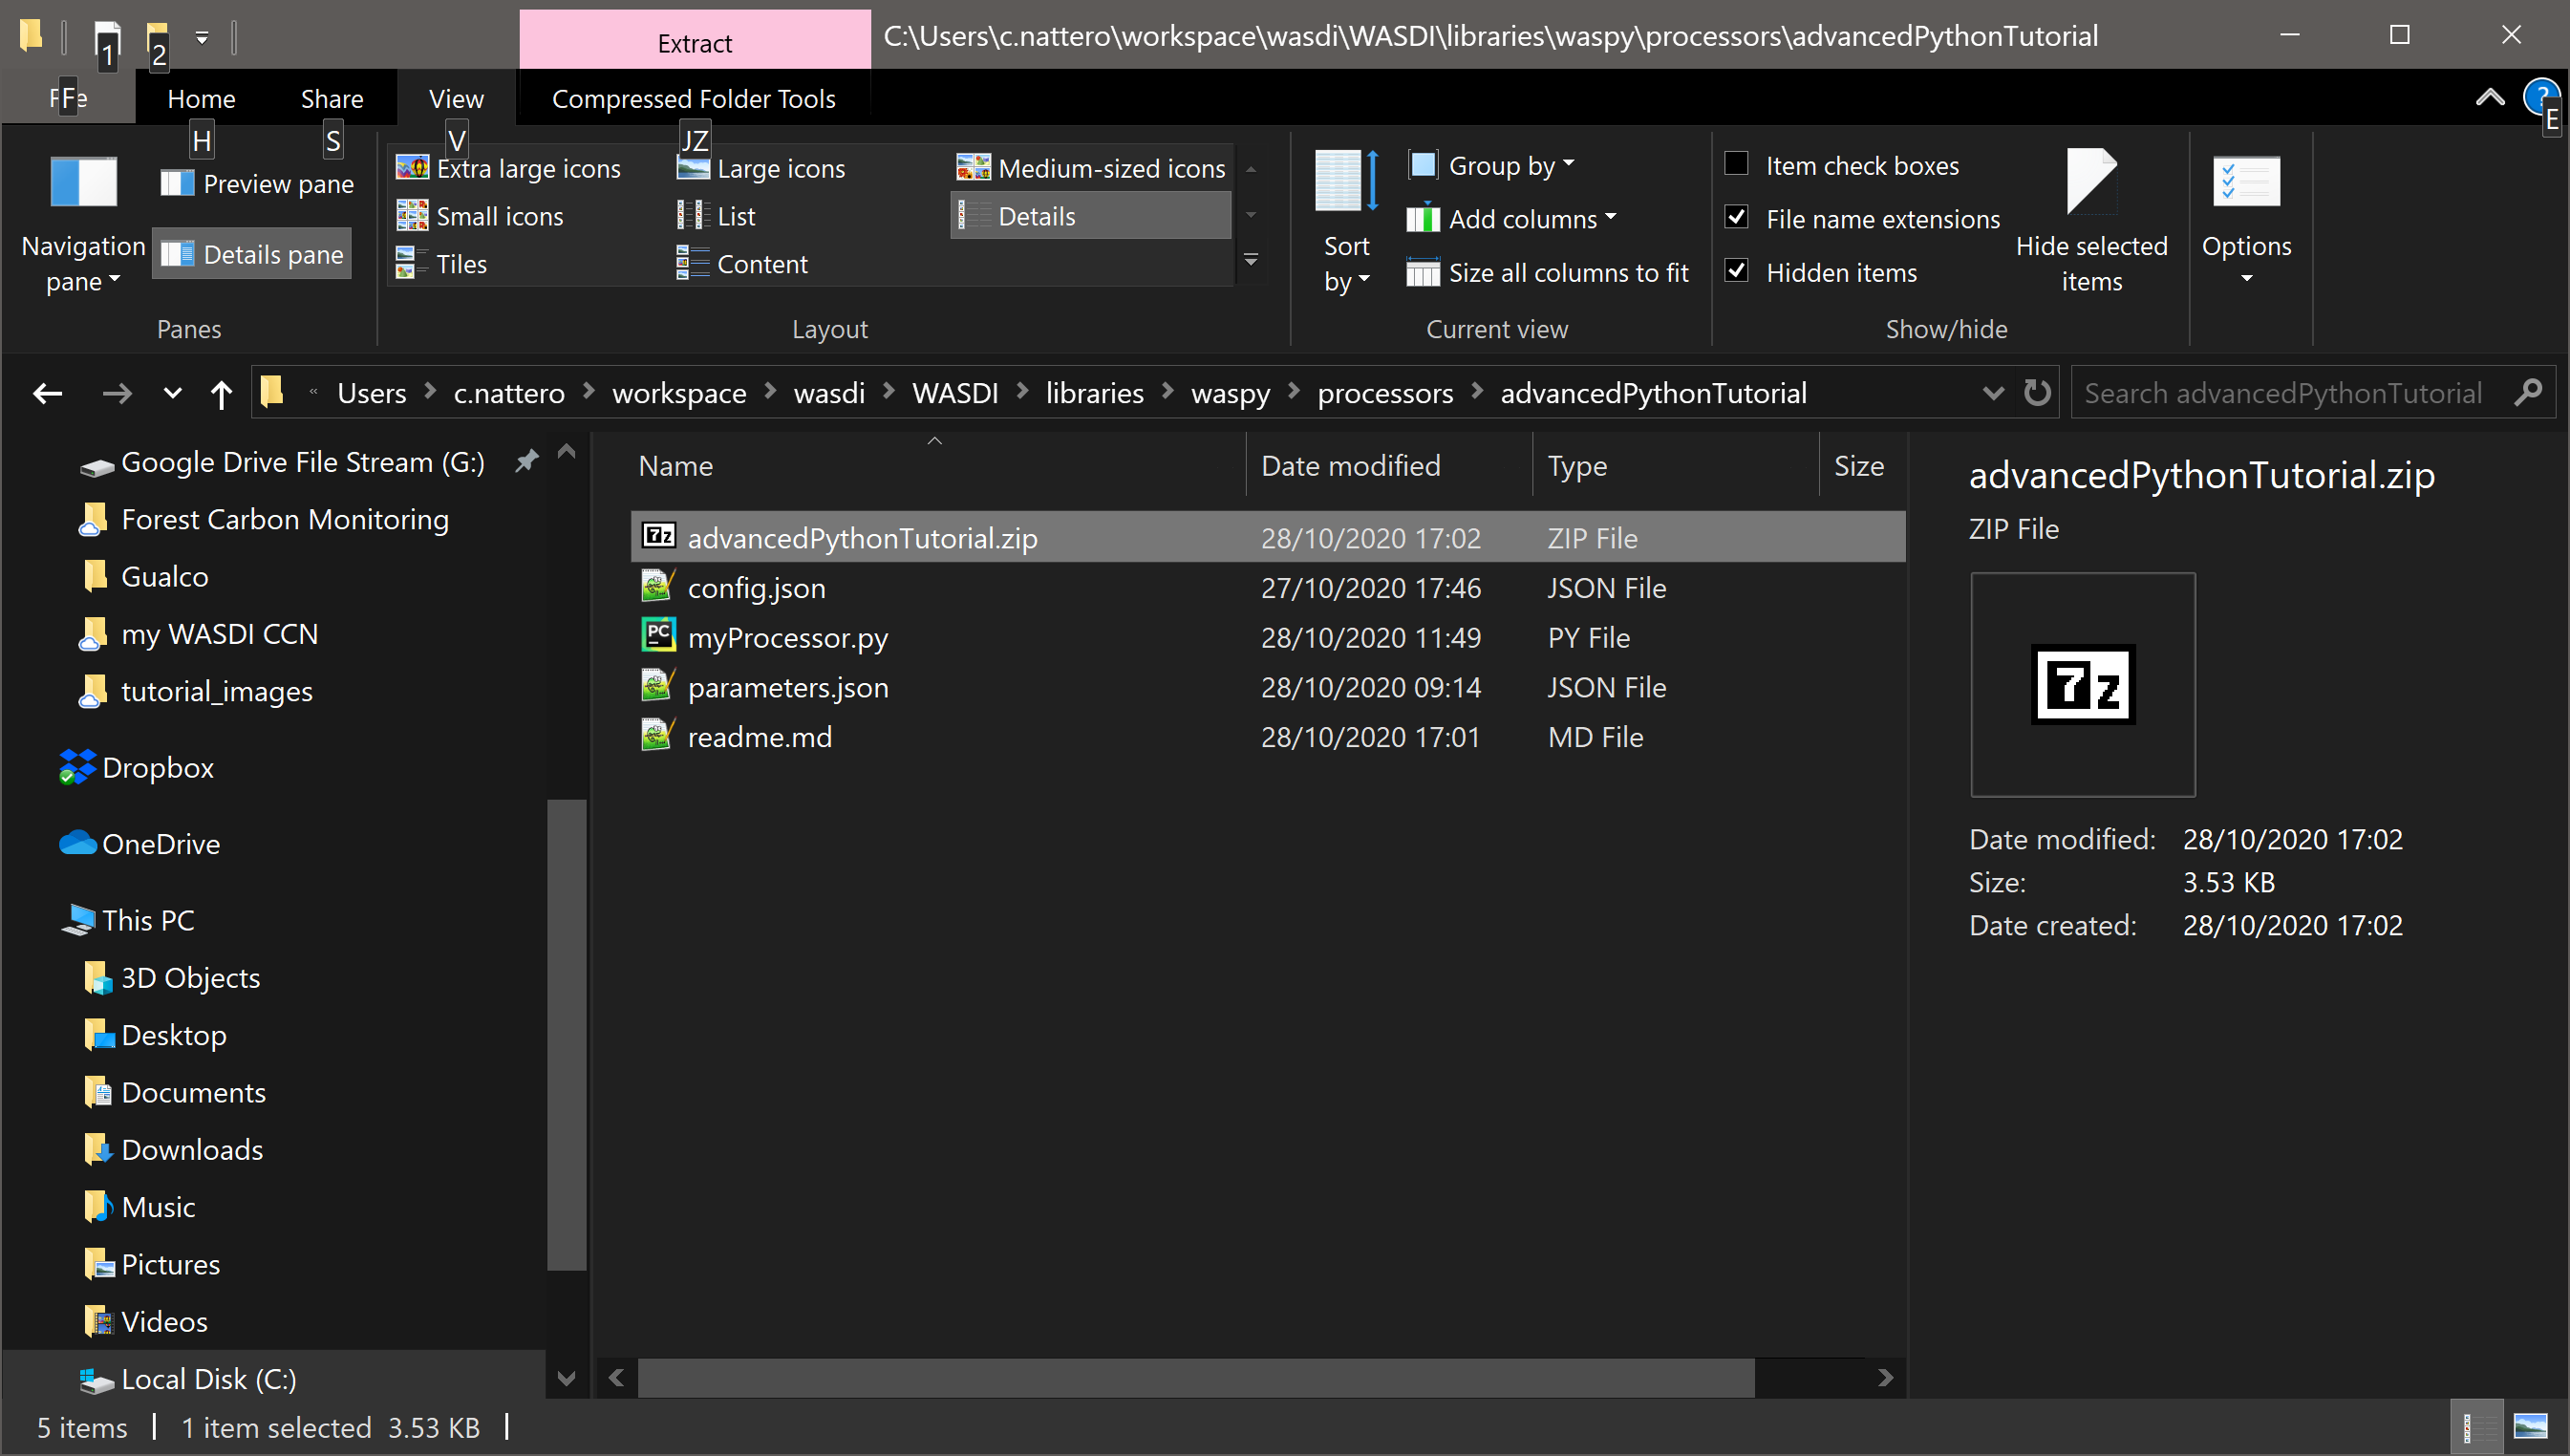
Now go to the folder containing your processor, create a zip file containing only the following two files:
Pay attention: parameters.json is not necessary, and it is definitely safer not to add config.json
Let us stress the latter once more: do not include config.json in the zip!
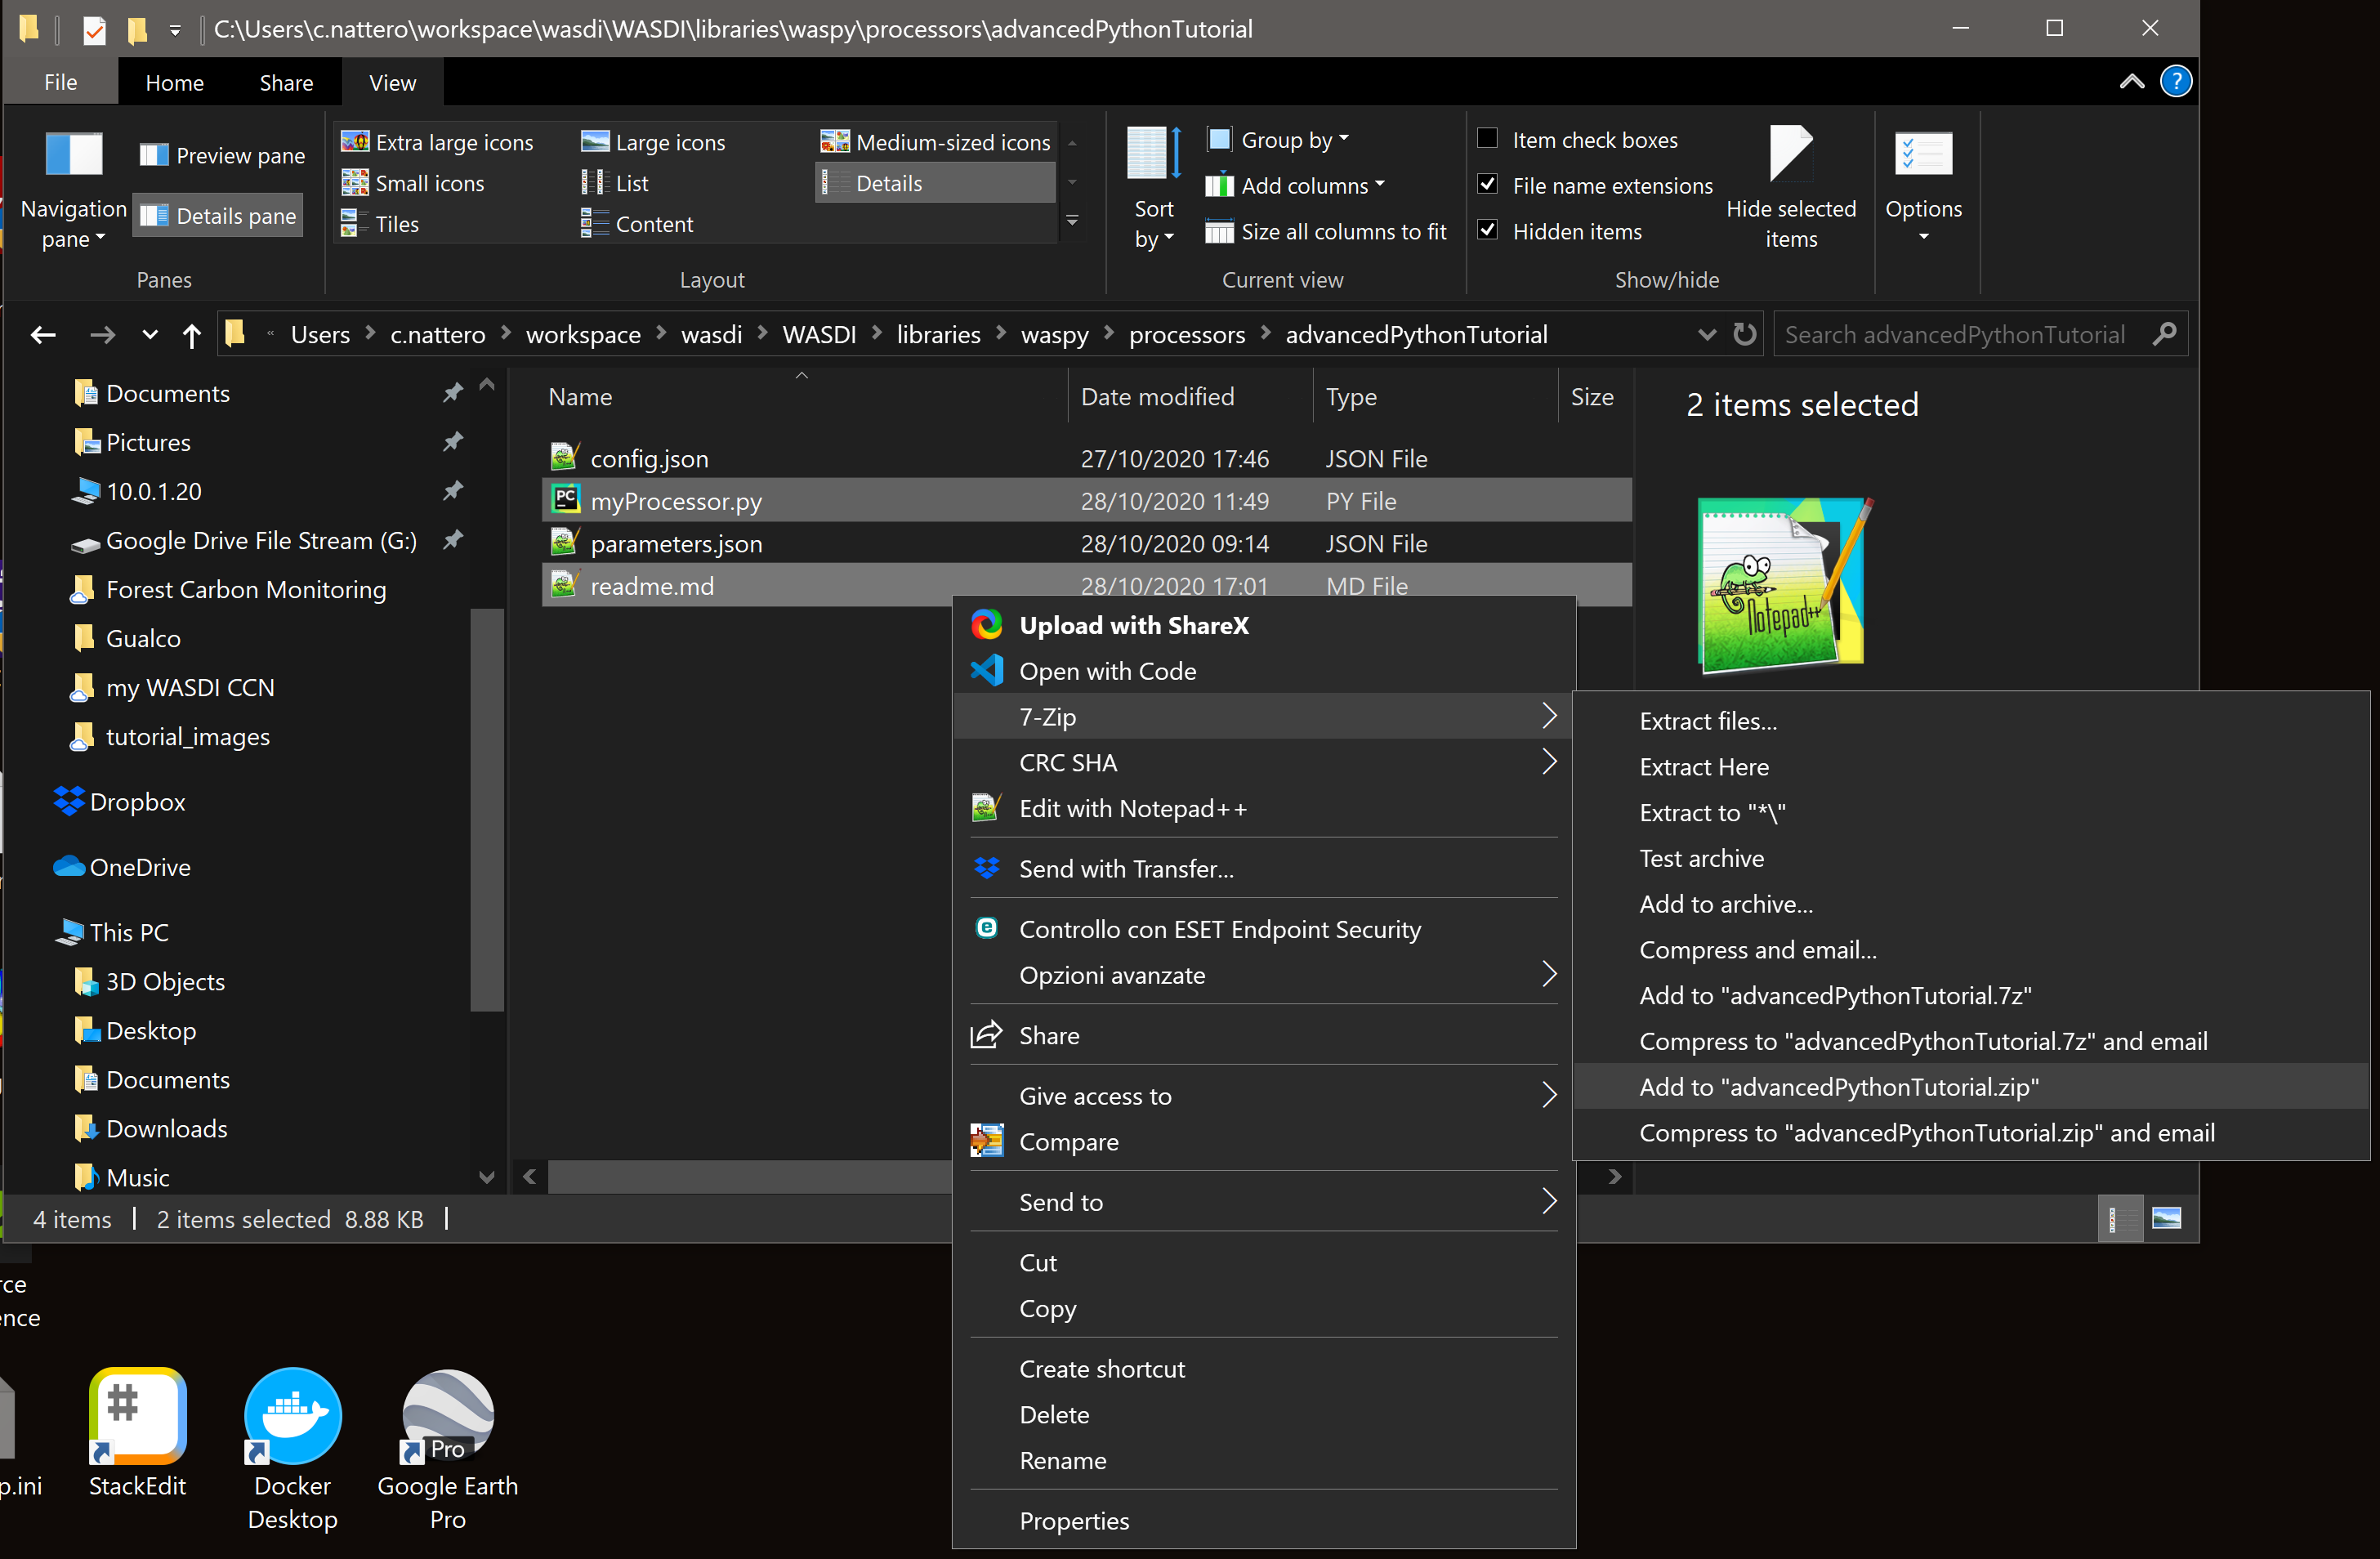
You may call the zip file advancedPythonTutorial.zip if you need a suggestion, but the name really makes no difference.
Note: in a more realistic situation, your processor would probably consist of several files, directory and additional ancillary data (e.g., a DTM); in such a case, be sure to:
make the run method in myProcessor.py the entry point
include every relevant file in the zip archive
Now go to the WASDI web UI, make sure you are in editing mode (i.e., you have a workspace open). Click the “APPS” menu, then click on “New App”.

A dialog opens:
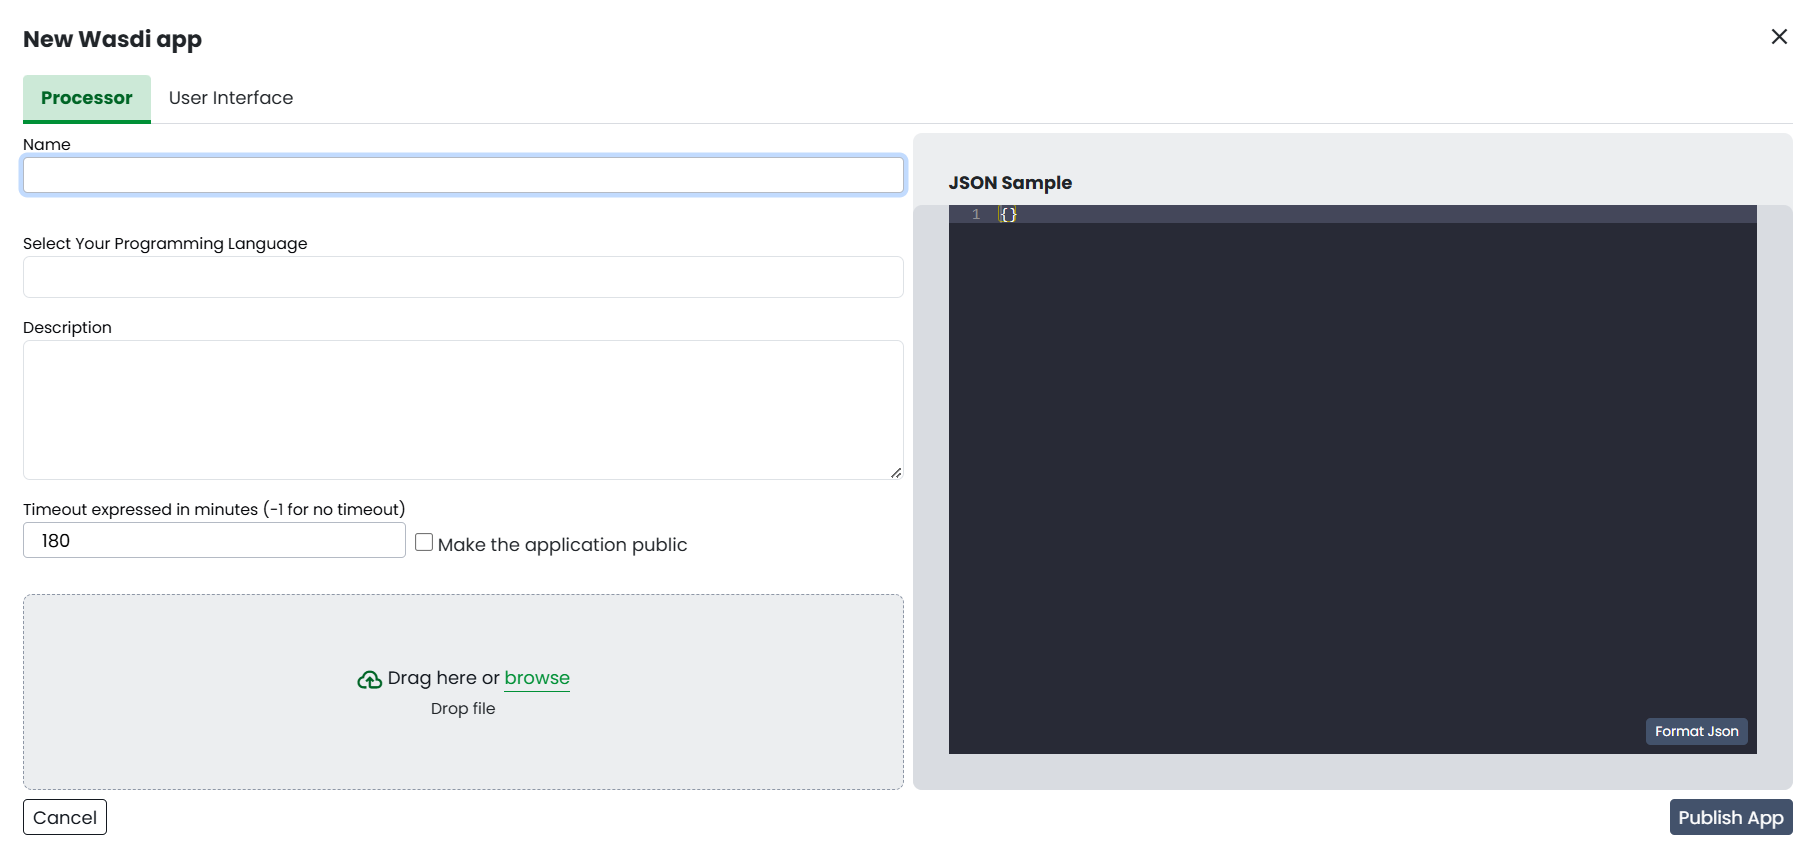
In the dialog:
give your processor a name (e.g., advancedpythontutorial). It must be one small case string
select Python 3.7 as Type
write a short description, e.g. “This is my very first demo processor”
leave the TimeOut with its default value (180)
paste the content of your parameters.json into the JSON sample
make sure you uncheck the Make Application Public box (yes, it’s definitely a nice processor, but we are going to have plenty of copies of it… ;-) )
Drag and drop your newly created zip file into the area for download

Are you done? Click “Publish App”!
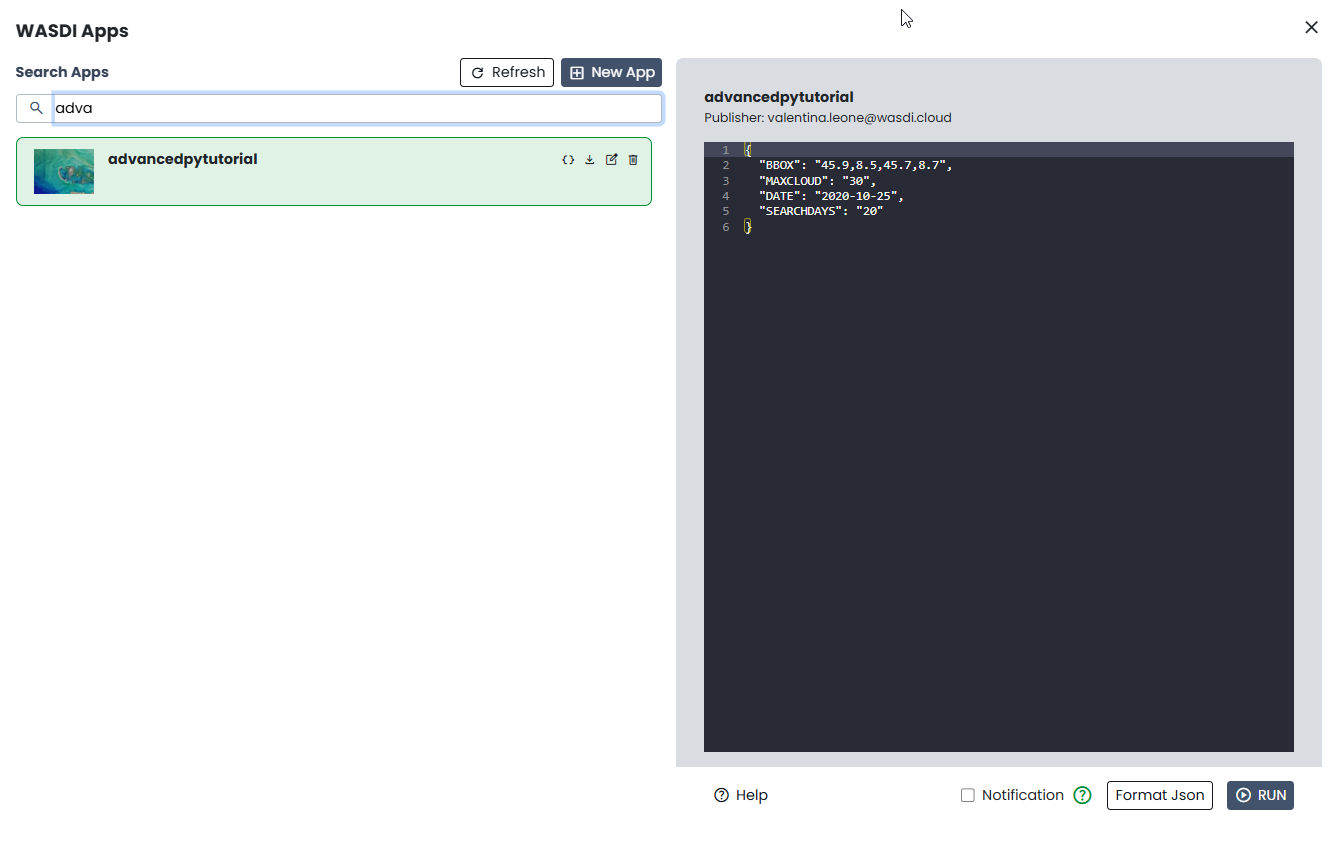
The processor is uploaded to WASDI and automatically deployed. Give it a moment and then click on WASDI Apps. Start writing the name of the processor to search for it.
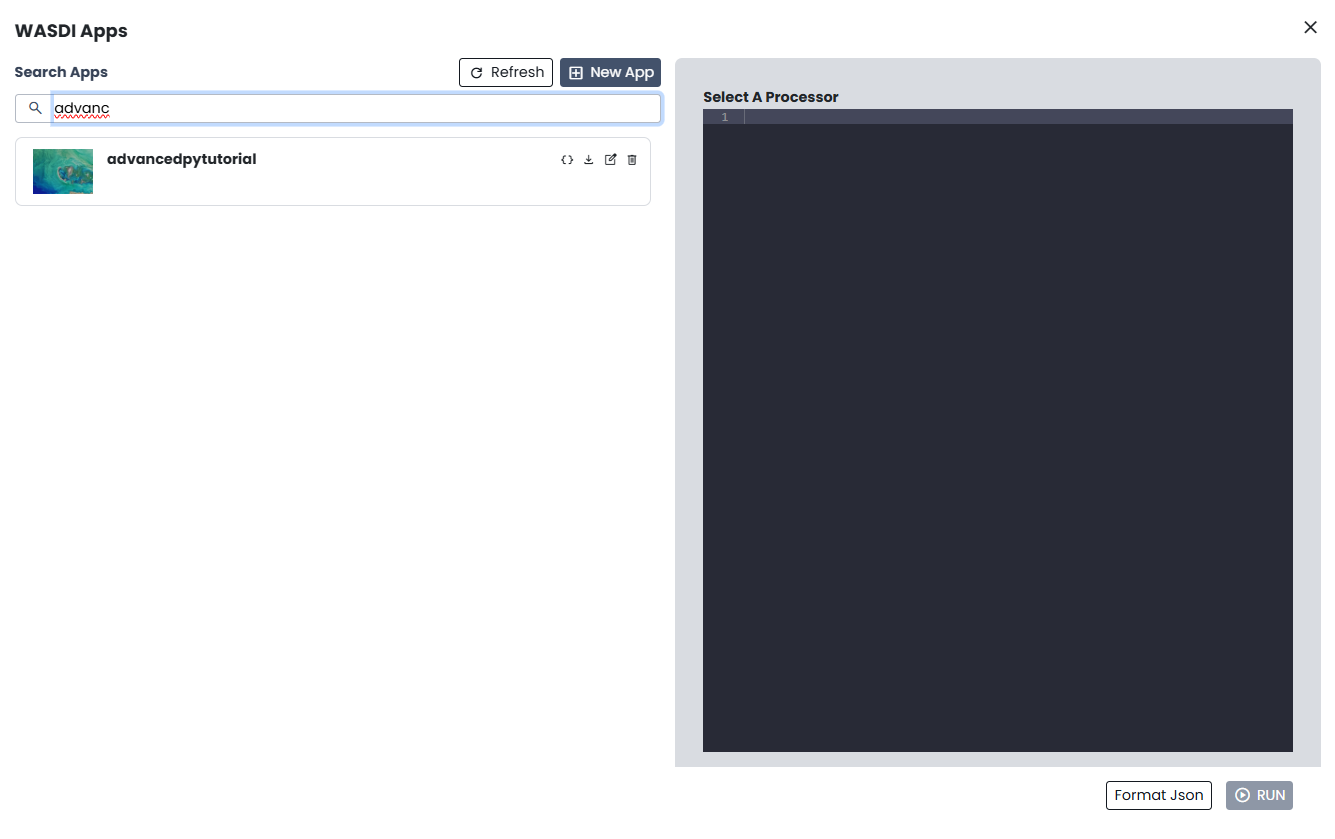
Select it, and your JSON demo will be displayed. From here you can run it!
Turn the processor into an app on the marketplace
Well, well, you did great! Now it’s time to let others use your processor (in a not too distant future, you will even be able to monetize your processor by selling its usage): enter the WASDI app store!
Go back to the apps, search for advancedpythontutorial, select it, and clic on the pencil icon to edit its properties.

You will see that the dialog has some more other than the one we took care of. Now, we are going to see all of them in details:
Processor
Store
Media
Share
UI
Processor tab
We already discussed its usage, but there are still some tweaks we can do here. If you ever needed to edit one or more of the files involved, simply make a zip containing just the files you need to modify, drag and drop it as usual, and click apply. Of course, you can always change any other propriety you wish, from here. Moreover, there are three cases in which you wish to click the Force refresh button:
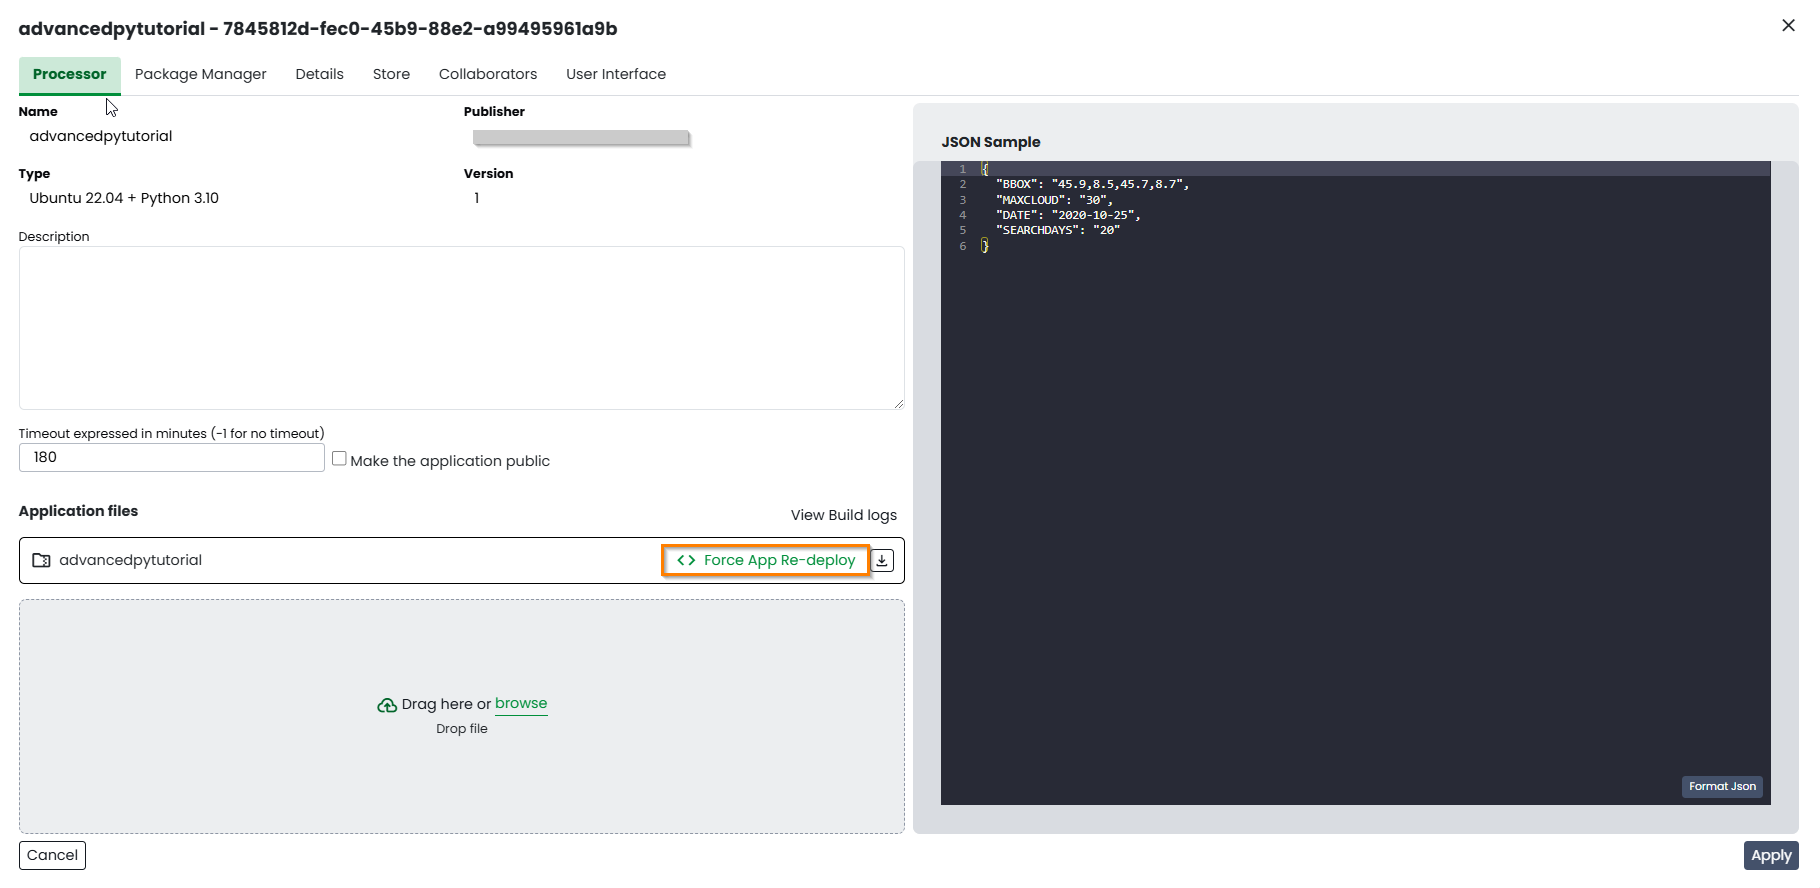
you added new pip packages. If you wish to use other packages, you need to write them down, one per line, in a text file called pip.txt. Add the file to the zip and deploy it
you need additional system packages installed. If you need to install additional packages using apt (your code runs on a Ubuntu distro), add a text file called packages.txt and list the packages you need, one per line. As in the previous case: add the file to the zip and deploy it
you updated the wasdi lib
Package Manager
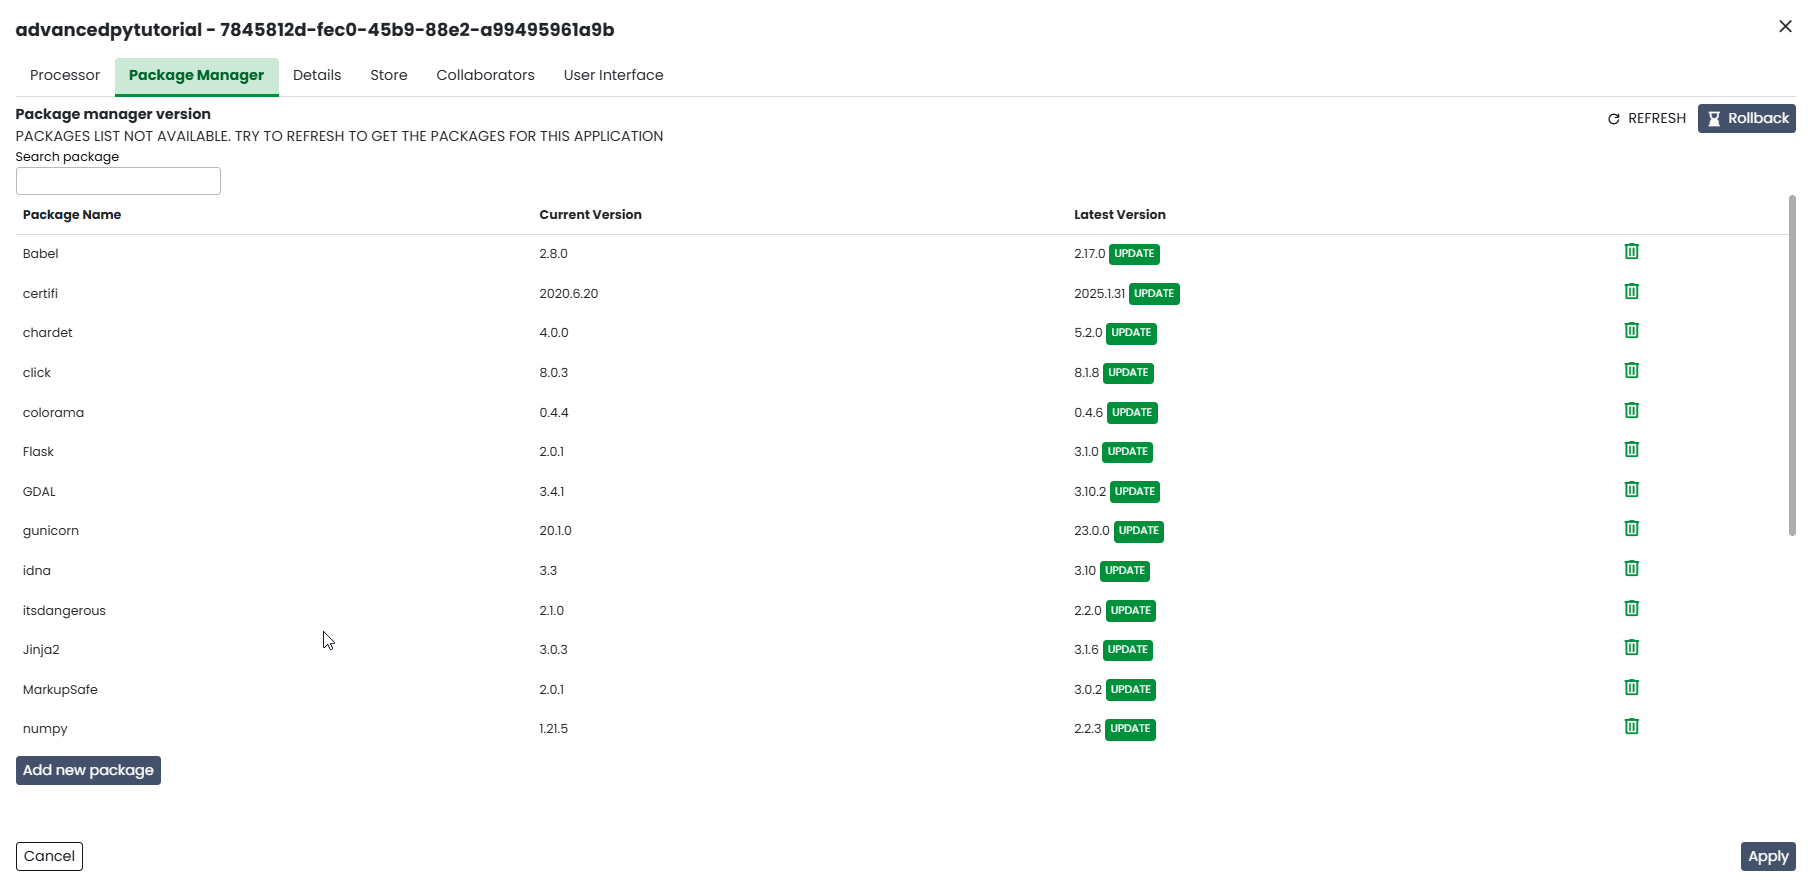
Here you can see the information about the packages installed to run your application. You can search for packages, delete packages or add new ones.
Details
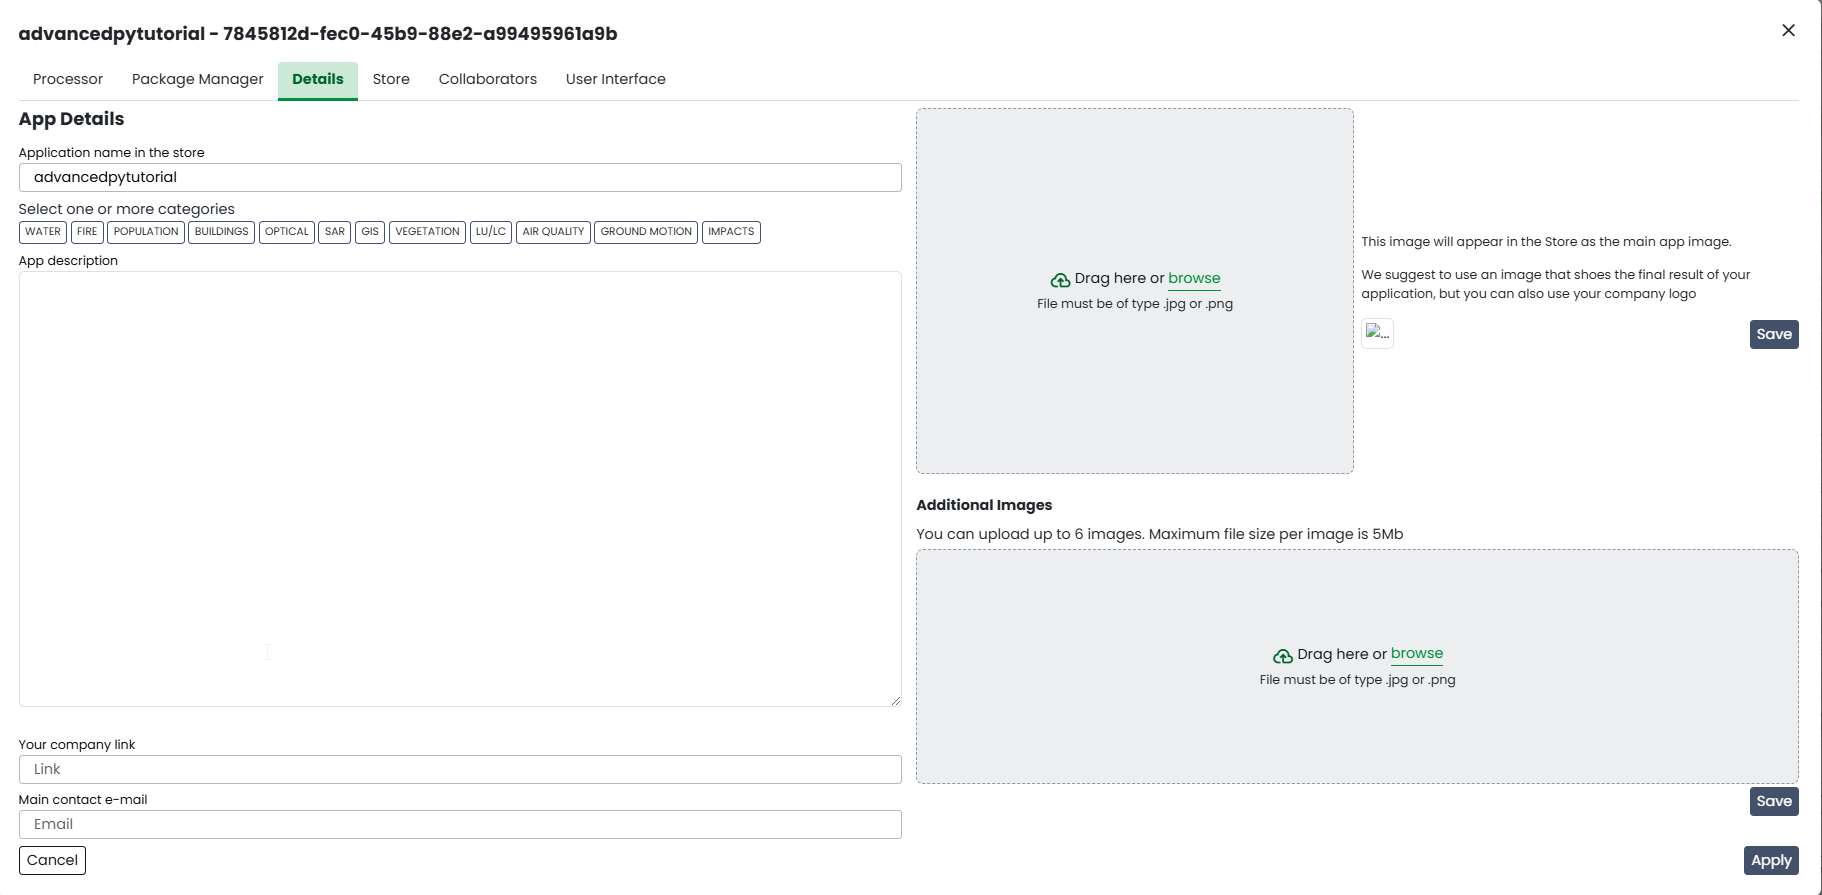
Here it’s where you can give more details about your application, in case you want to show it in the marketplace. You can choose a more friendly name, add a link and an email address for the users to reach out to support, write a longer and nicer description and select some categories. You can also add a logo and additional images.
Store
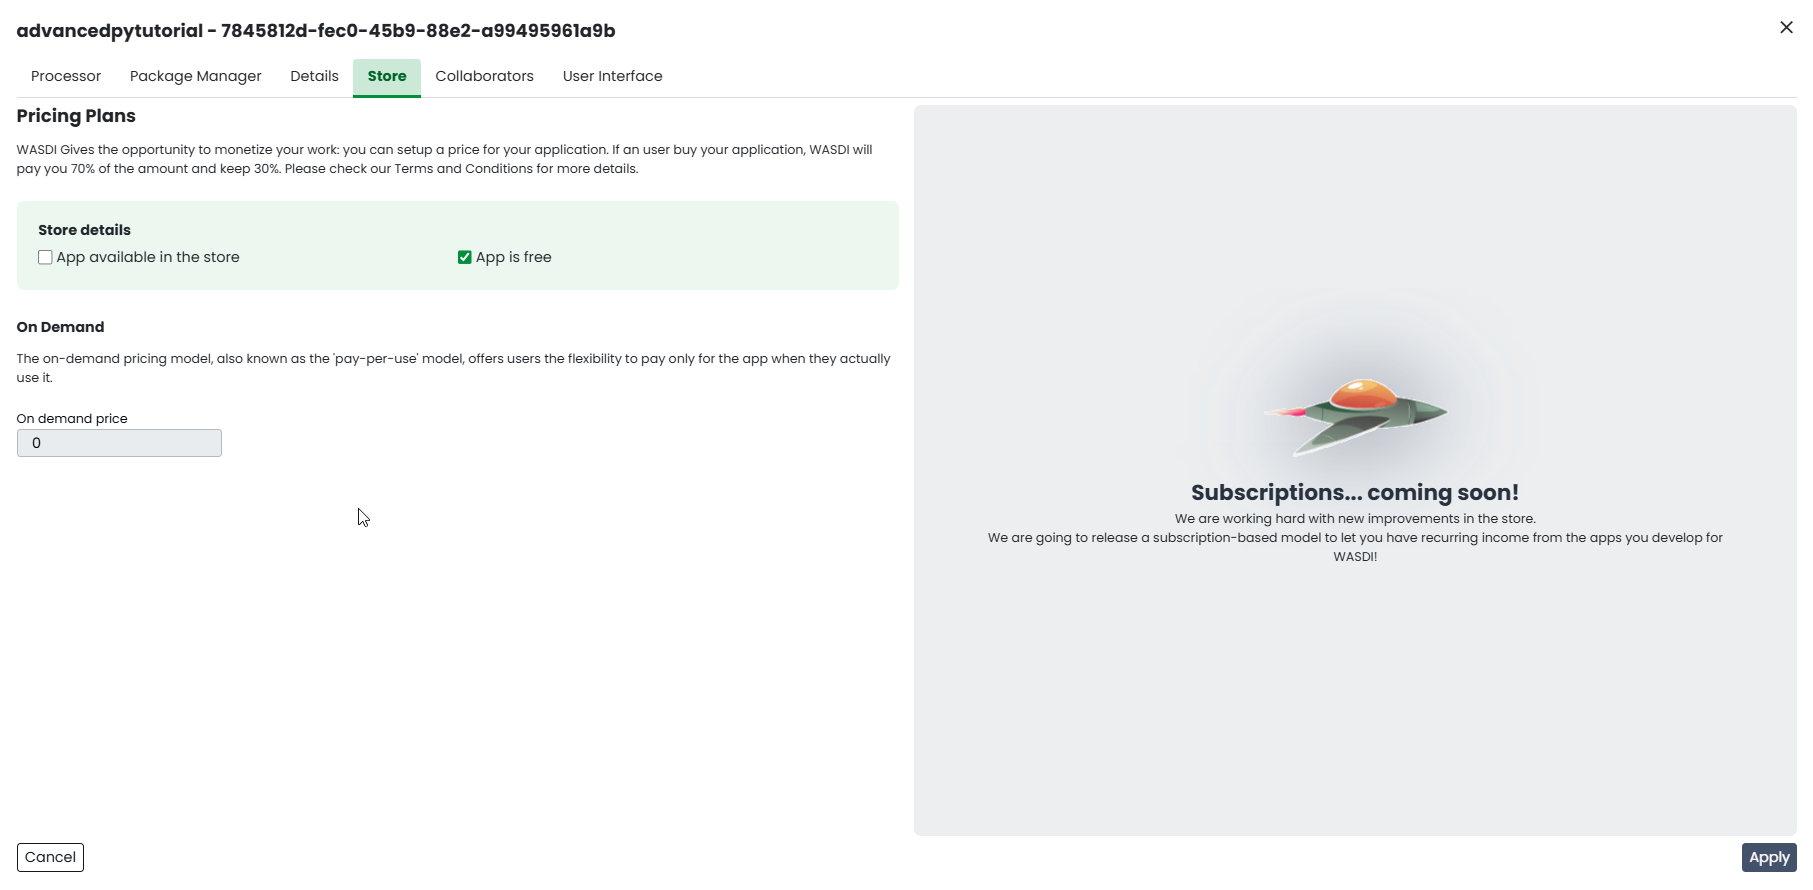
Here it’s where you can choose to show your application on the marketplace. You can also add prices for the on demand and subscription-based usage modes.
Collaborators
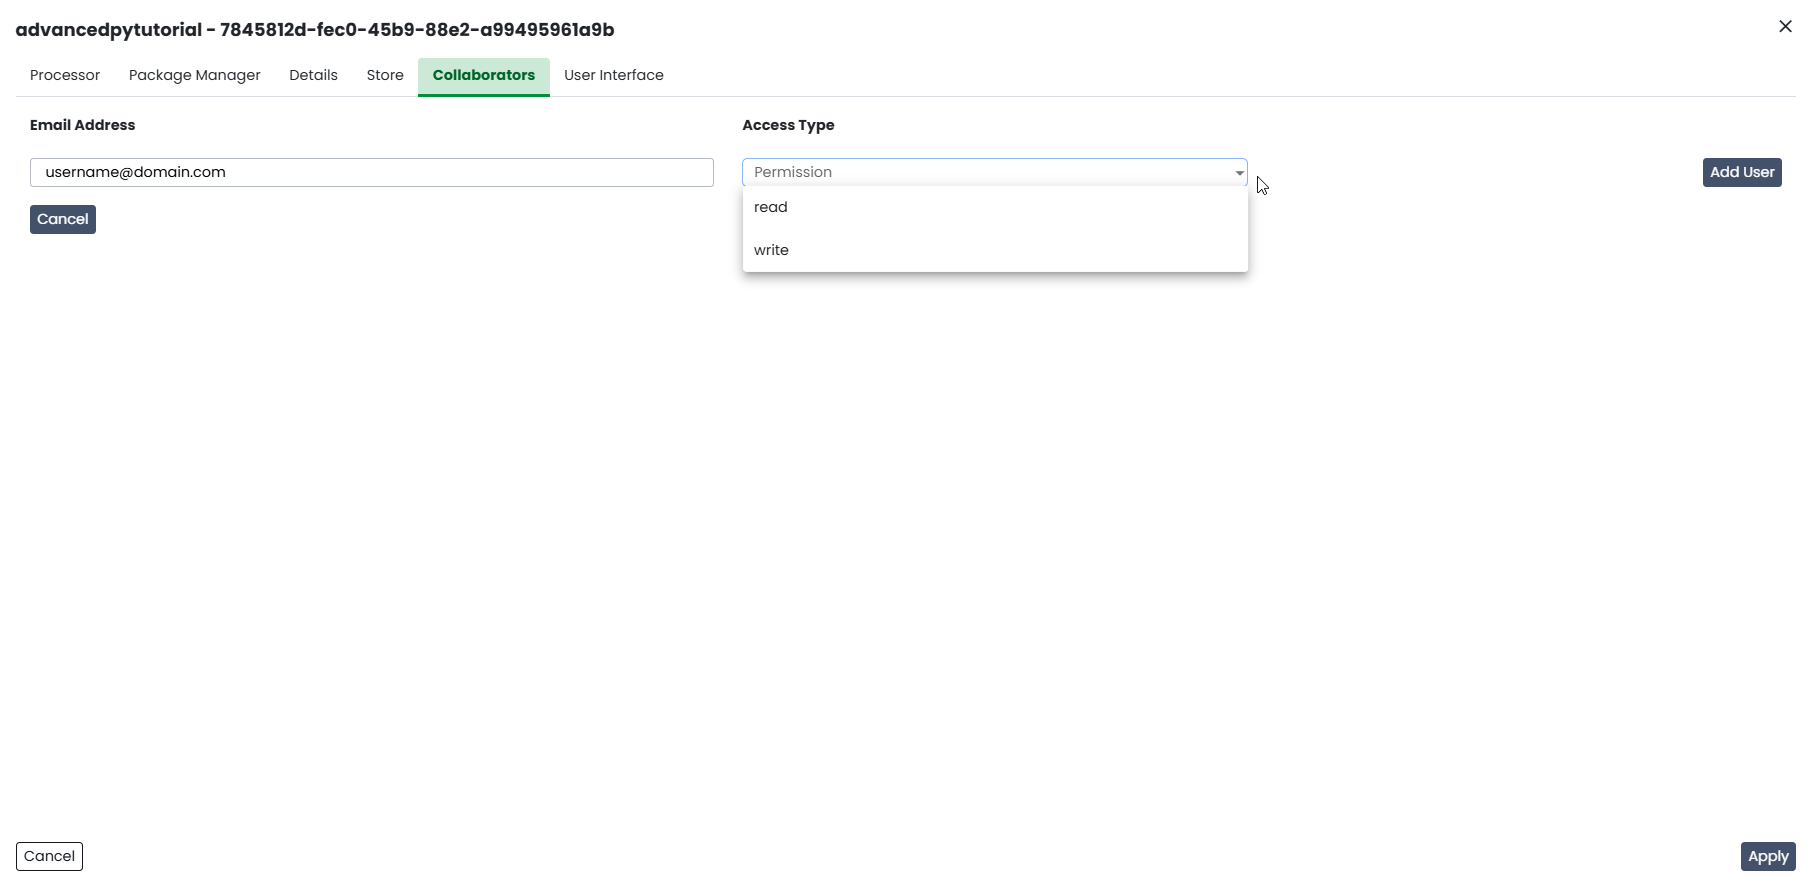
You can add a user to your application. Think of a colleague: you both will be able to contribute to the same processor.
User Interface
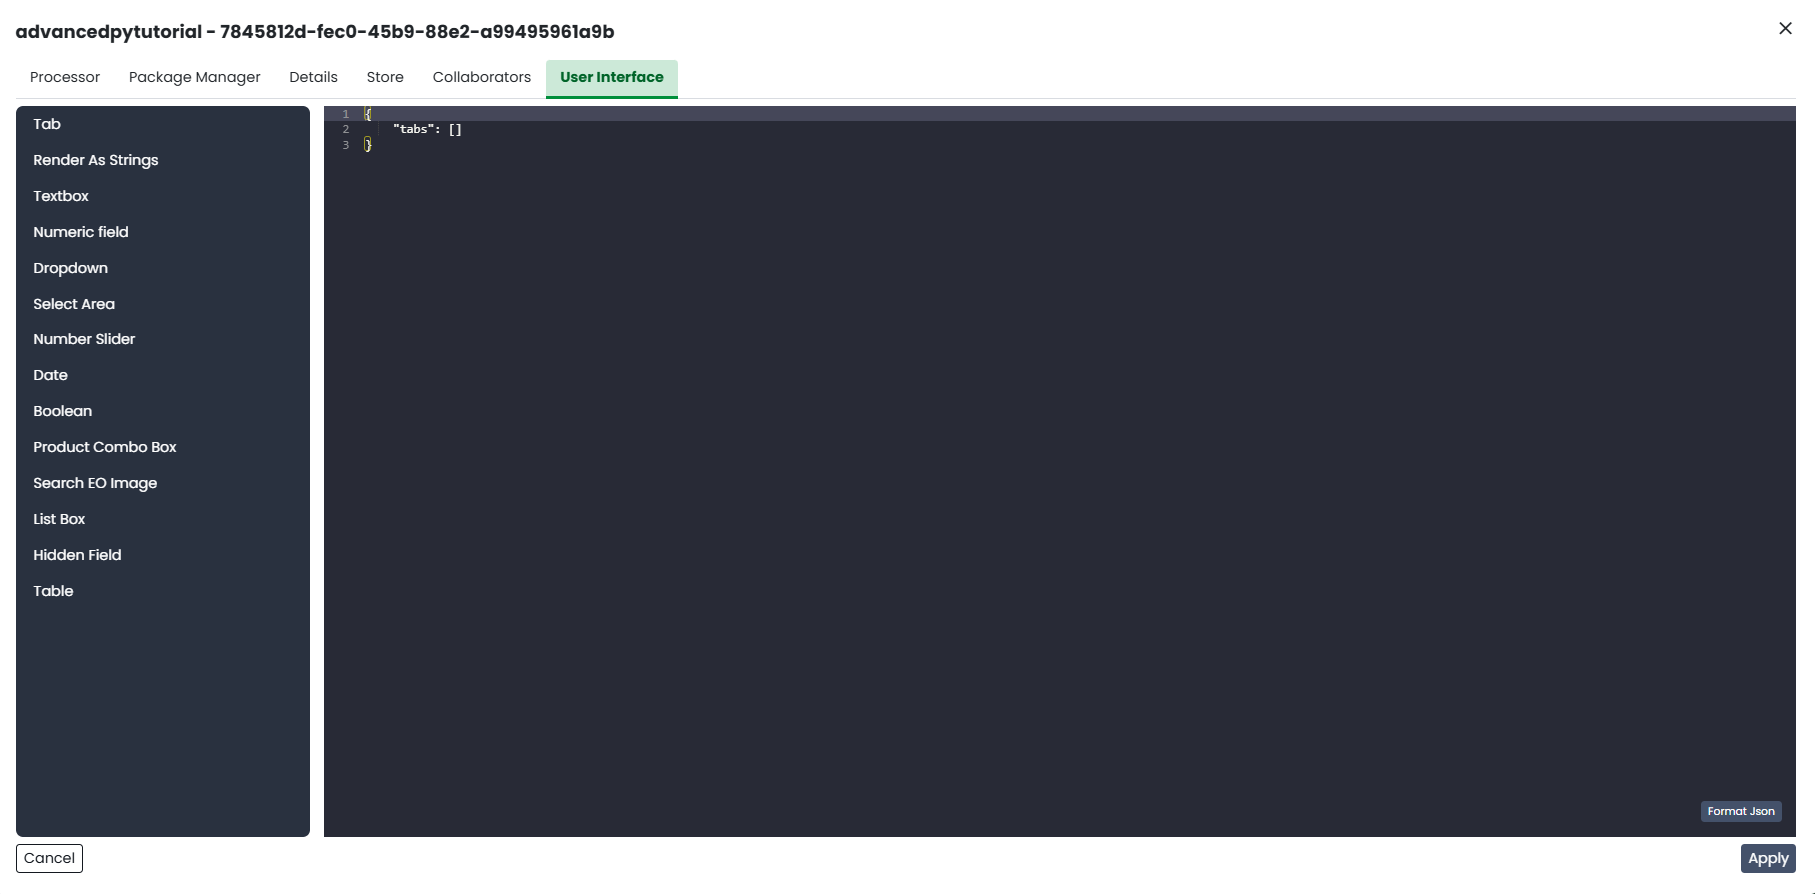
This is where magic happens again: the WASDI interface generator! Using a JSON you can describe a web user interface, which will generated automatically for you. You can fiddle around and you will learn how to use, but let’s make the UI for our processor together.
Click to put the cursors inside the curly brackets, before “tabs”, then click Render As Strings
move inside the square brackets after “tabs” and use the Tab button. Name it “Input”. Remove the trailing comma (or the JSON will not be valid) before the last closing square bracket. Click between the square brackets of your newly created tab.
Use the Date button. Call the parameter “DATE” and mark it required. Click after the comma at the end of the DATE parameter block
Use the Number slider. Call the parameter “SEARCHDAYS”, mark it required. Give it a description. Give it boundaries and a default value (e.g., 5-20, default: 10).
Use the Select Area button. Call the parameter “BBOX”. Mark it required.
Use the Number slider. Call the parameter “MAXCLOUD”. Mark it required. Bounds are 0 and 100. Default: 30. Give it a description.
Check there are no trailing commas!
This is what it should look like in the end (you can copy paste this, if you did not manage to build your own):
  {
  "renderAsStrings": true,
  "tabs": [{
          "name": "Input",
          "controls": [{
                  "param": "PROVIDER",
                  "type": "dropdown",
                  "label": "Data Provider:",
                  "default": "AUTO",
                  "values": [
                      "AUTO",
                      "EODC",
                      "SOBLOO",
                      "CREODIAS"
                  ]
              }, {
                  "param": "DATE",
                  "type": "date",
                  "label": "Date",
                  "required": true
              }, {
                  "param": "SEARCHDAYS",
                  "type": "slider",
                  "label": "Days to search in the past",
                  "default": 10,
                  "min": 5,
                  "max": 20,
                  "required": true
              }, {
                  "param": "MAXCLOUD",
                  "type": "slider",
                  "label": "Max cloud cover (percent)",
                  "default": 30,
                  "min": 0,
                  "max": 100,
                  "required": true
              }, {
                  "param": "BBOX",
                  "type": "bbox",
                  "label": "Bounding Box",
                  "required": true
              }
          ]
      }
  ]
}
If you wish, you can download the UI description as a JSON file from here: UI.json
The app store
Now go to the app store, and try to use your app from there. To find it, you can filter using your user, or search using the name.
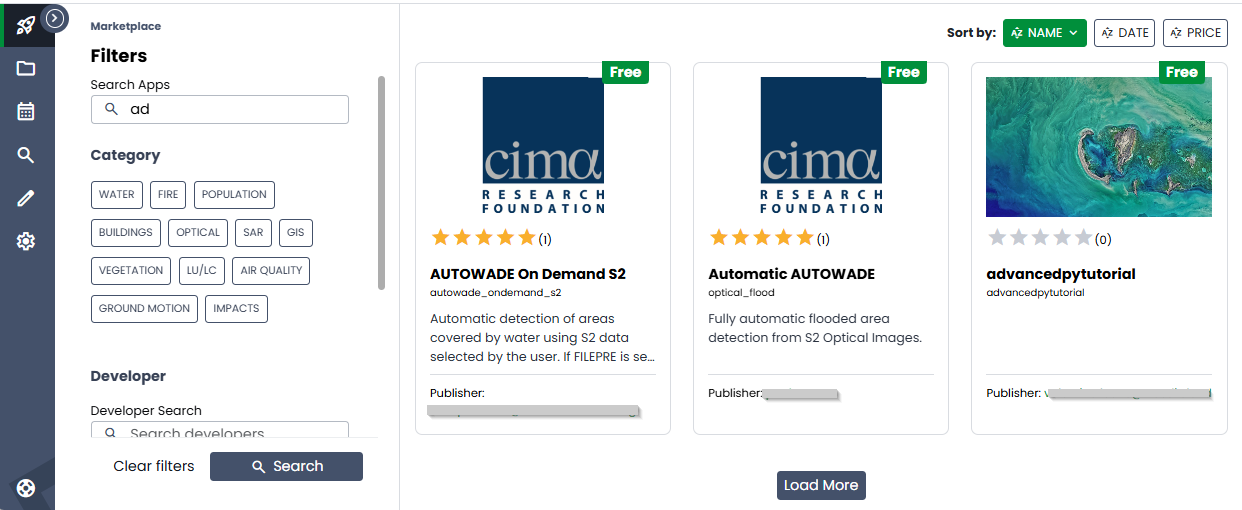
You can open the app presentation page
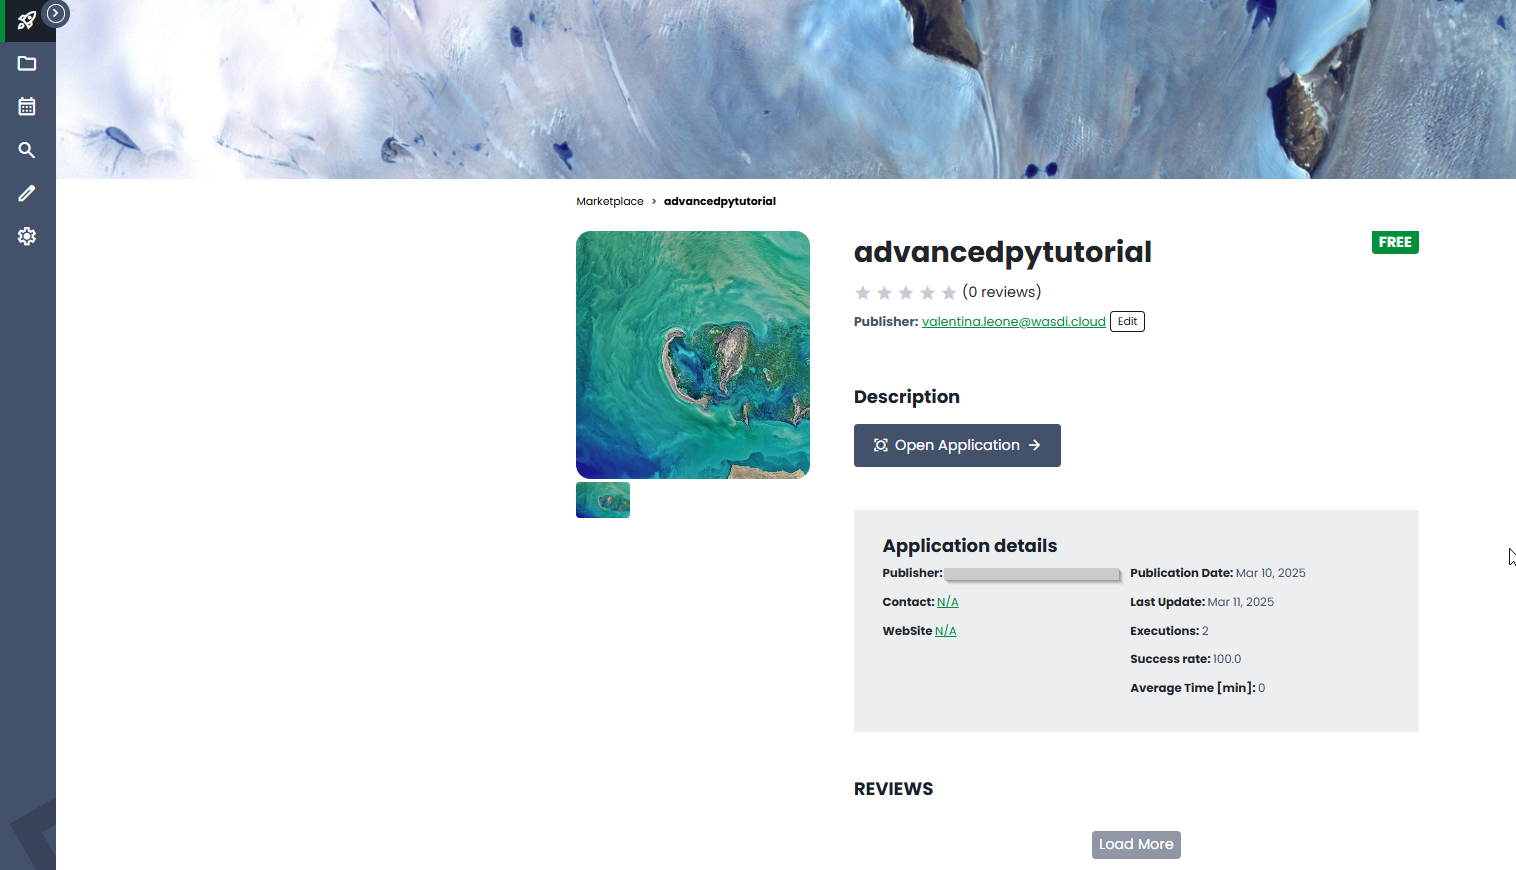
and then open the application to test it for real. There you can see the interface you just described. Use it, and to see if it works as expected

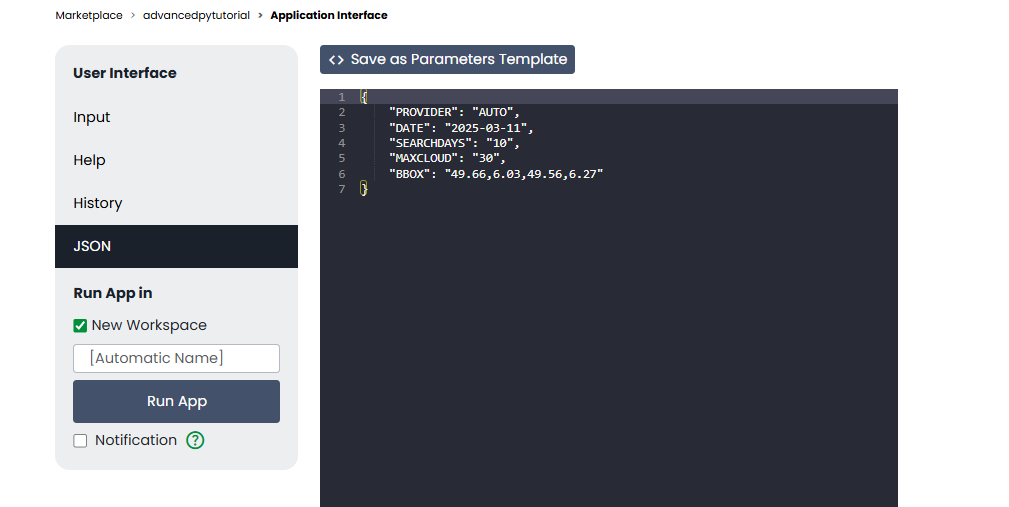
Before running the processor, you can also check the JSON that will be generated automatically with the parameters your processor need:
Feel free to play with your processor and tweak it.
Delete your app
Are you done? Here you are two sad facts:
this processor is not a milestone in the history of remote sensing
Santa Claus does not exist
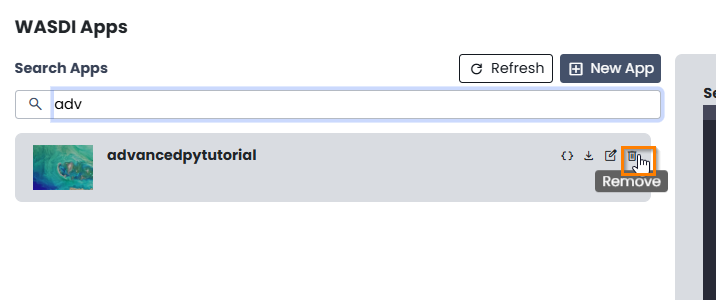
We cannot change the second, but we can solve the first by deleting the processor: got to the editor (i.e., open a workspace), search for your app in the WASDI apps menu, clic on the x symbol to delete the app
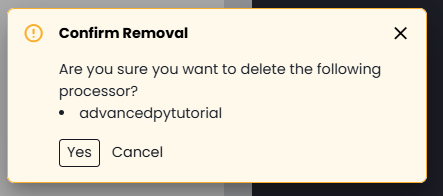
That’s how you delete a processor Clic OK to confirm that you want to delete it
Confirm processor deletion That’s it, now you know how to manage the entire lifecycle of a WASDI app!
Have fun, and let us know your thoughts